Tag Archives: Kaleidoscope Quilt

Christmas Kaleidoscope Quilt Stack and Wack Method

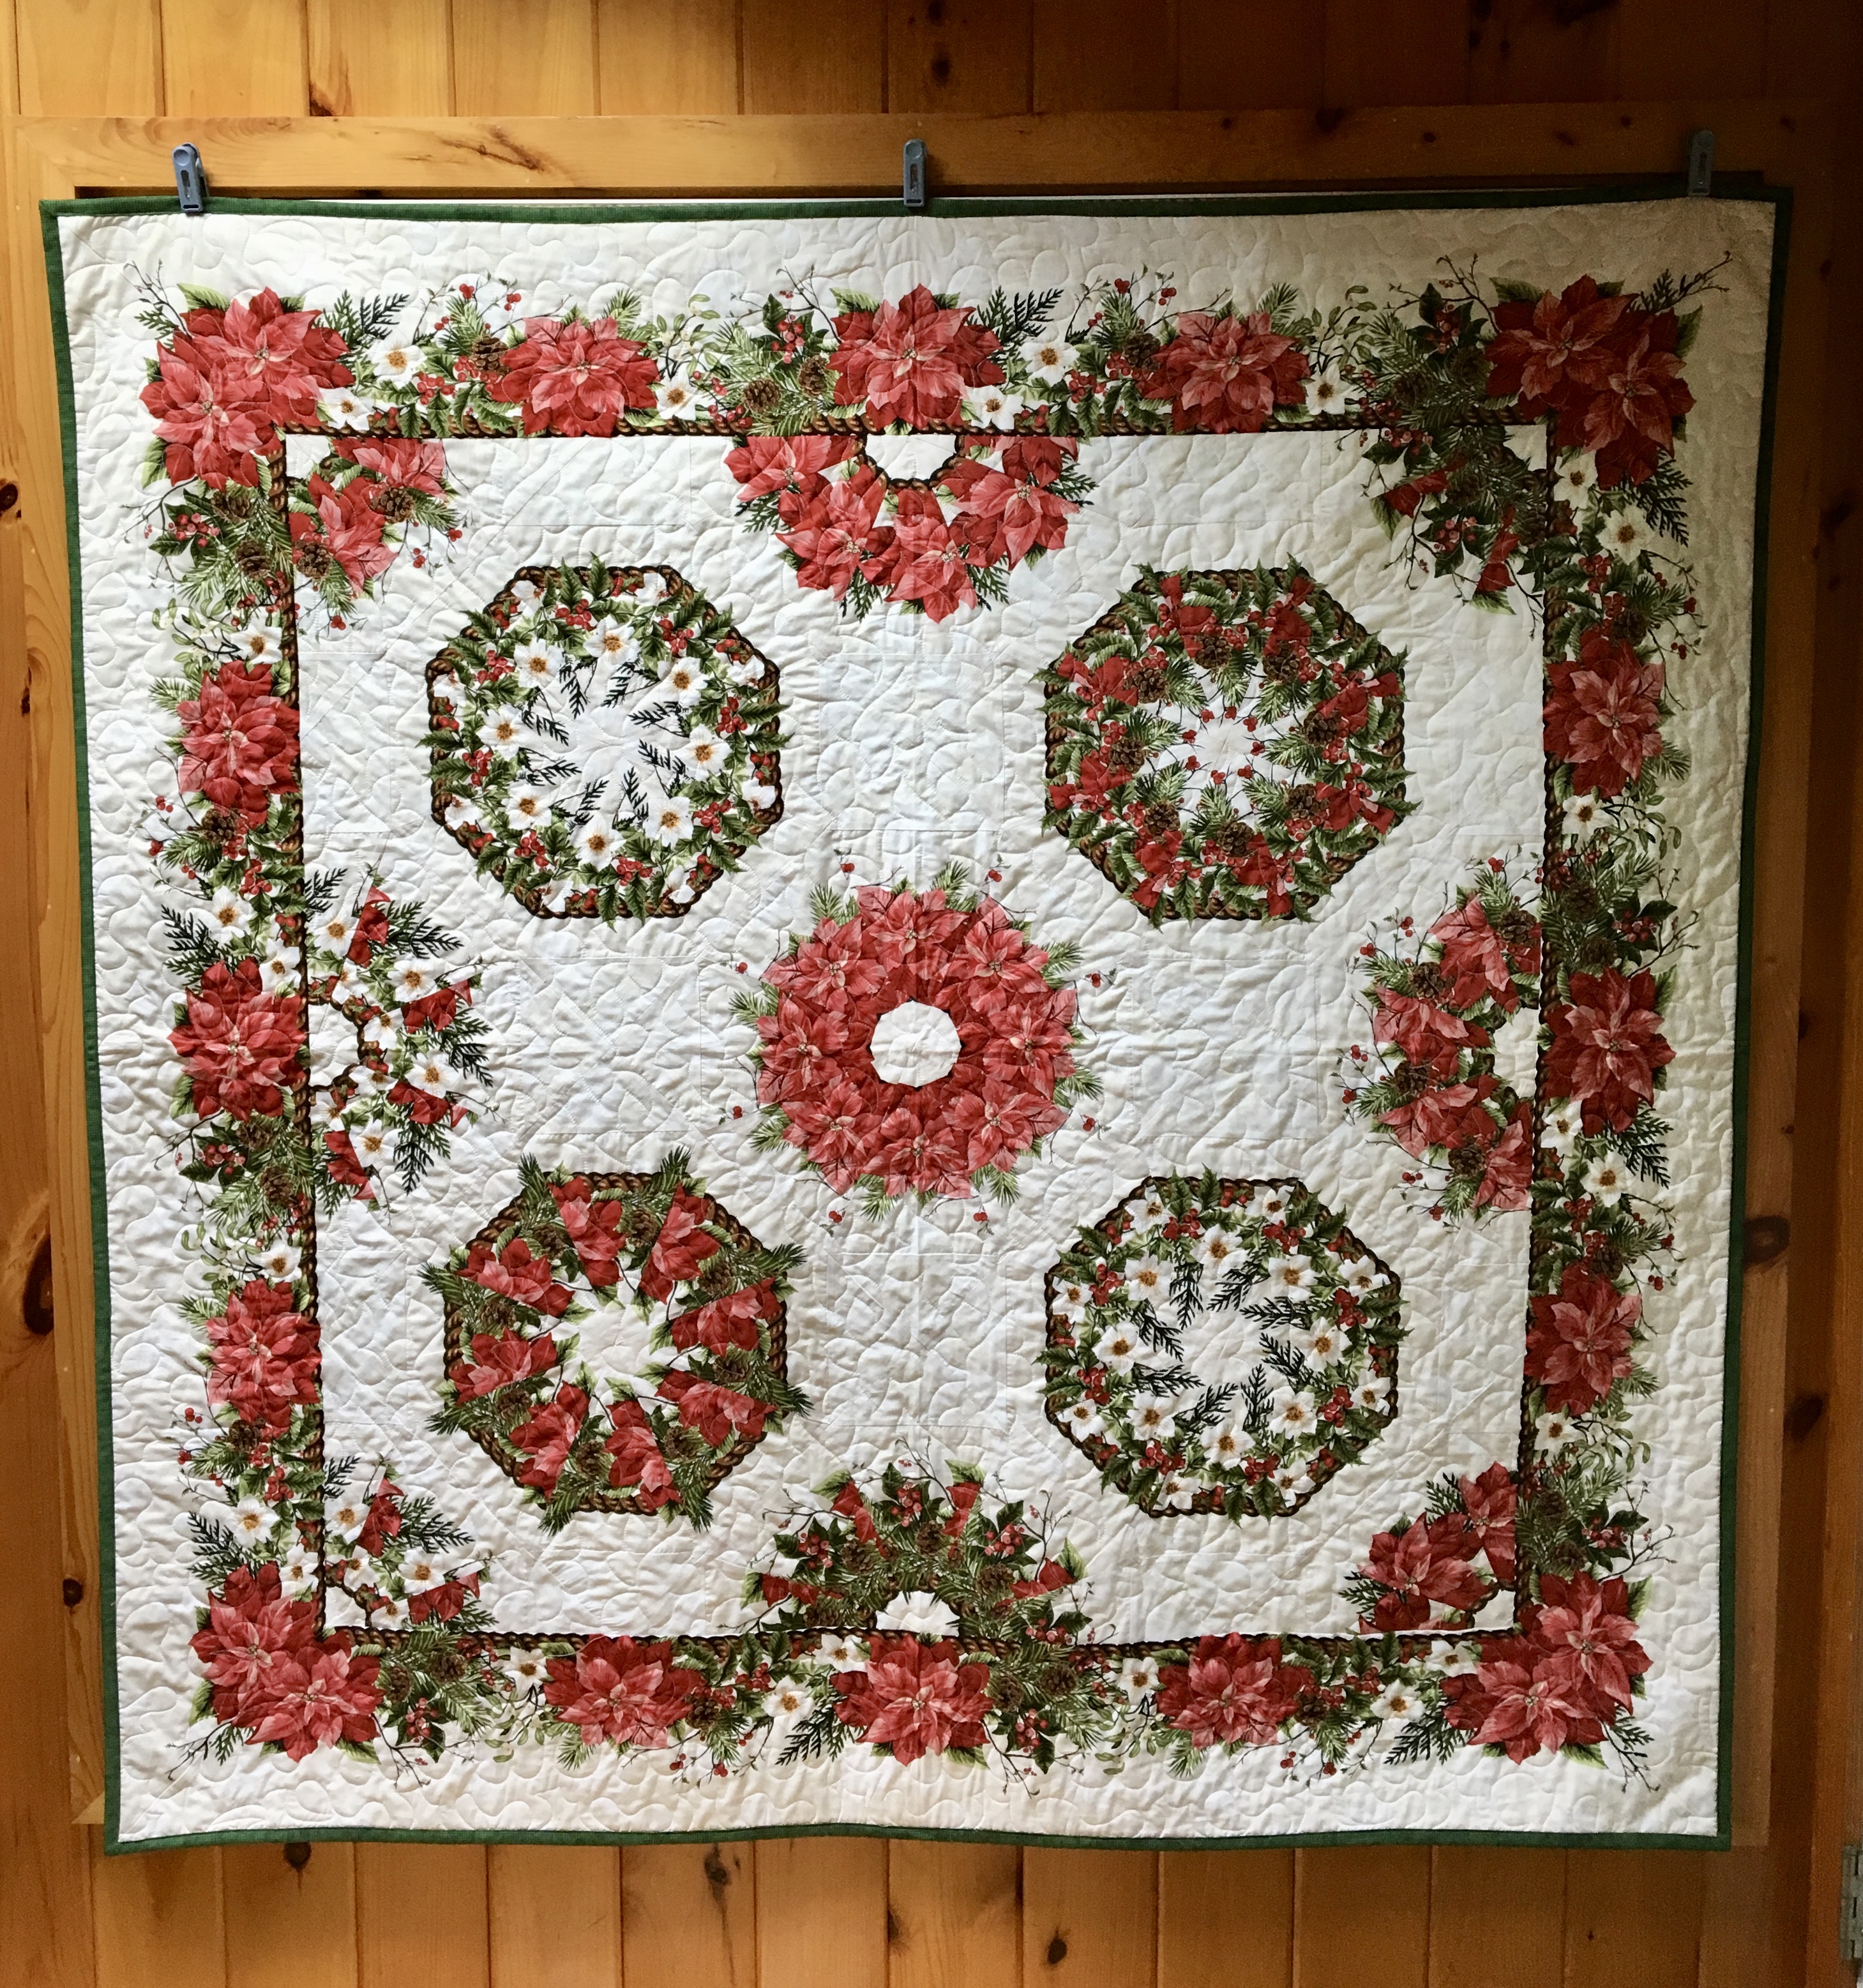
This is a tutorial for Jason Yenter’s Winter Twist One-Fabric Kaleidoscope Quilt Pattern.  The pattern is available from and uses fabric from In the Beginning.

Cutting Kaleidoscope Fabric:

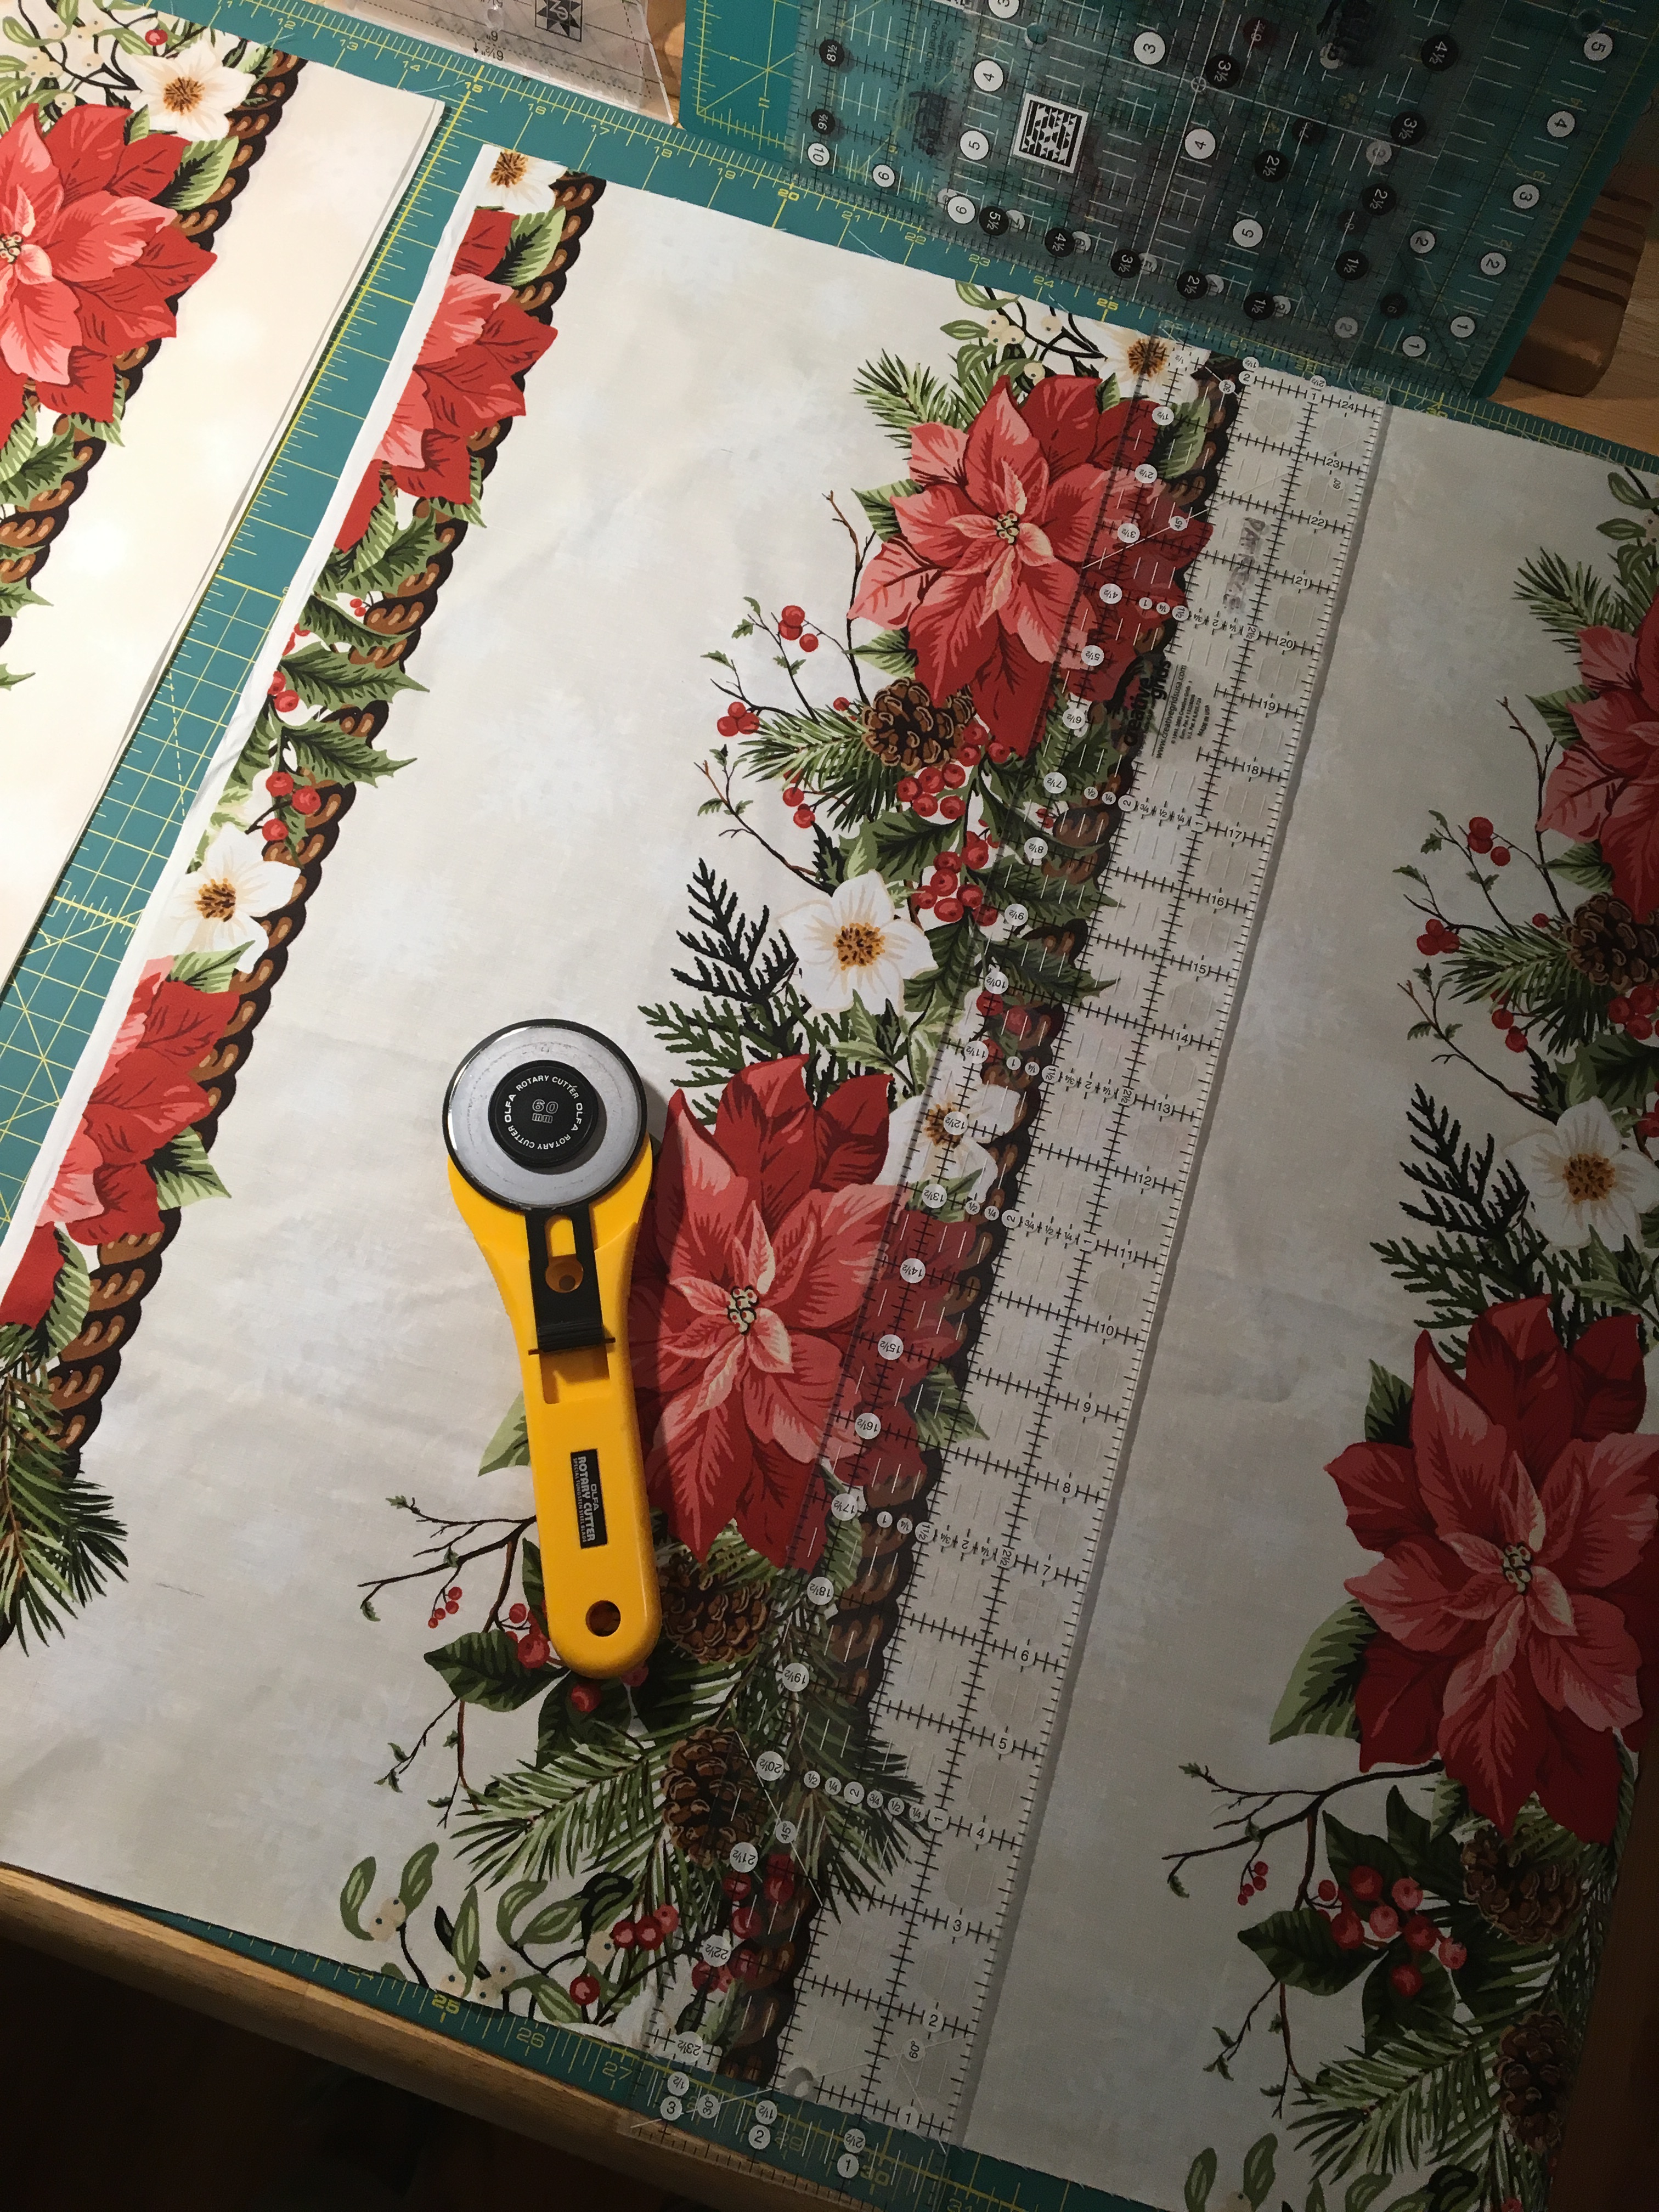
Cut 6 Repeats of the Fabric.  Each repeat is about 24″ long.

Cut each repeat of the fabric into 4 border strip pieces.  Cut 2″ from the edge of each brown cable.  You will have 24 border pieces that are approximately 24″ x 9 1/2″.

Group these into 3 sets, each with 8 layers of fabric.  Line up the layers in each set by putting a straight pin straight through the same place in the fabric design on each layer.  Run a second pin through all layers next to the first pin to hold the layers in place.  Repeat this process 3 or four more times along the length of the strip.

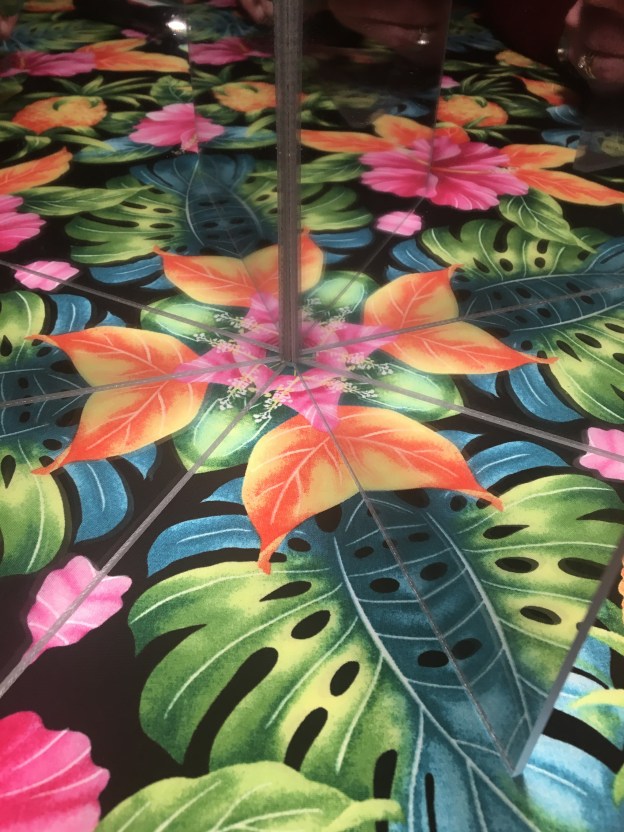
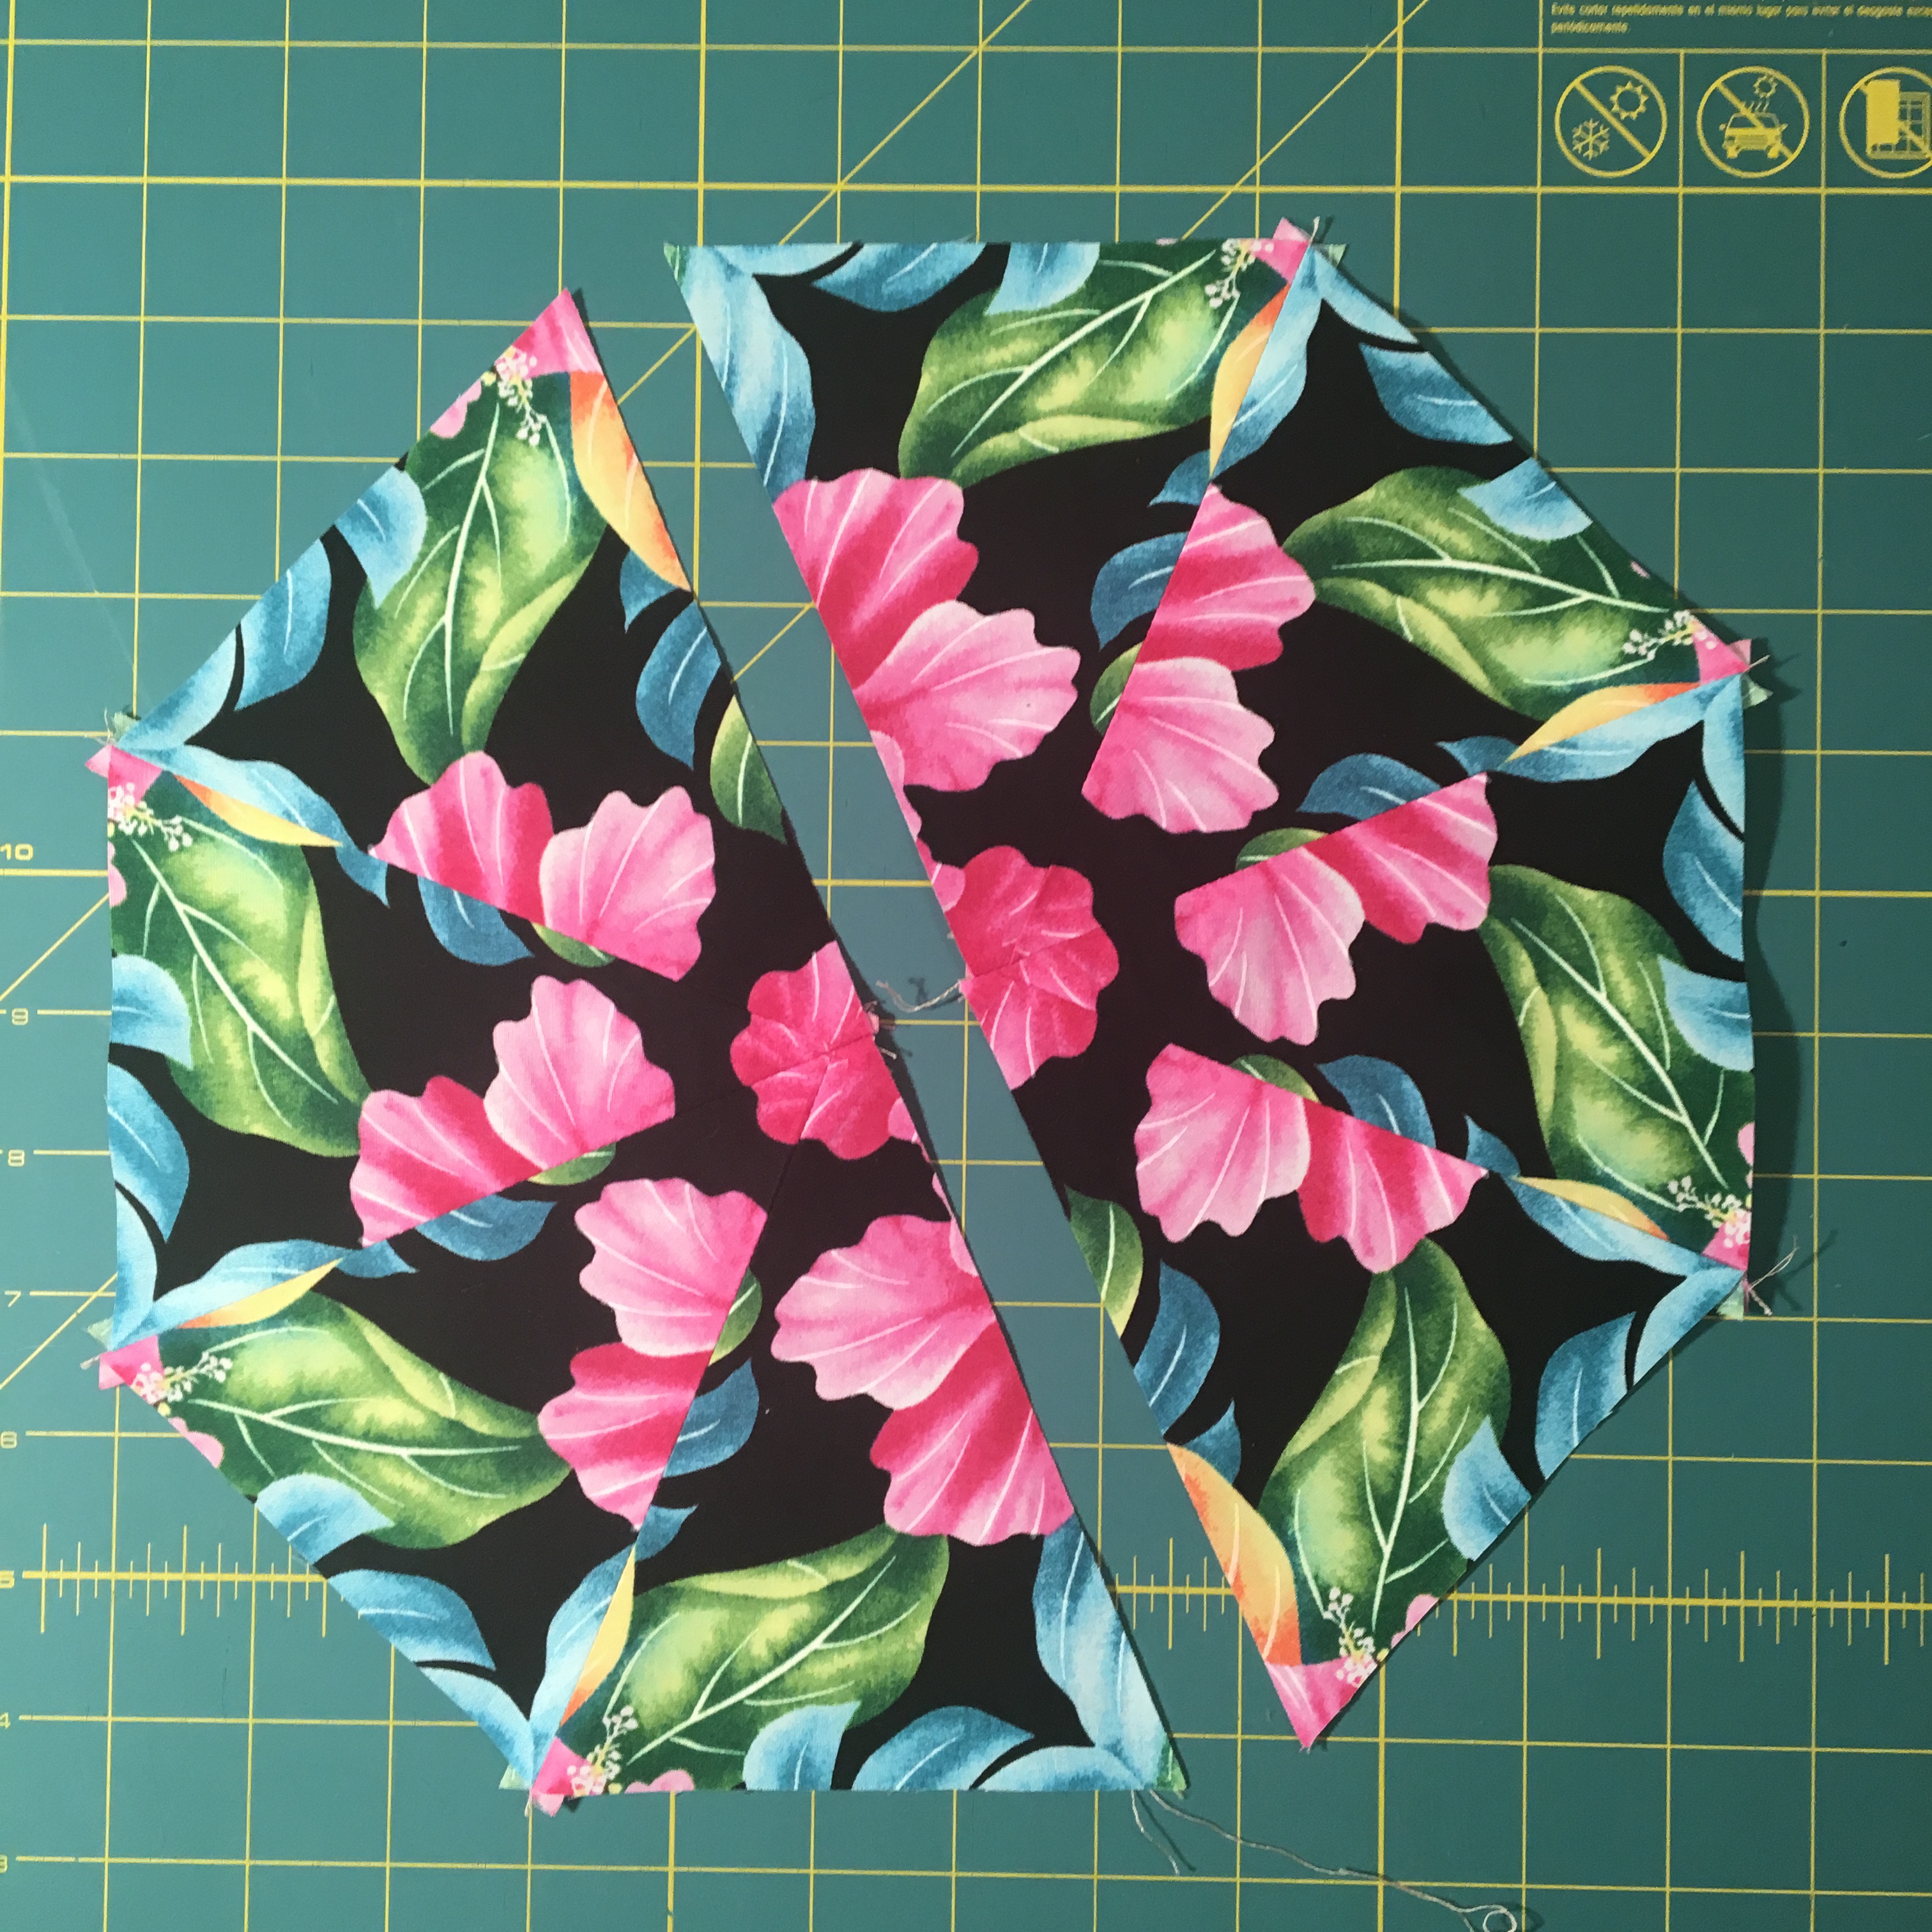
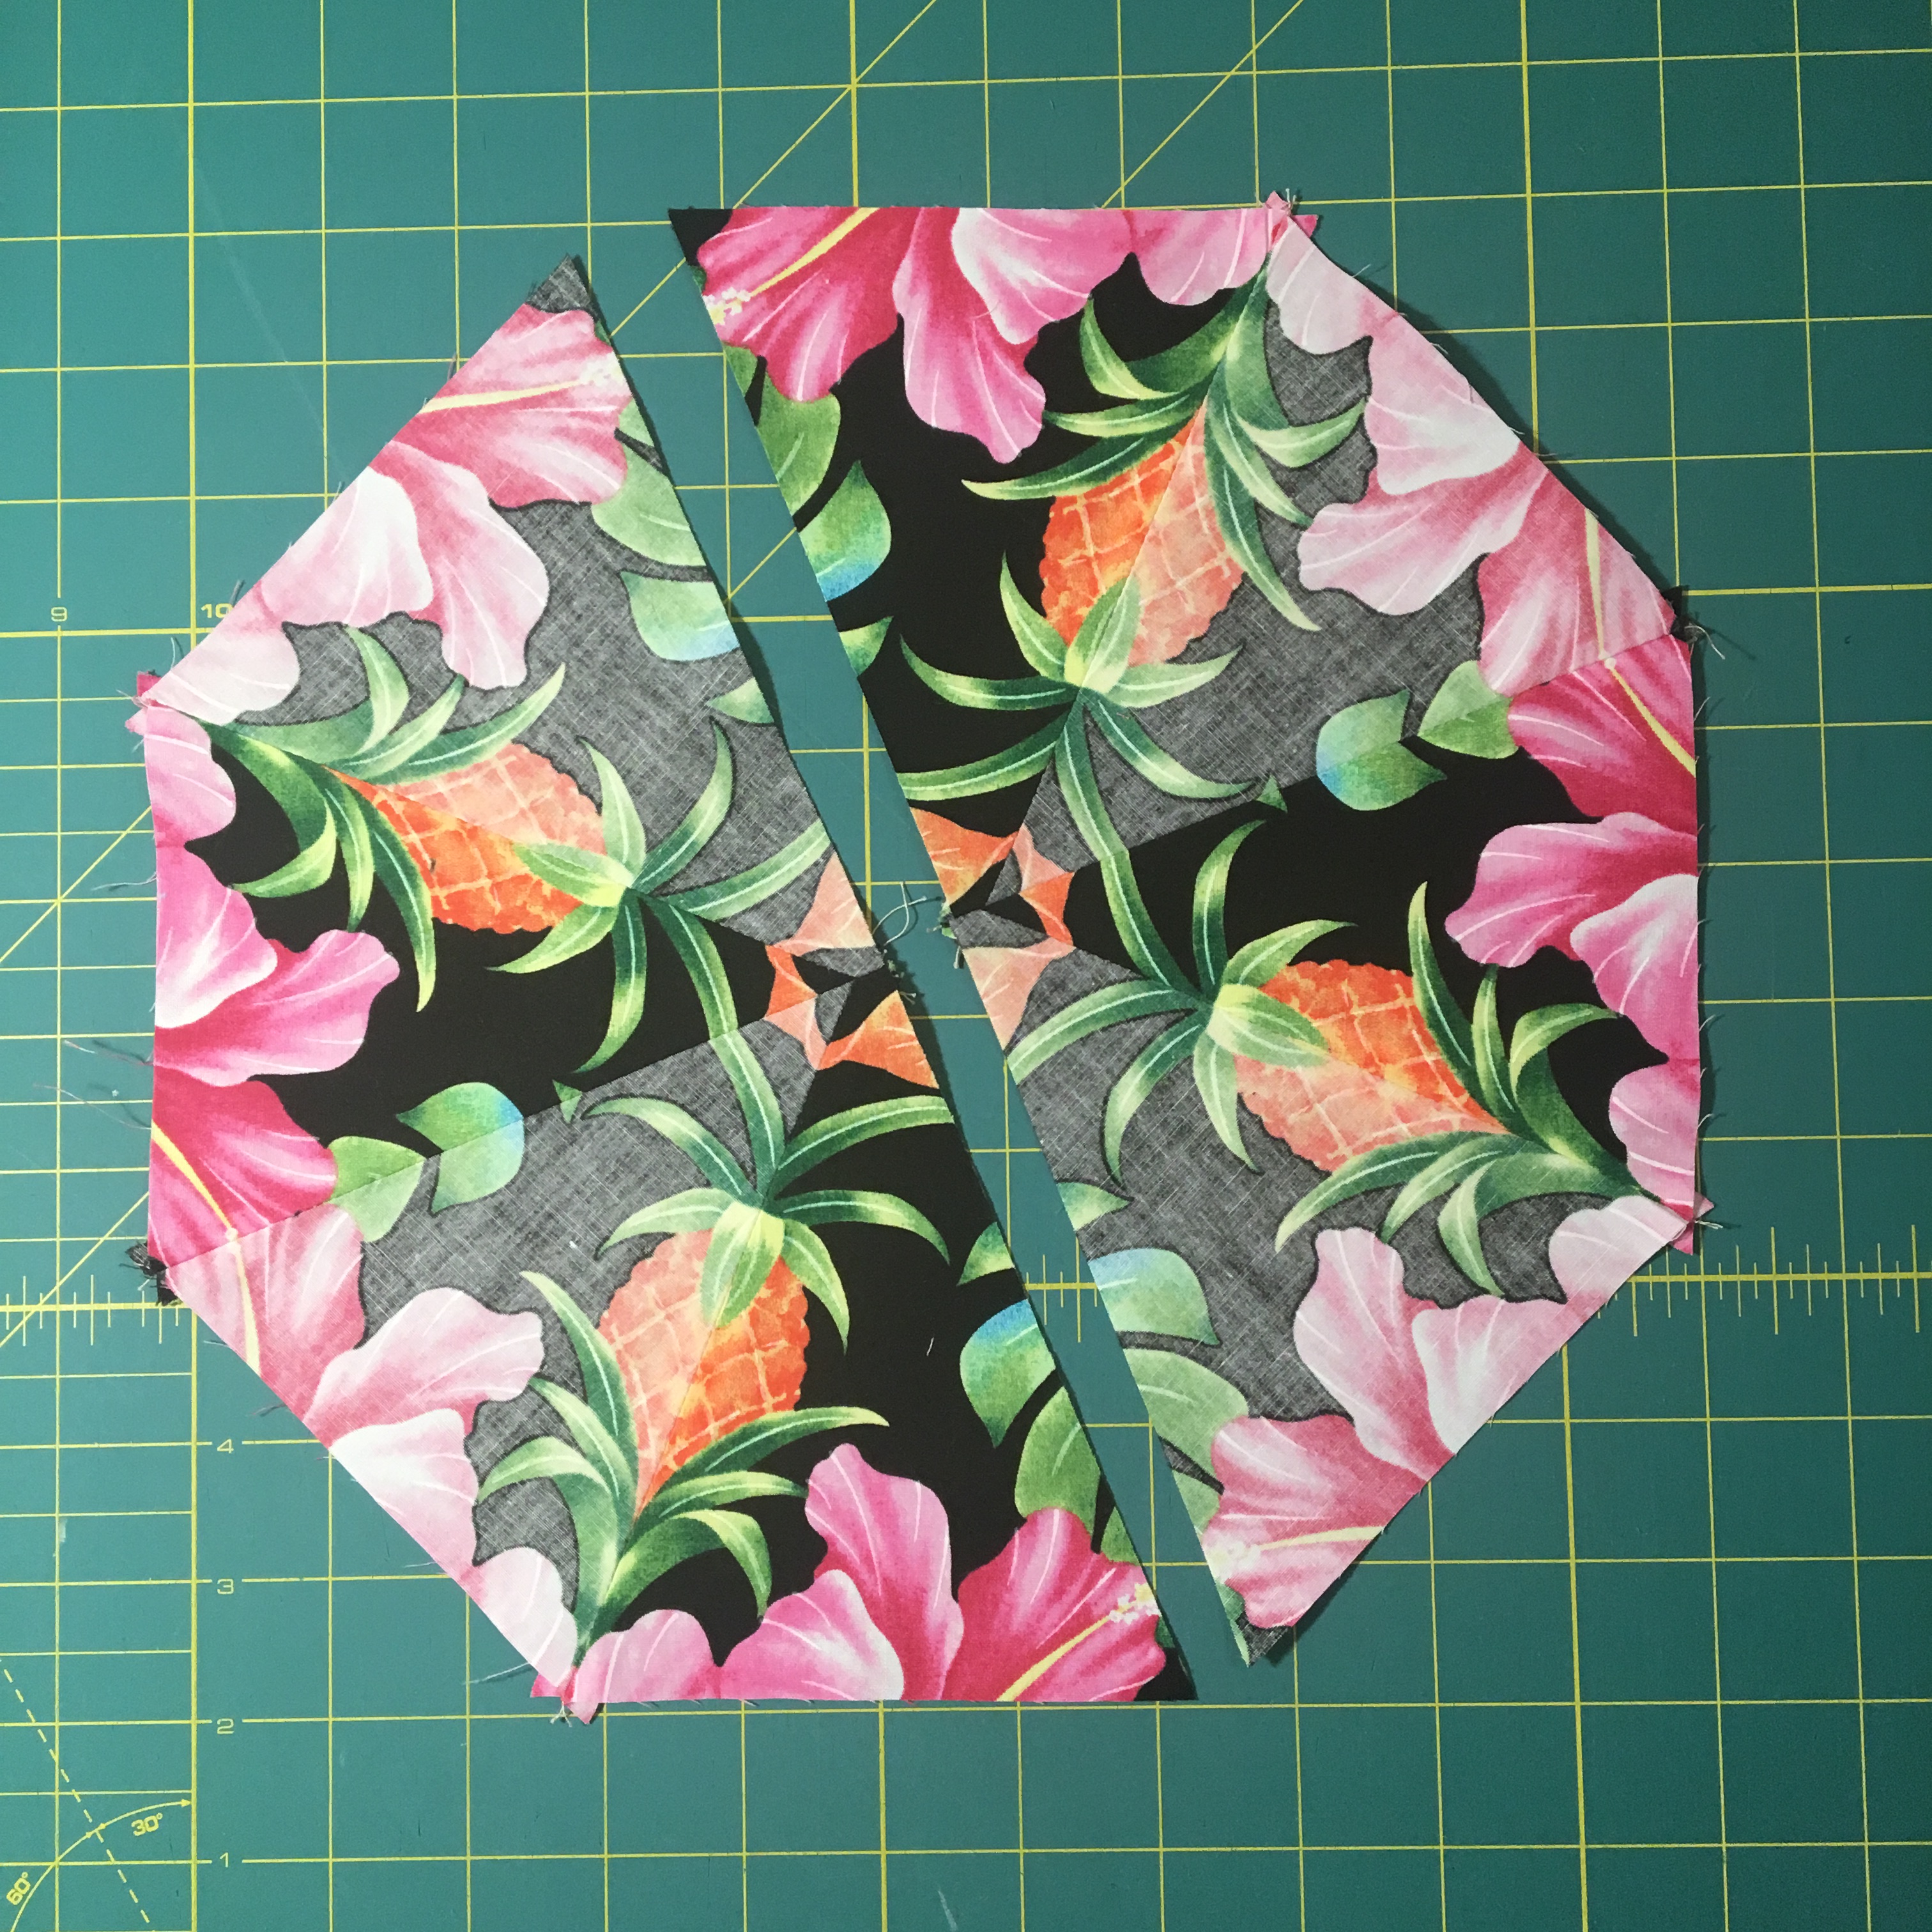
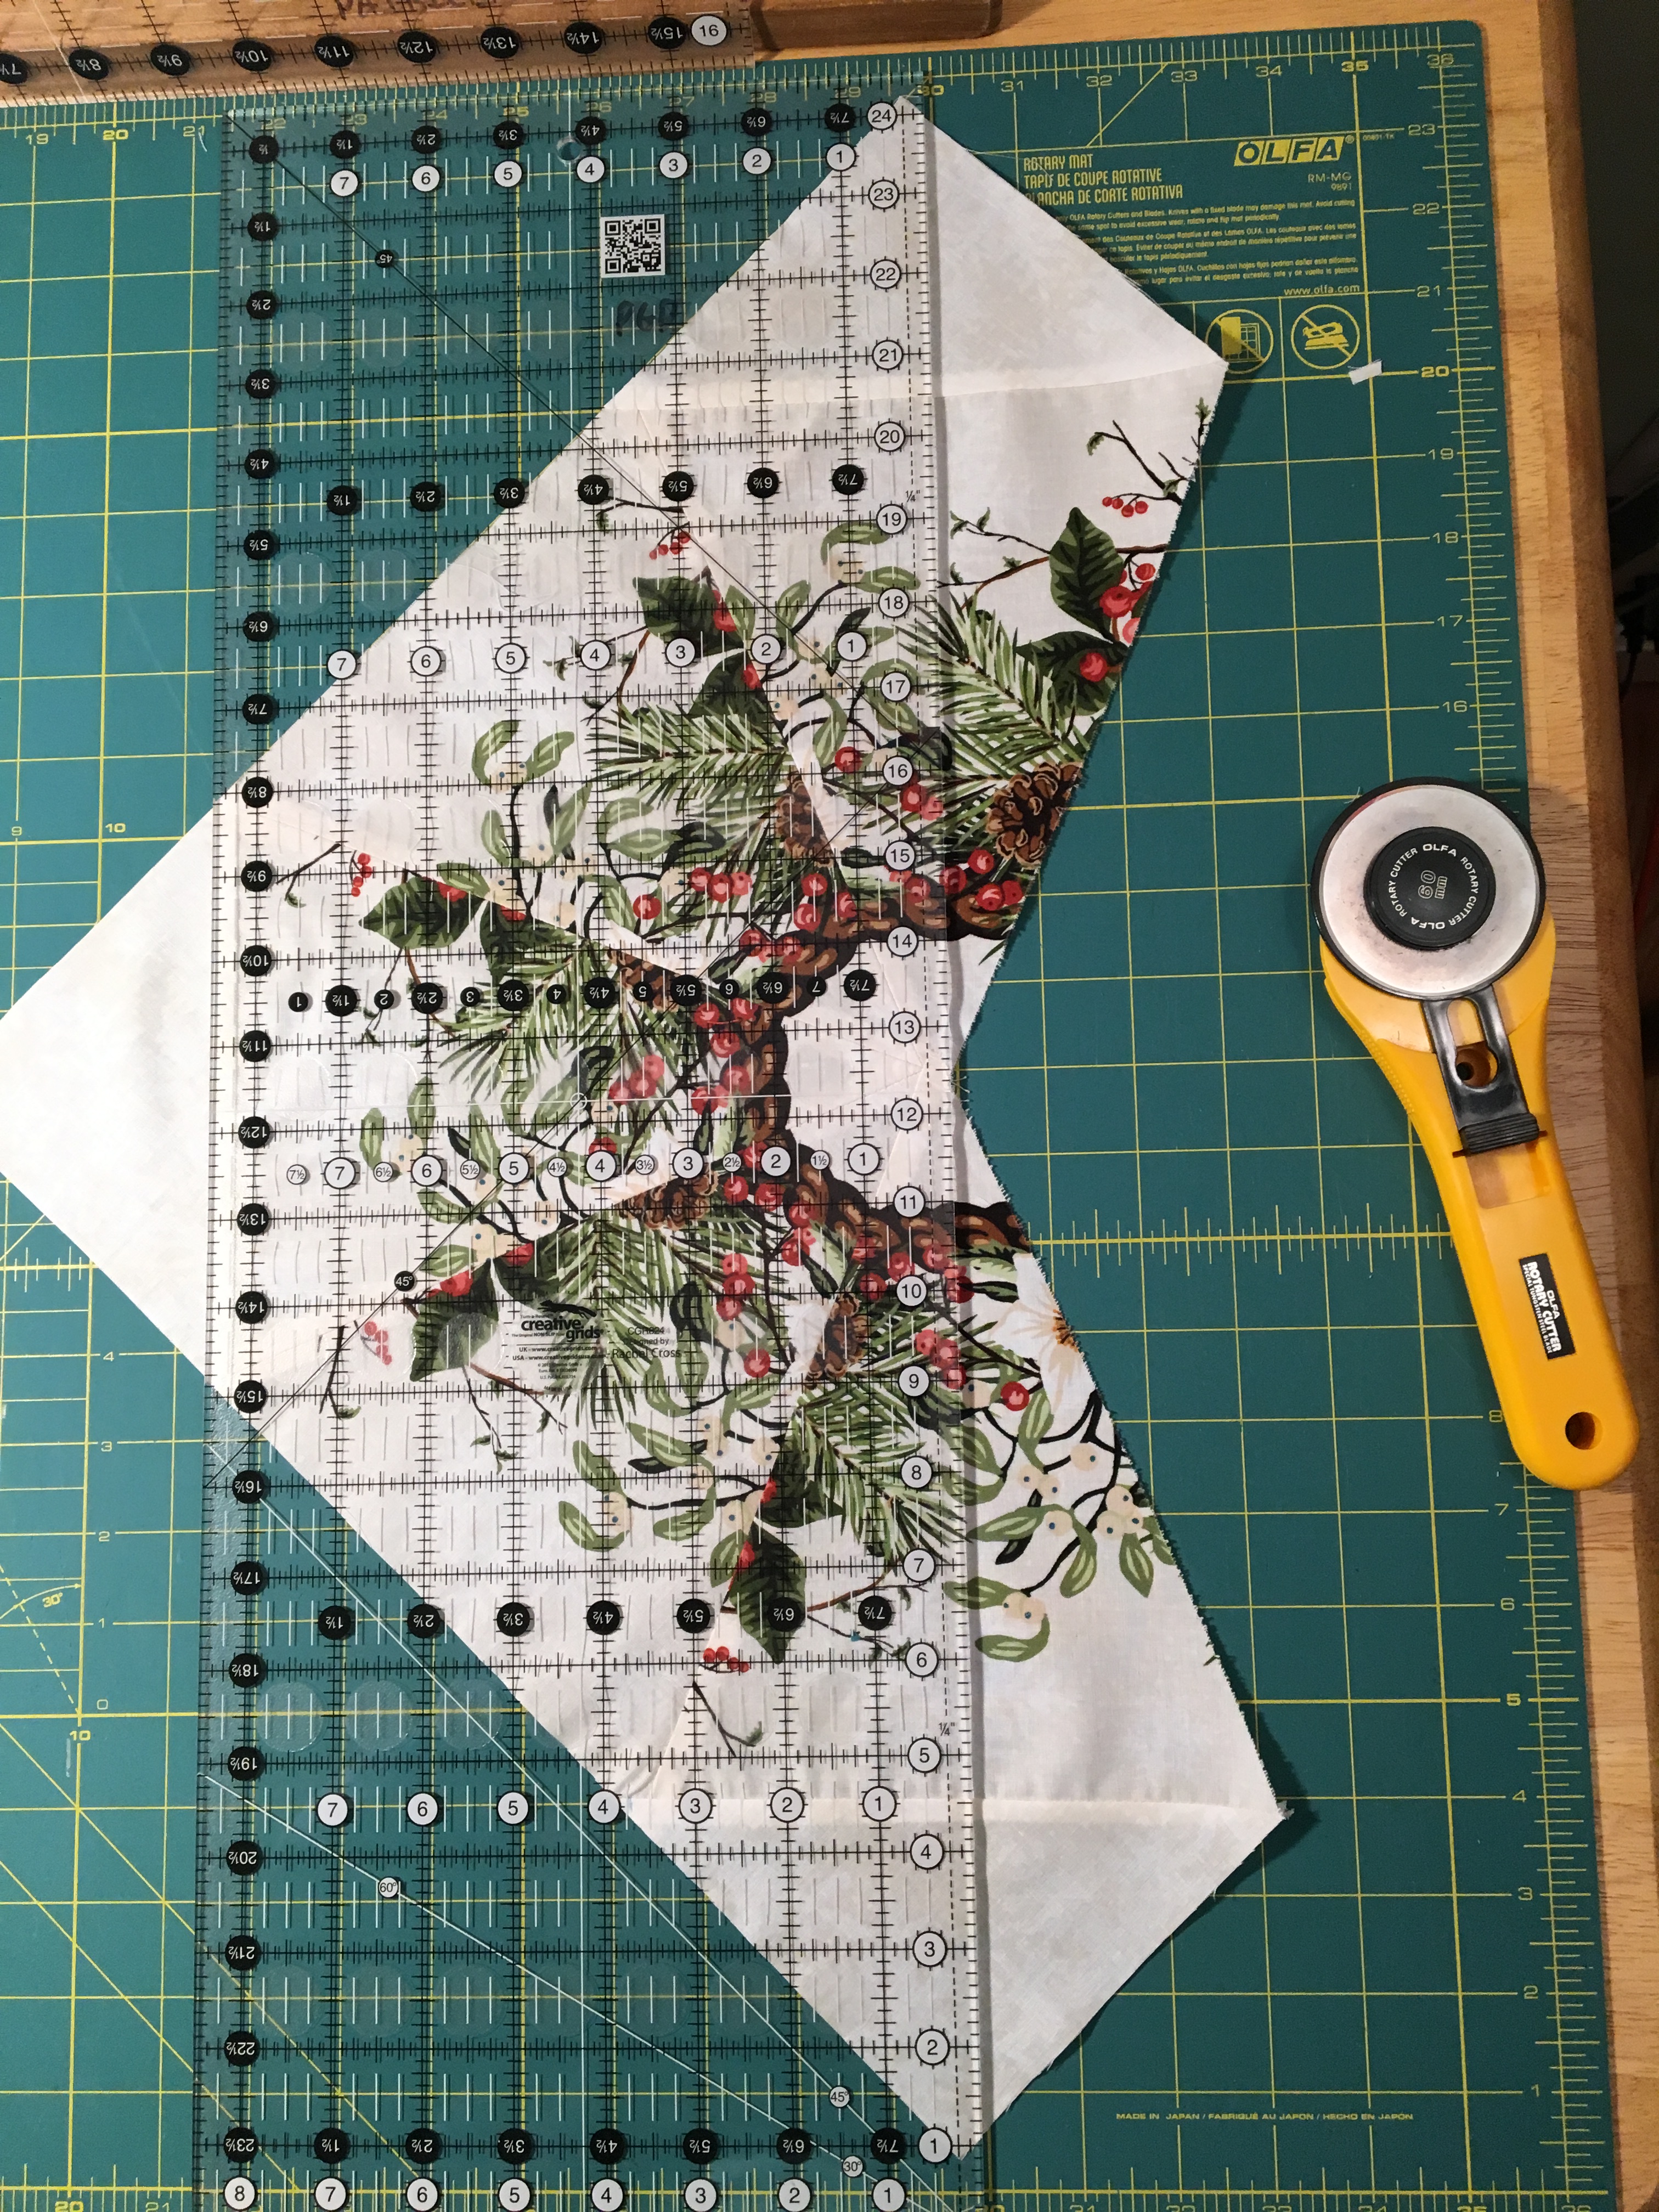
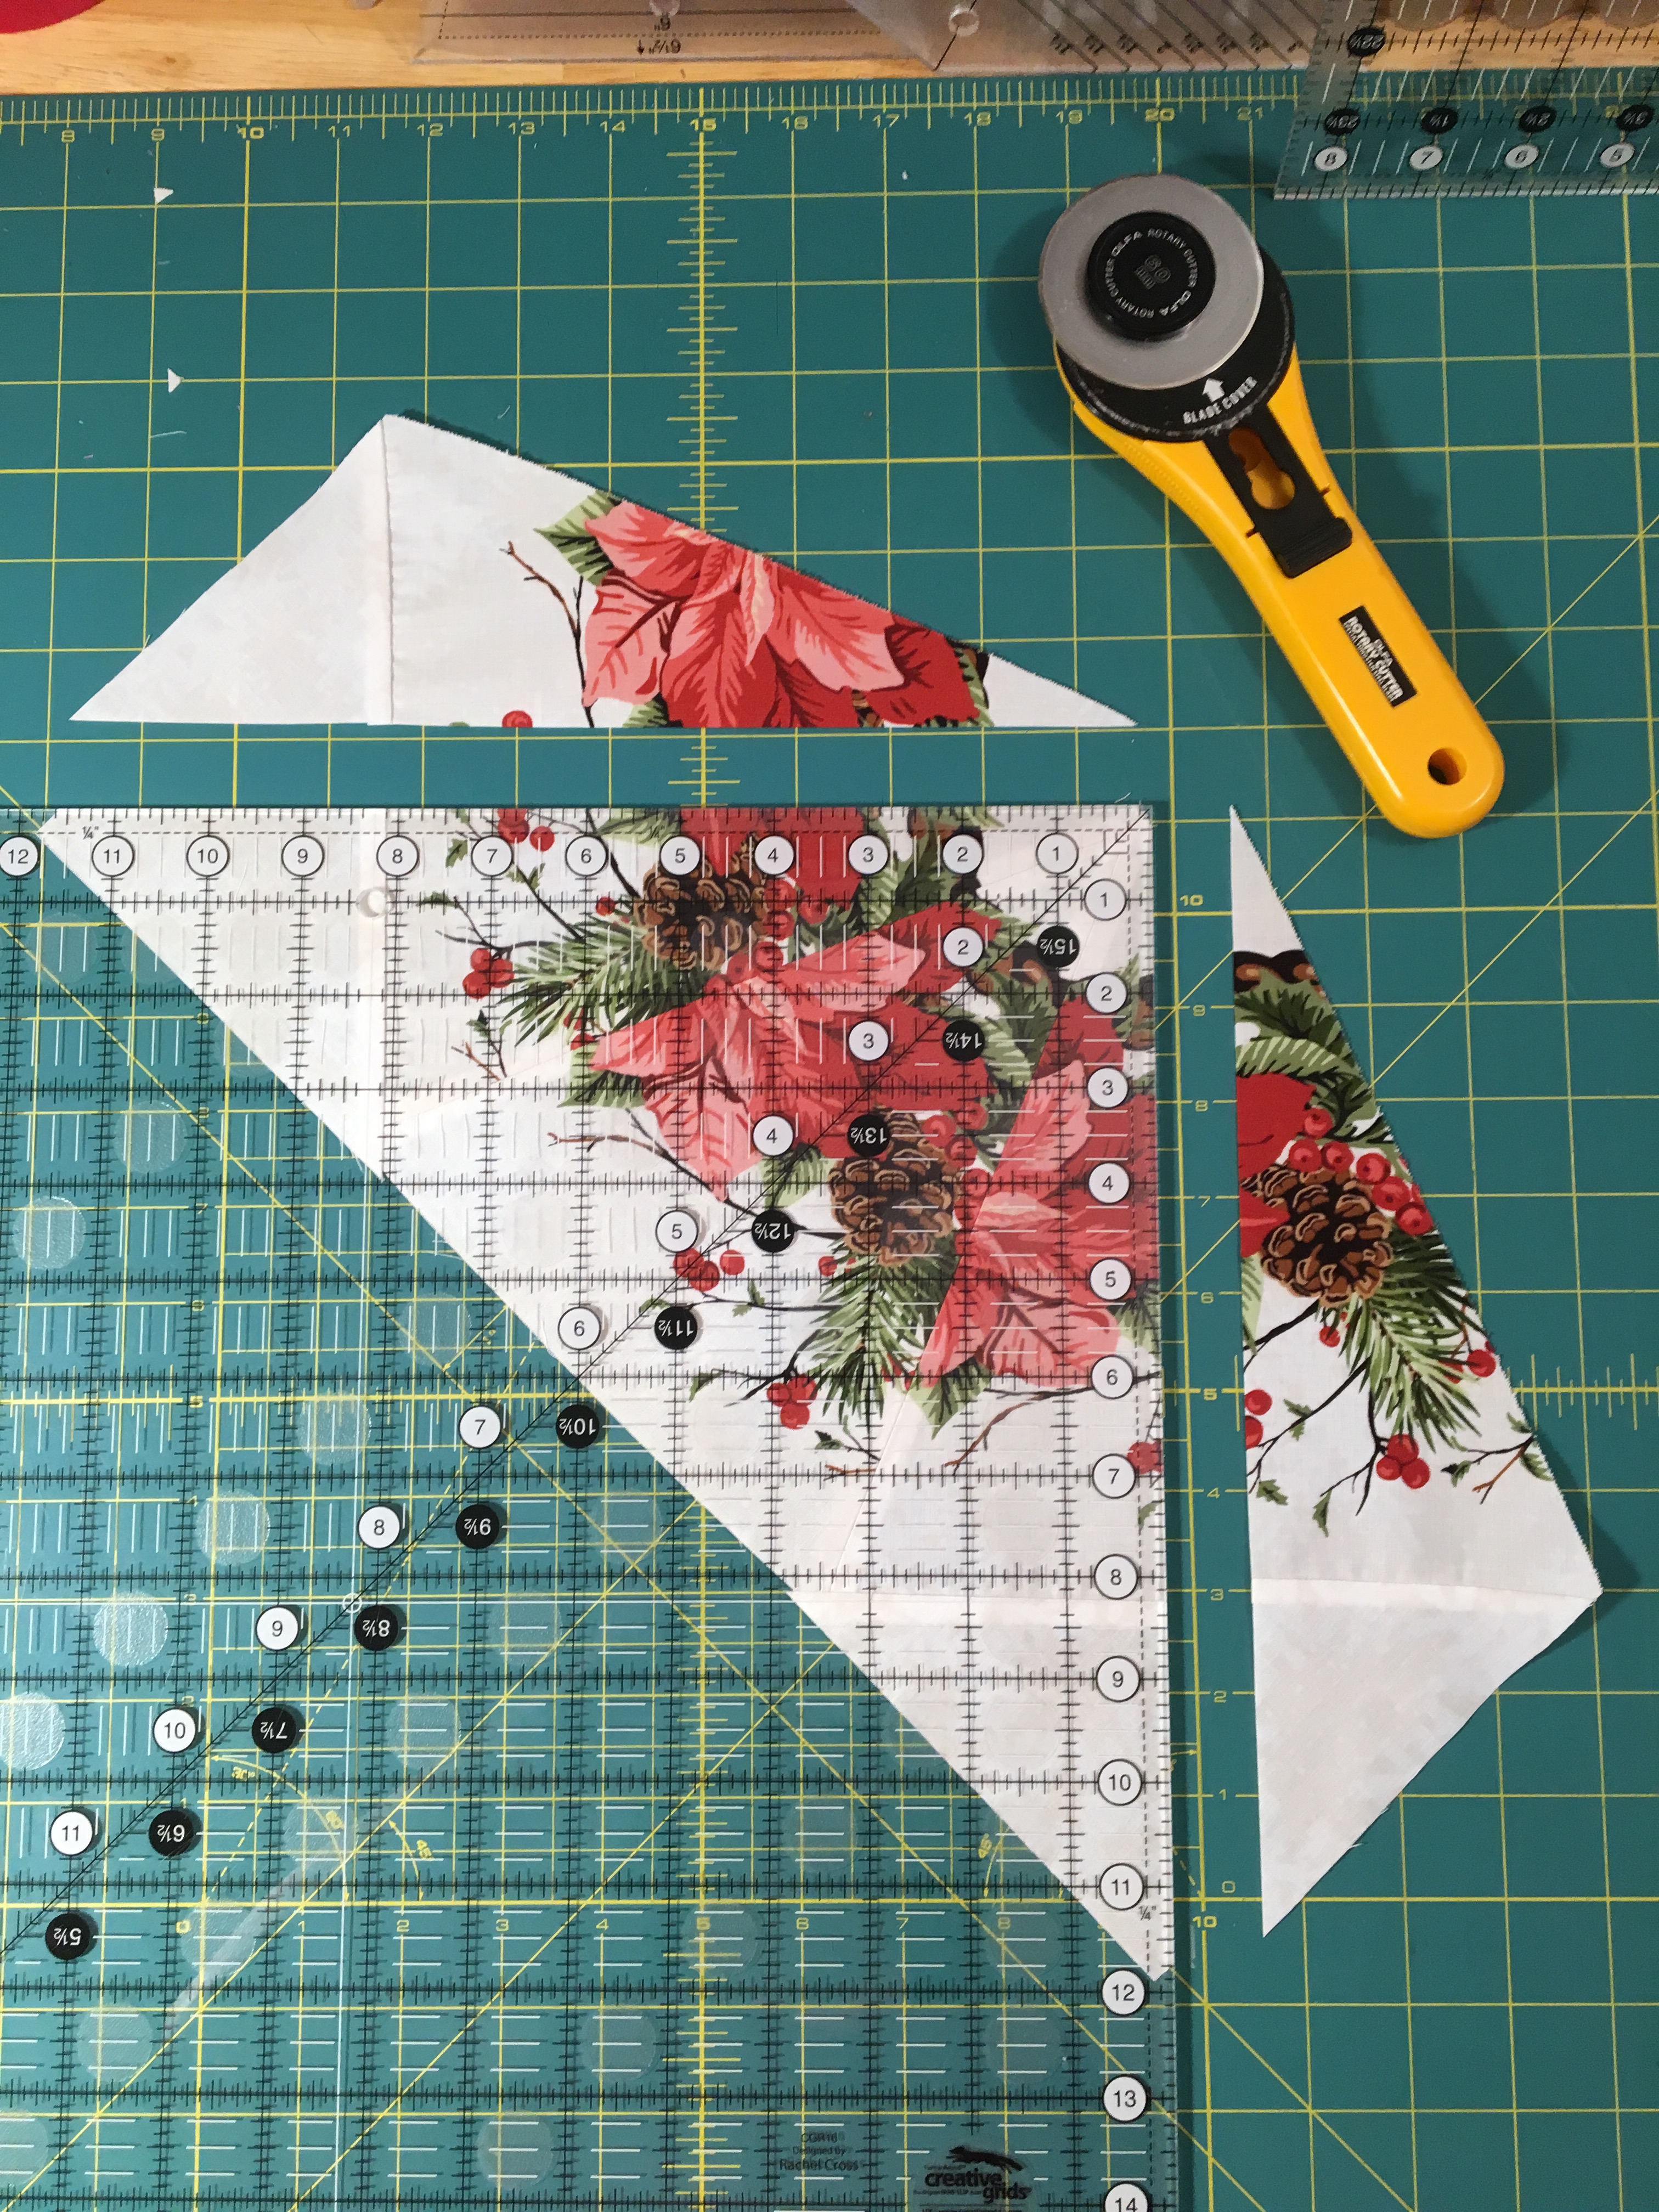
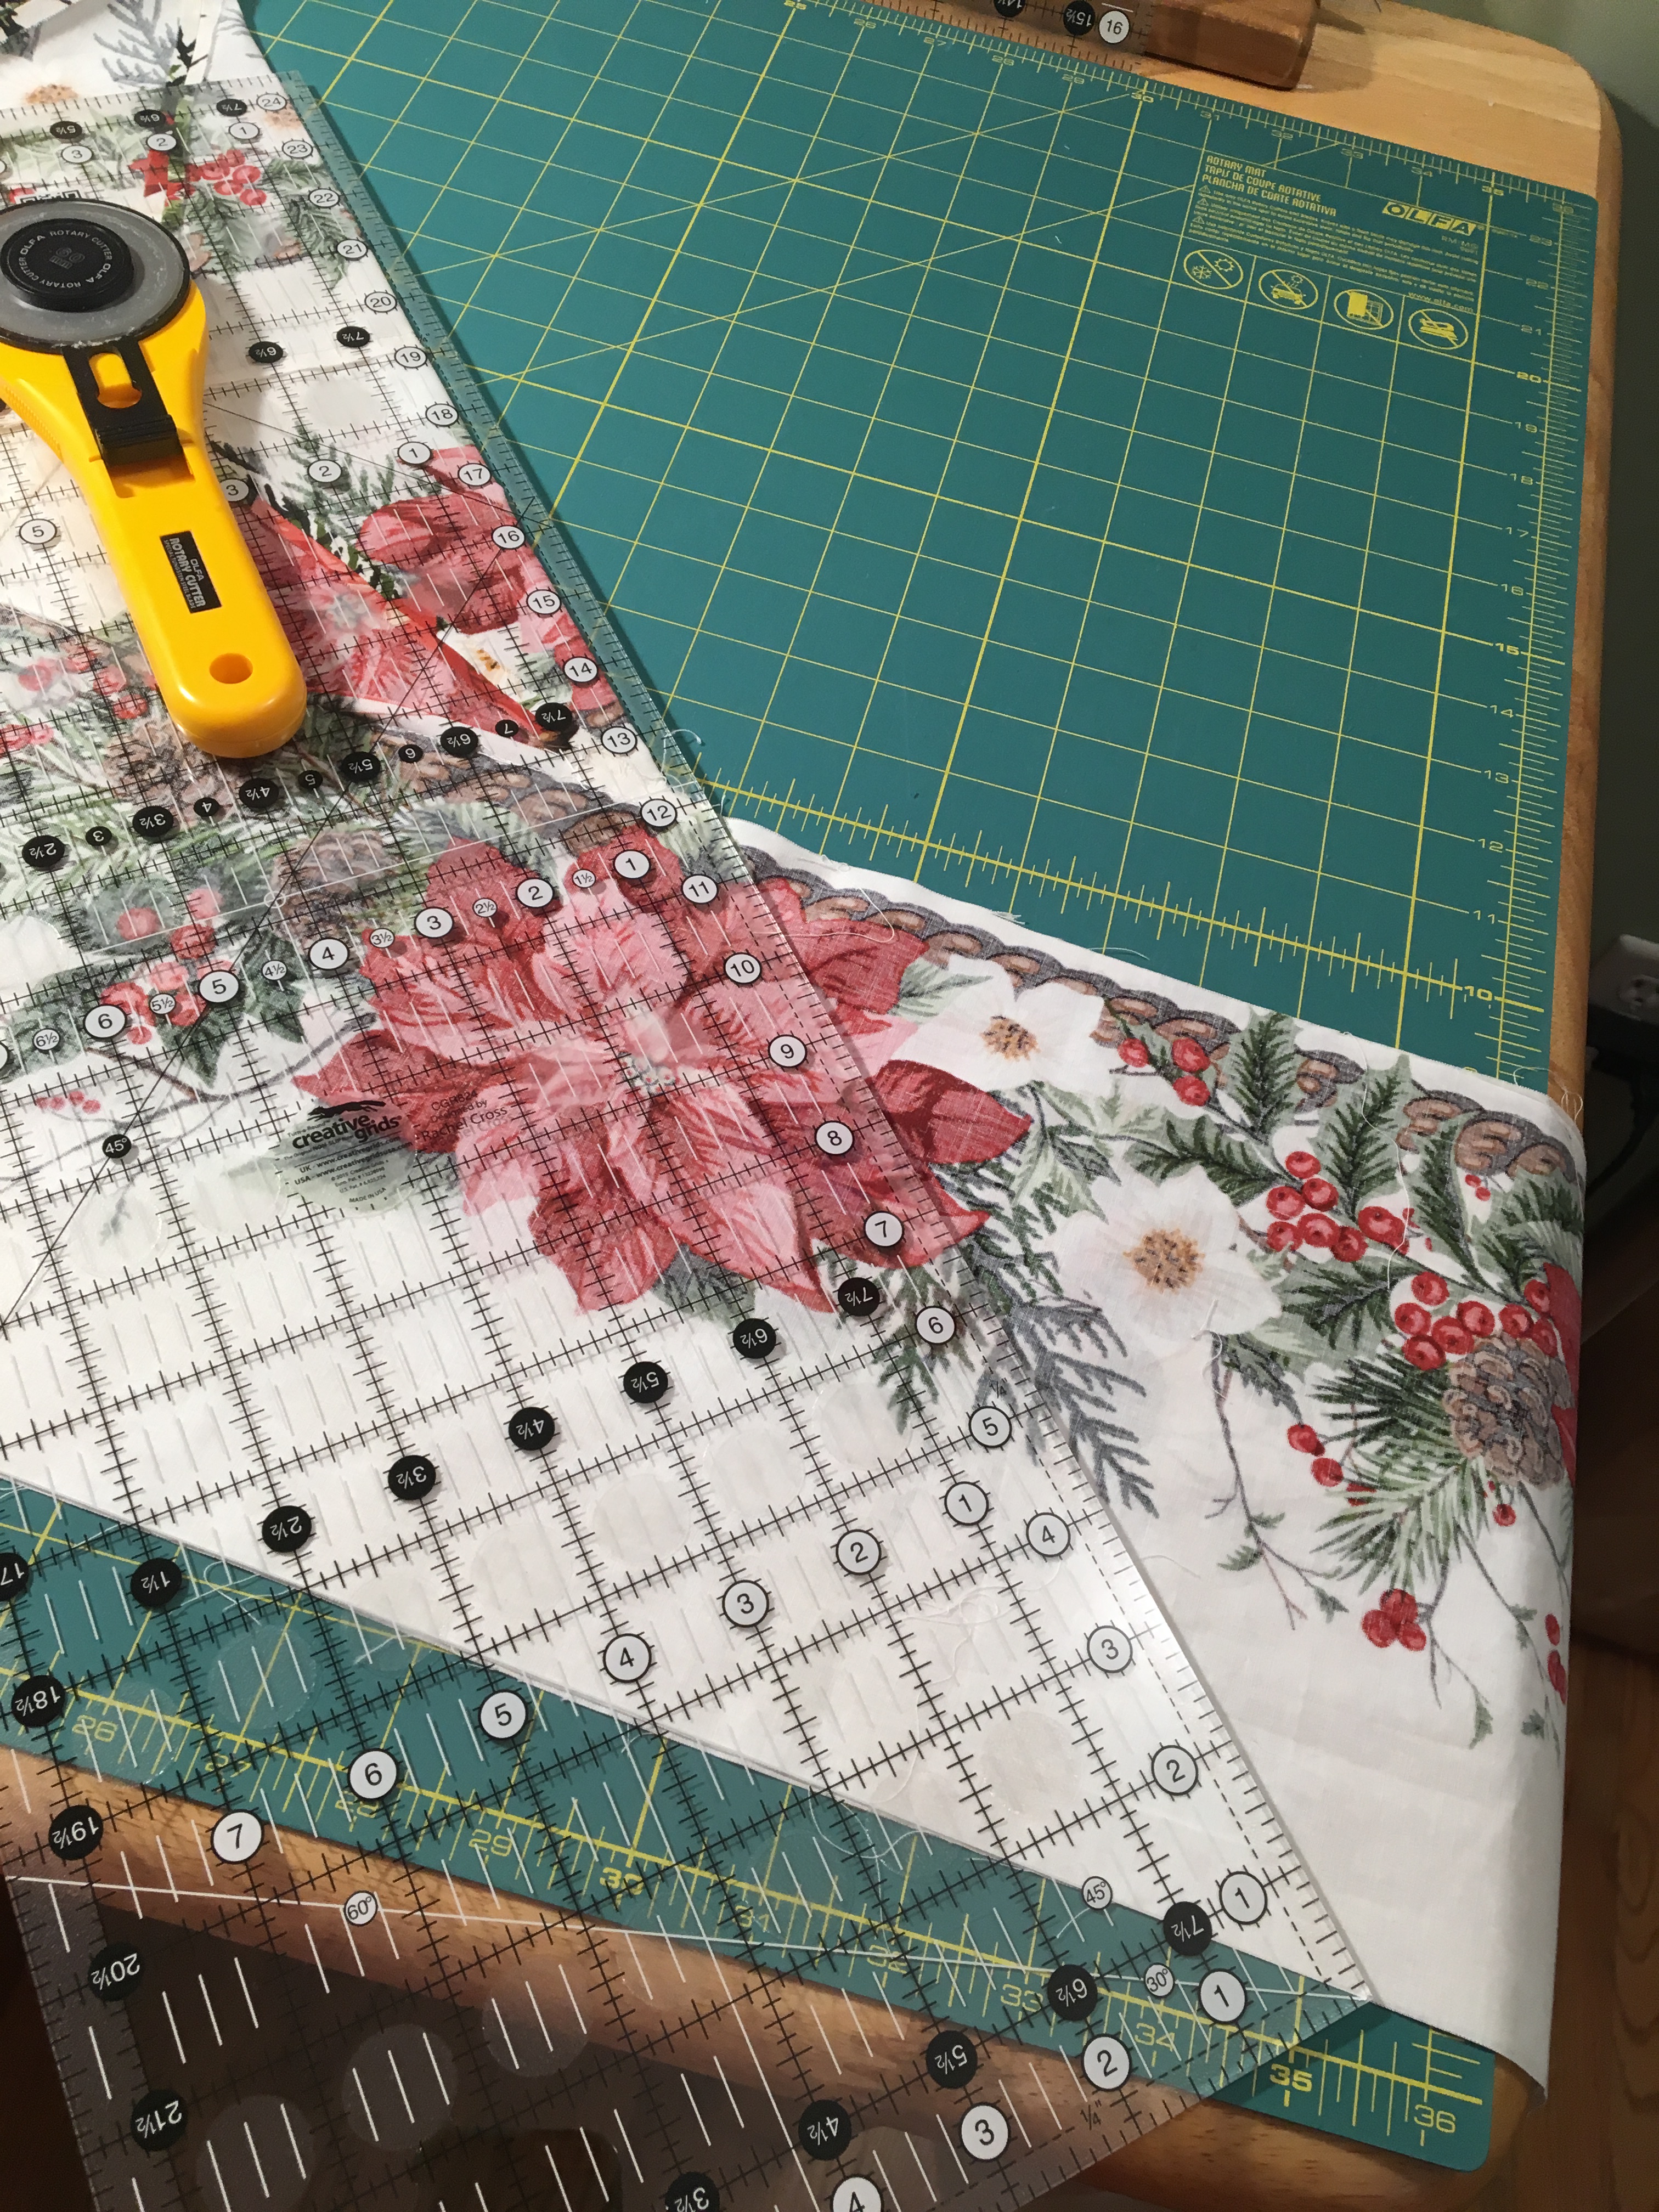
Trim the strip sets to 8 1/2″ wide.  This is easiest to do with an 8 1/2″ wide ruler.  From each strip set cut at least 3 sets of triangles using a 45 degree triangle ruler with a 8 1/2″ cutting line on the ruler.  Make sure the ruler has flat top at the triangle point.

Make sure to cut 4 sets that have the cable at the base of the triangles and 5 that have the cable at the point.  Cut selectively to get different areas of and colors from the fabric design.  You should be able to get at least 4 sets of triangles from each set so you will have enough fabric for at least 12 blocks.  This will let you pick and choose which ones you want to use and allows for errors in cutting, as well.

Piecing:

Take 4 of the sets of the triangles with the cable at the point of the triangle and separate them into sets of 5 for the side blocks and sets of 3 for the corners.

Refer to the pattern diagrams for piecing the blocks.

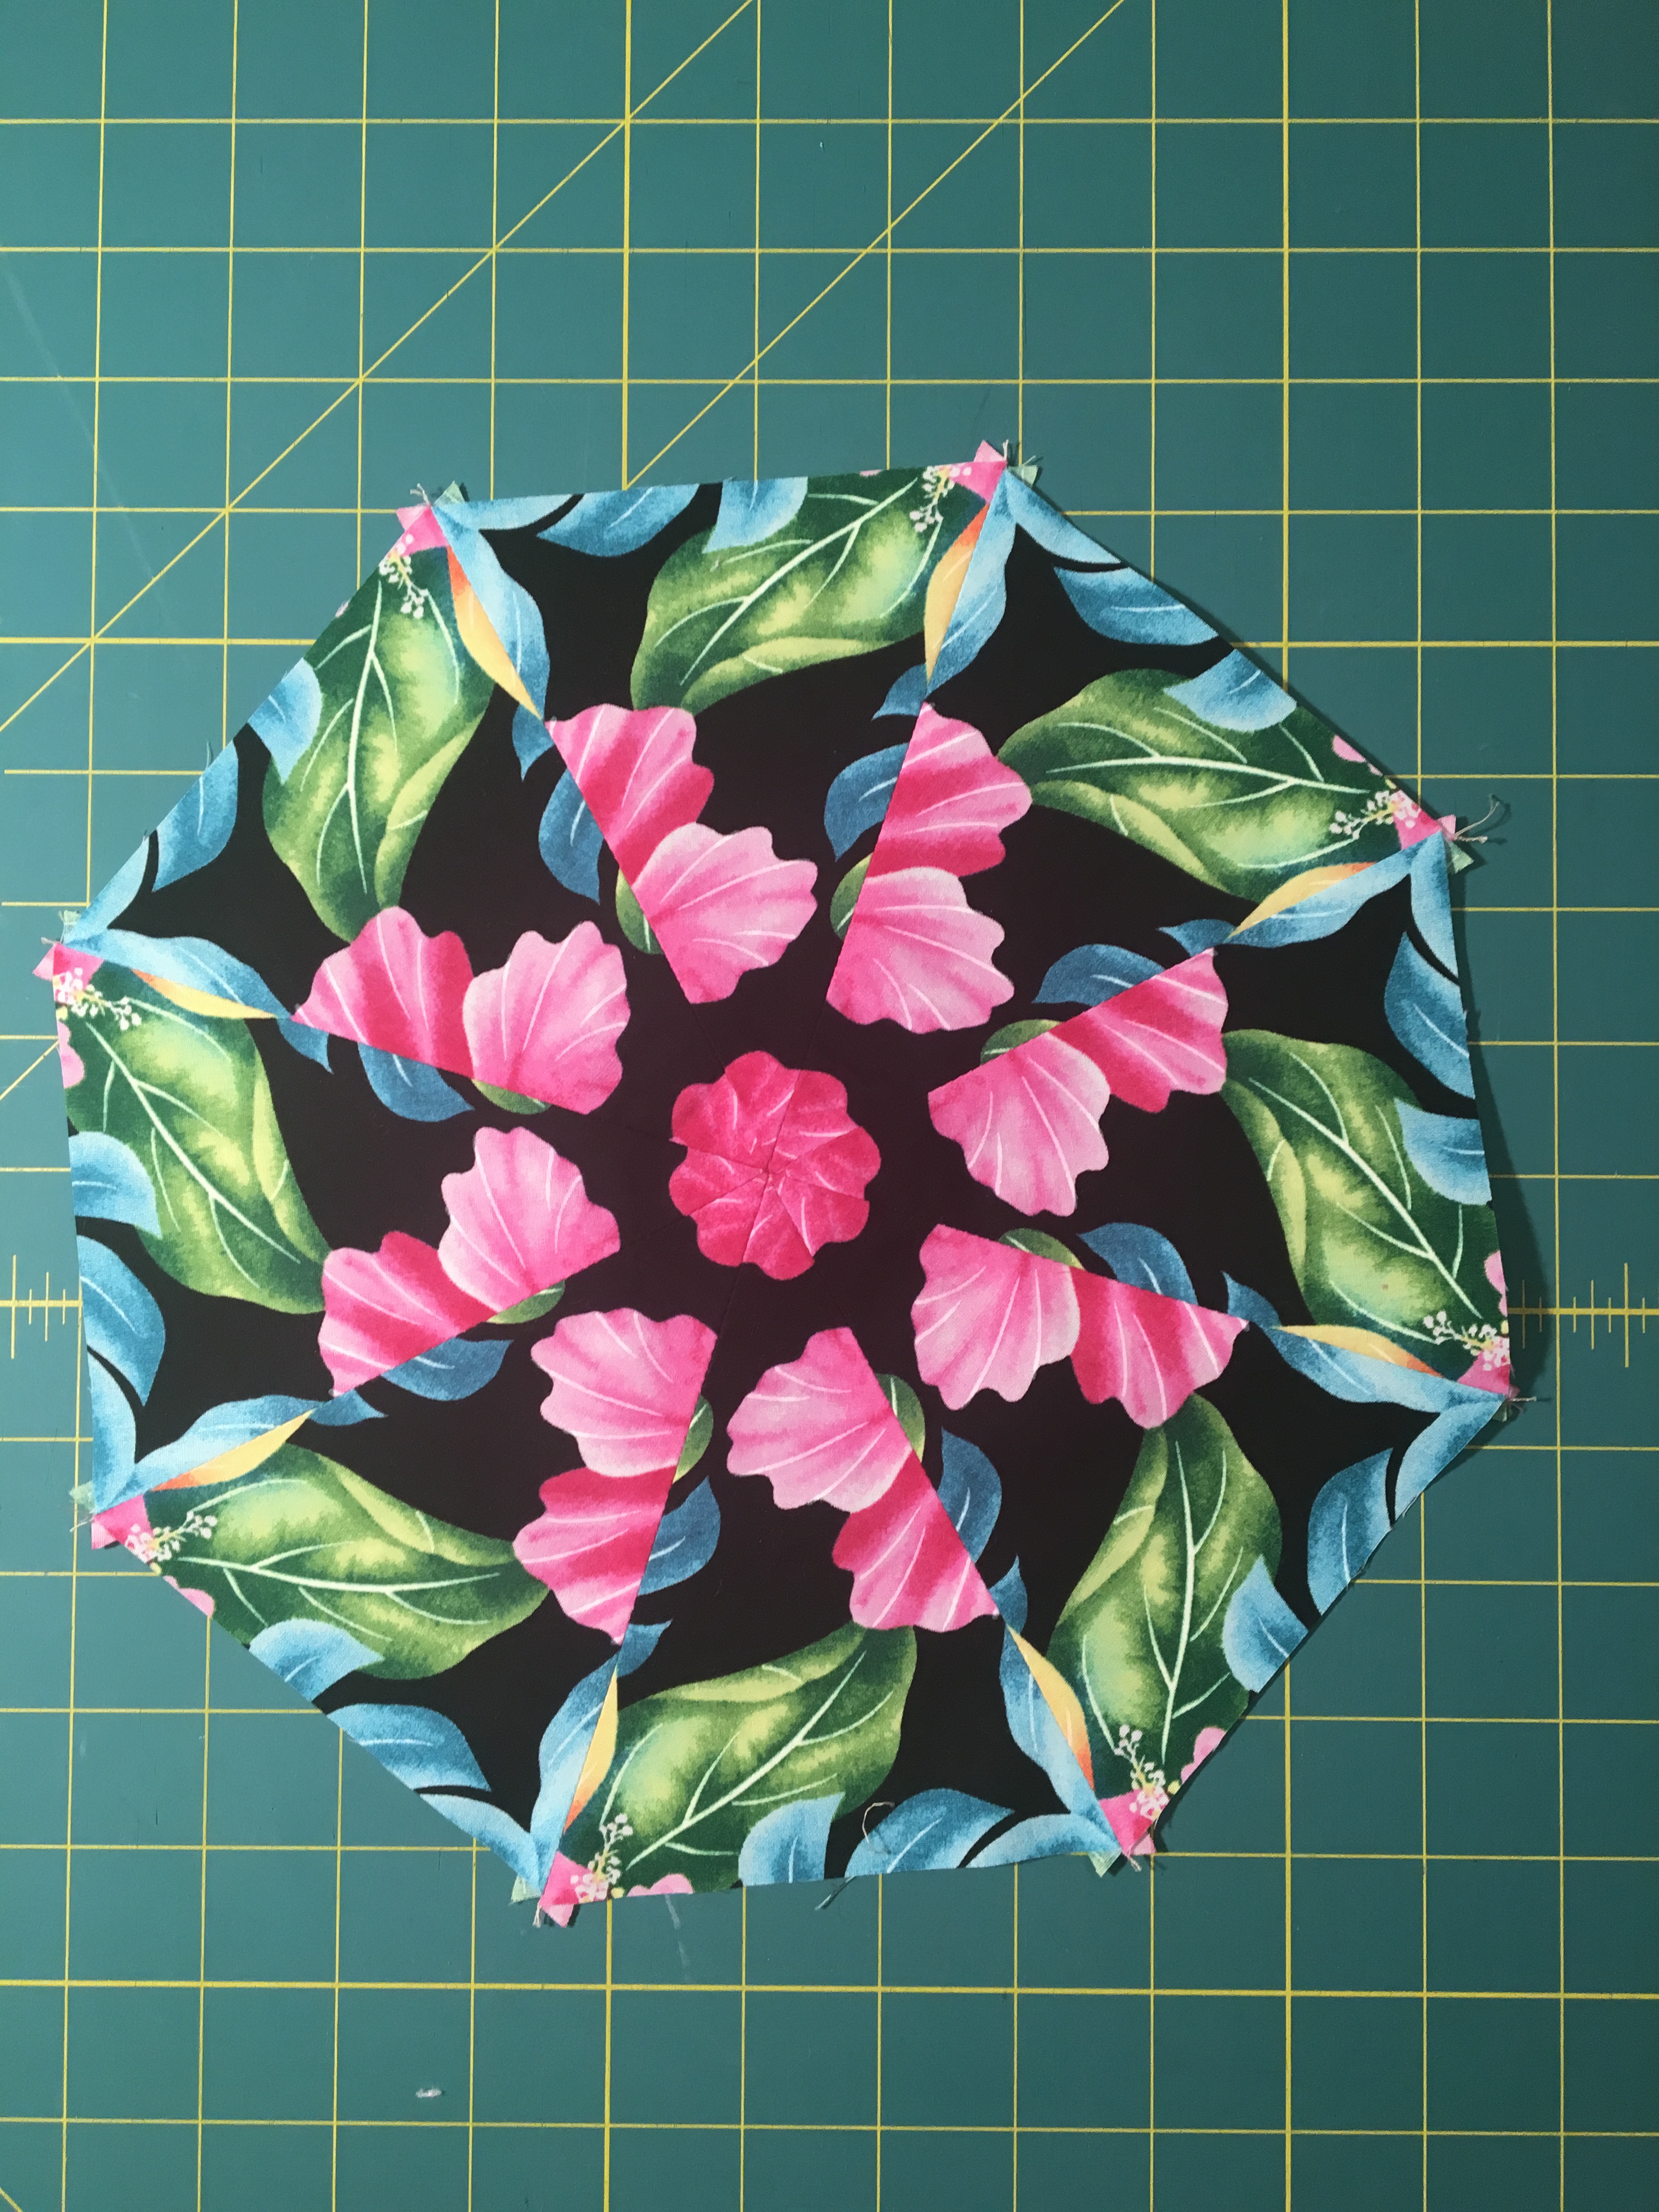
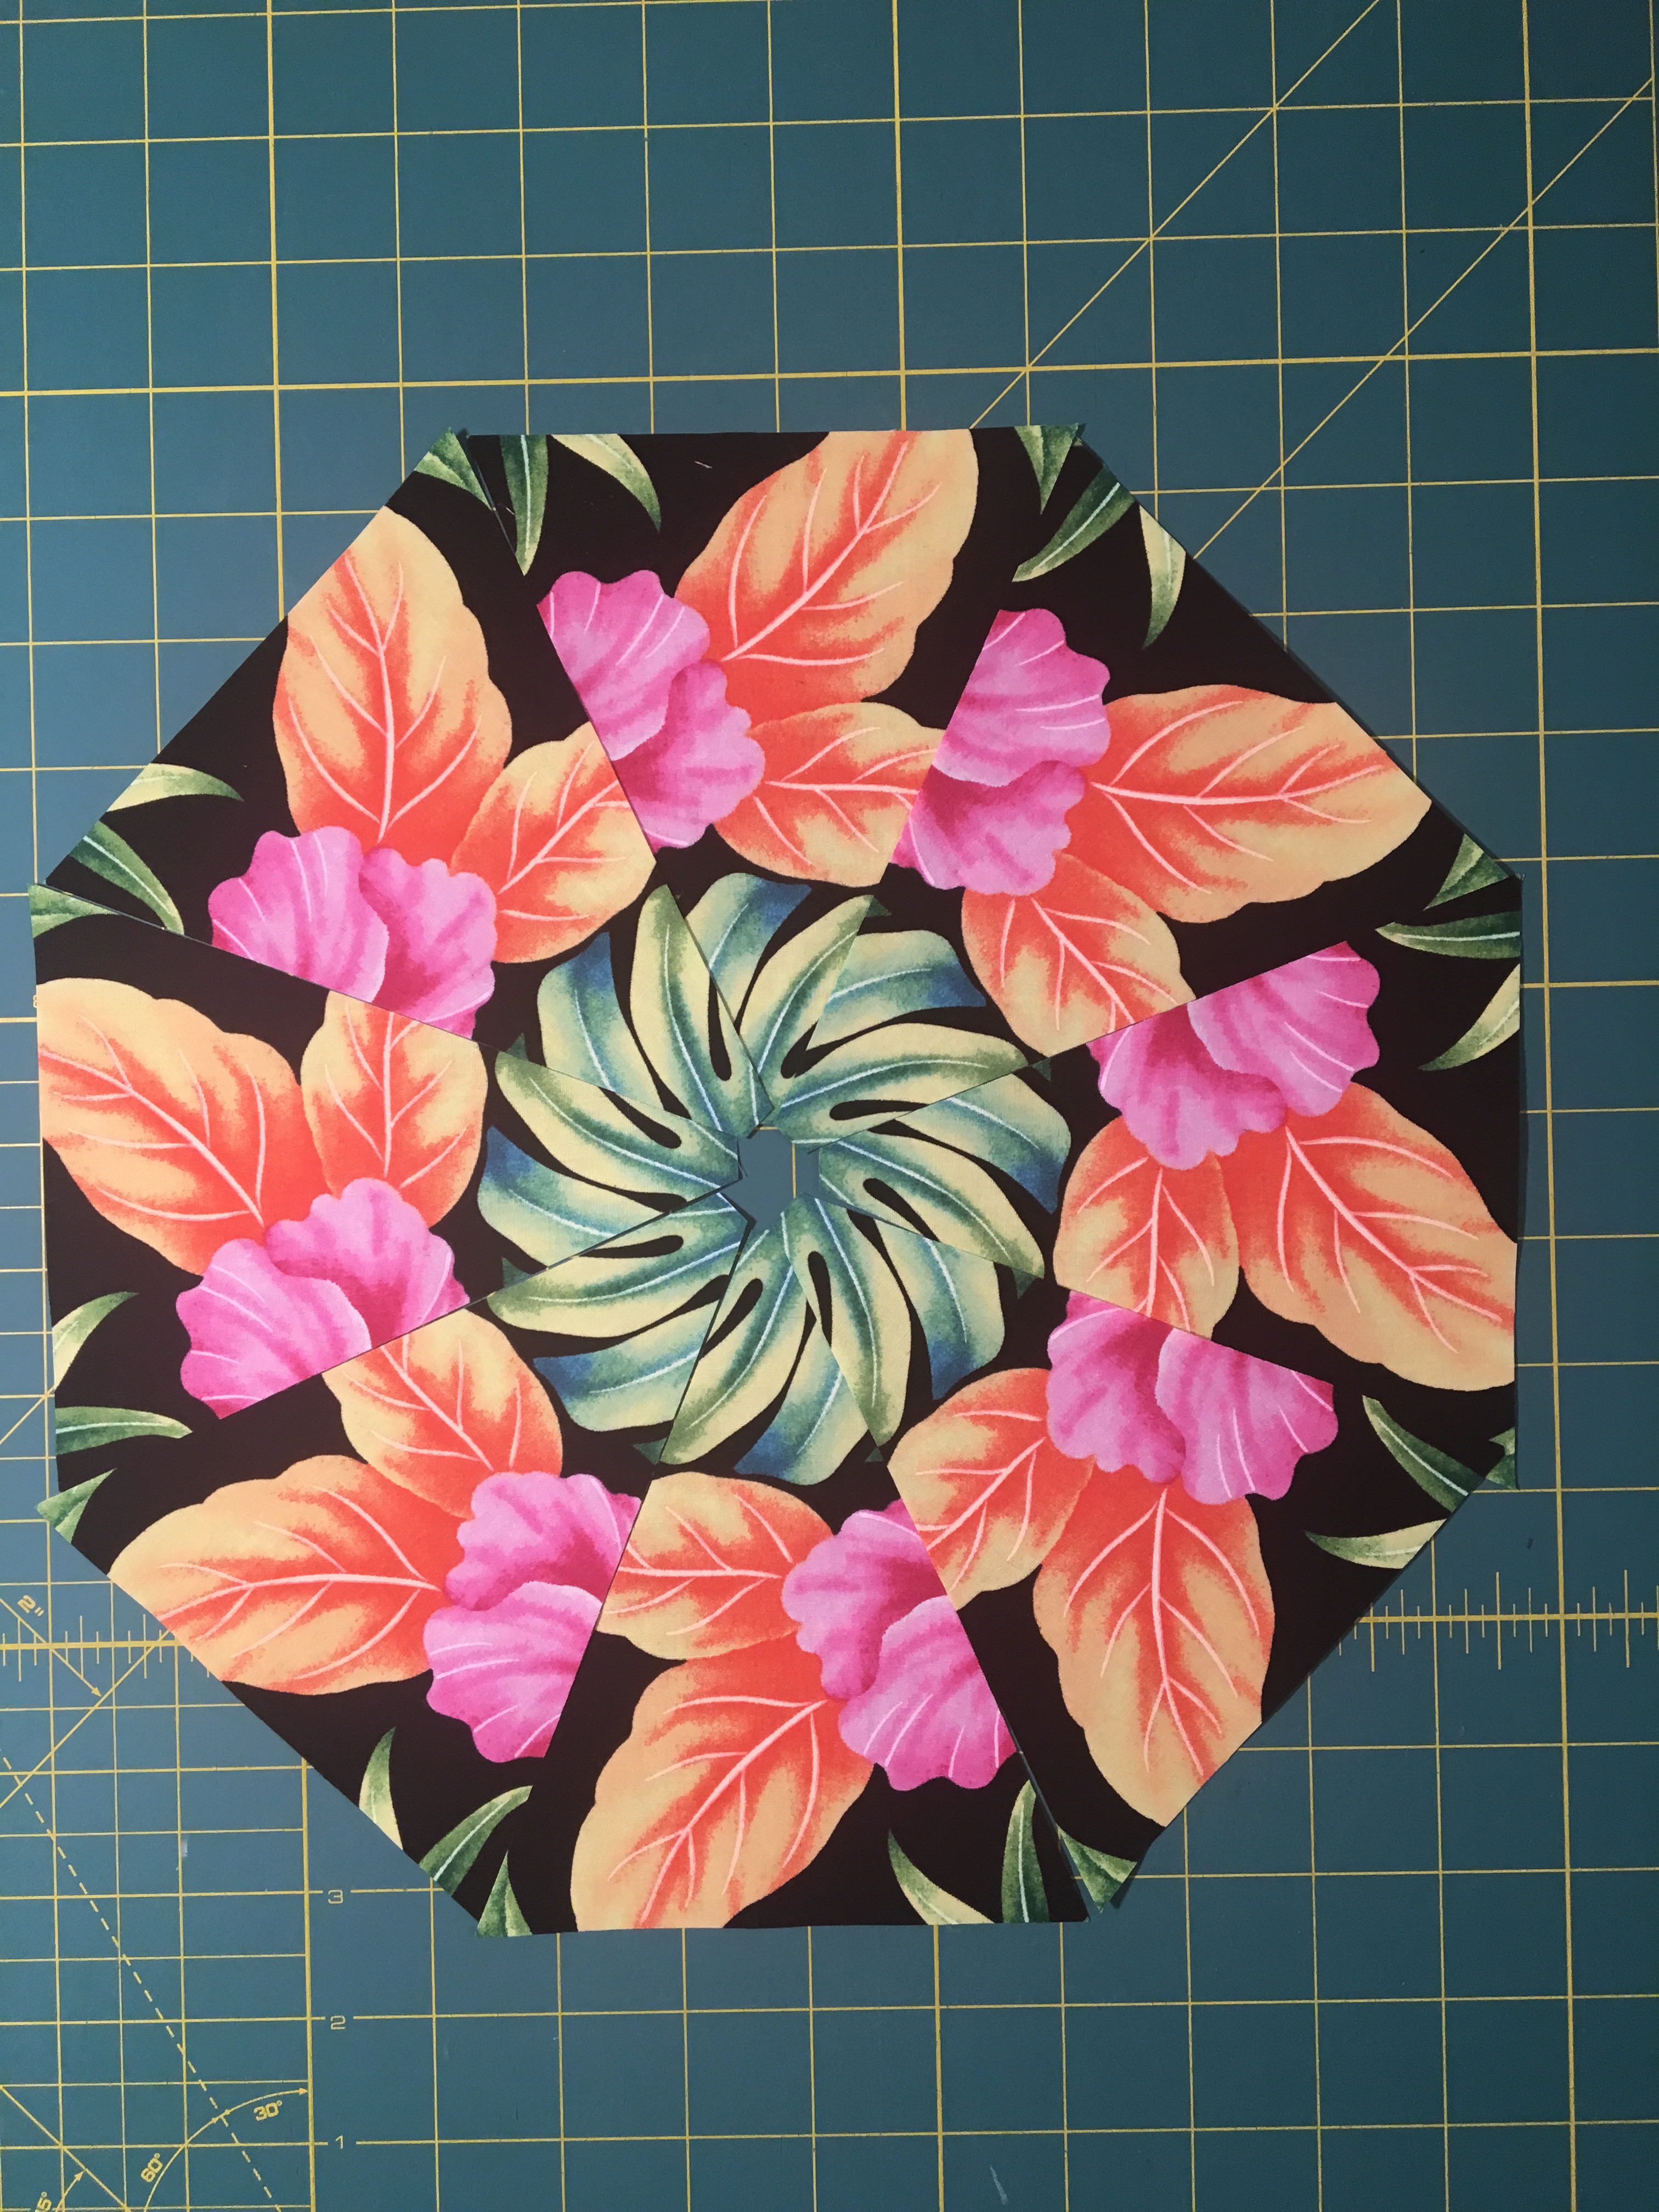
For each of the 5 center blocks sew four pairs of triangle pieces together.  Then sew two sets together, and then the two halves together.  I prefer to press all my seams open for these blocks.

You will have four blocks with the cable on the bottom, and one with the cable at the point. This one is the center block.

For the Side Blocks sew two pairs together.  Then sew the two halves together.  To finish sew a fifth triangle to one side of the block.  I press seams open except for the last triangle.  That seam is pressed towards that 5th triangle.

For each of the corner blocks sew a pair of triangles together and then sew the third triangle to one side of the block.  Press the seams open.

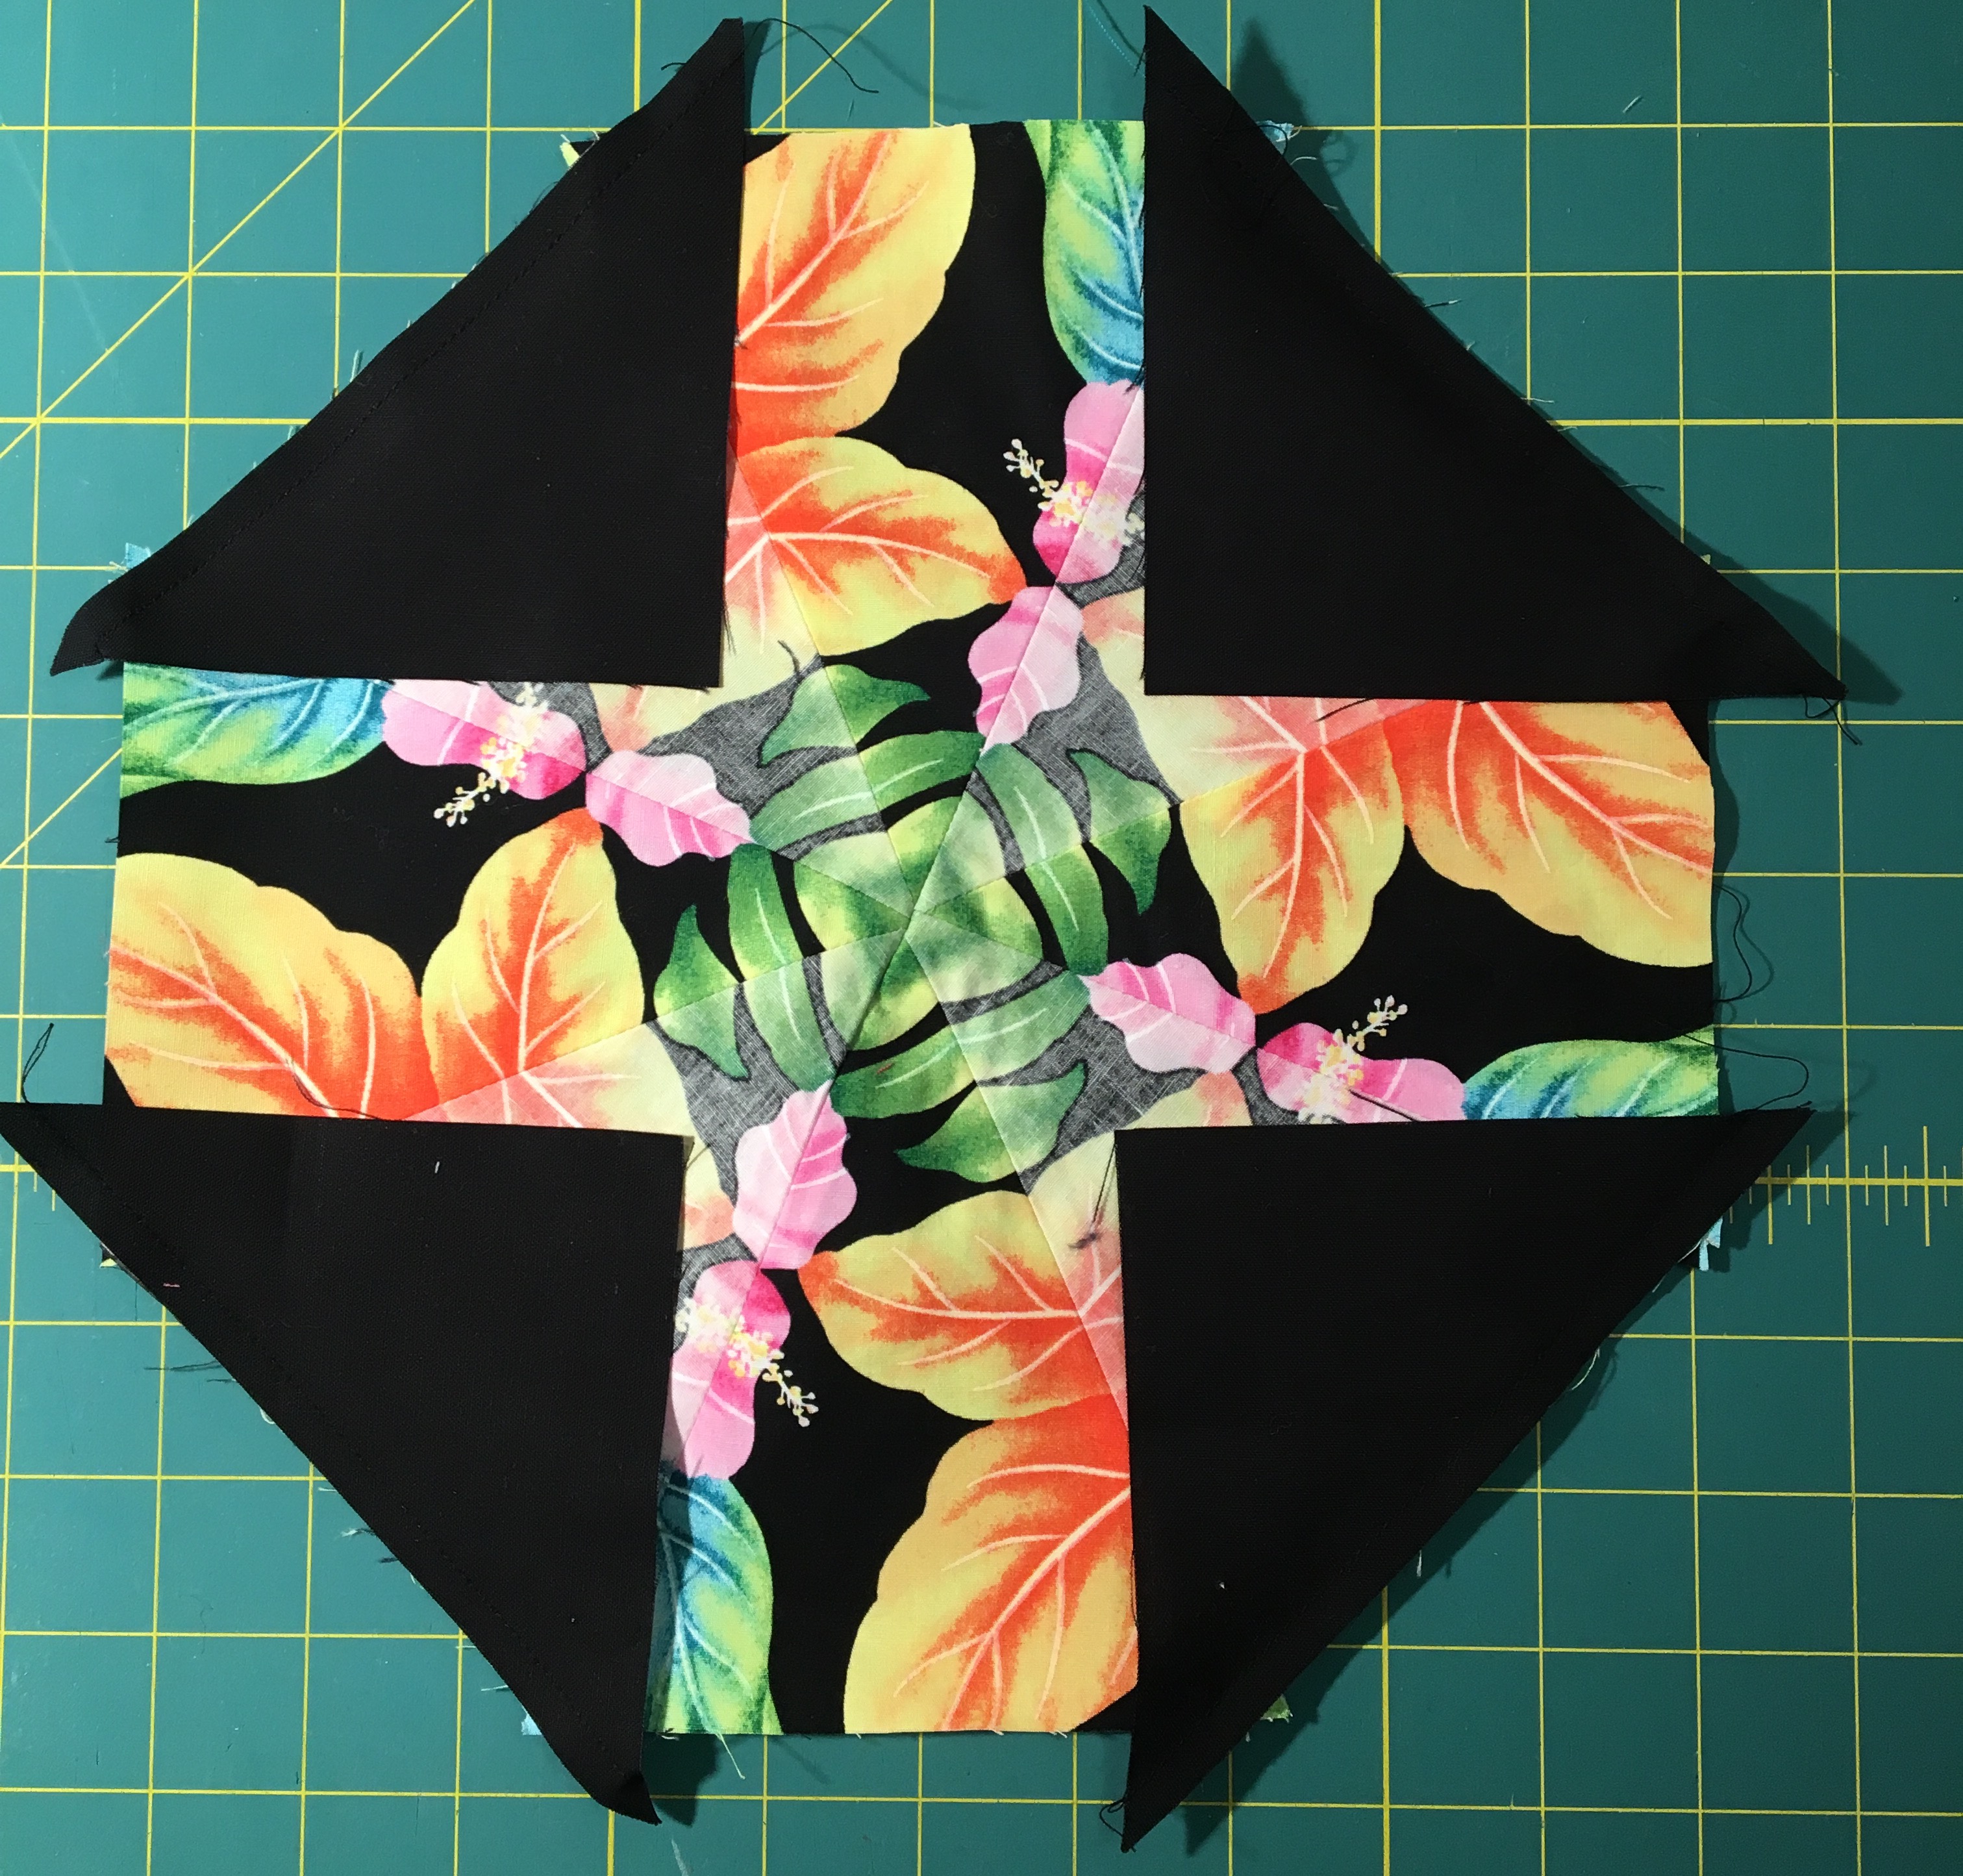
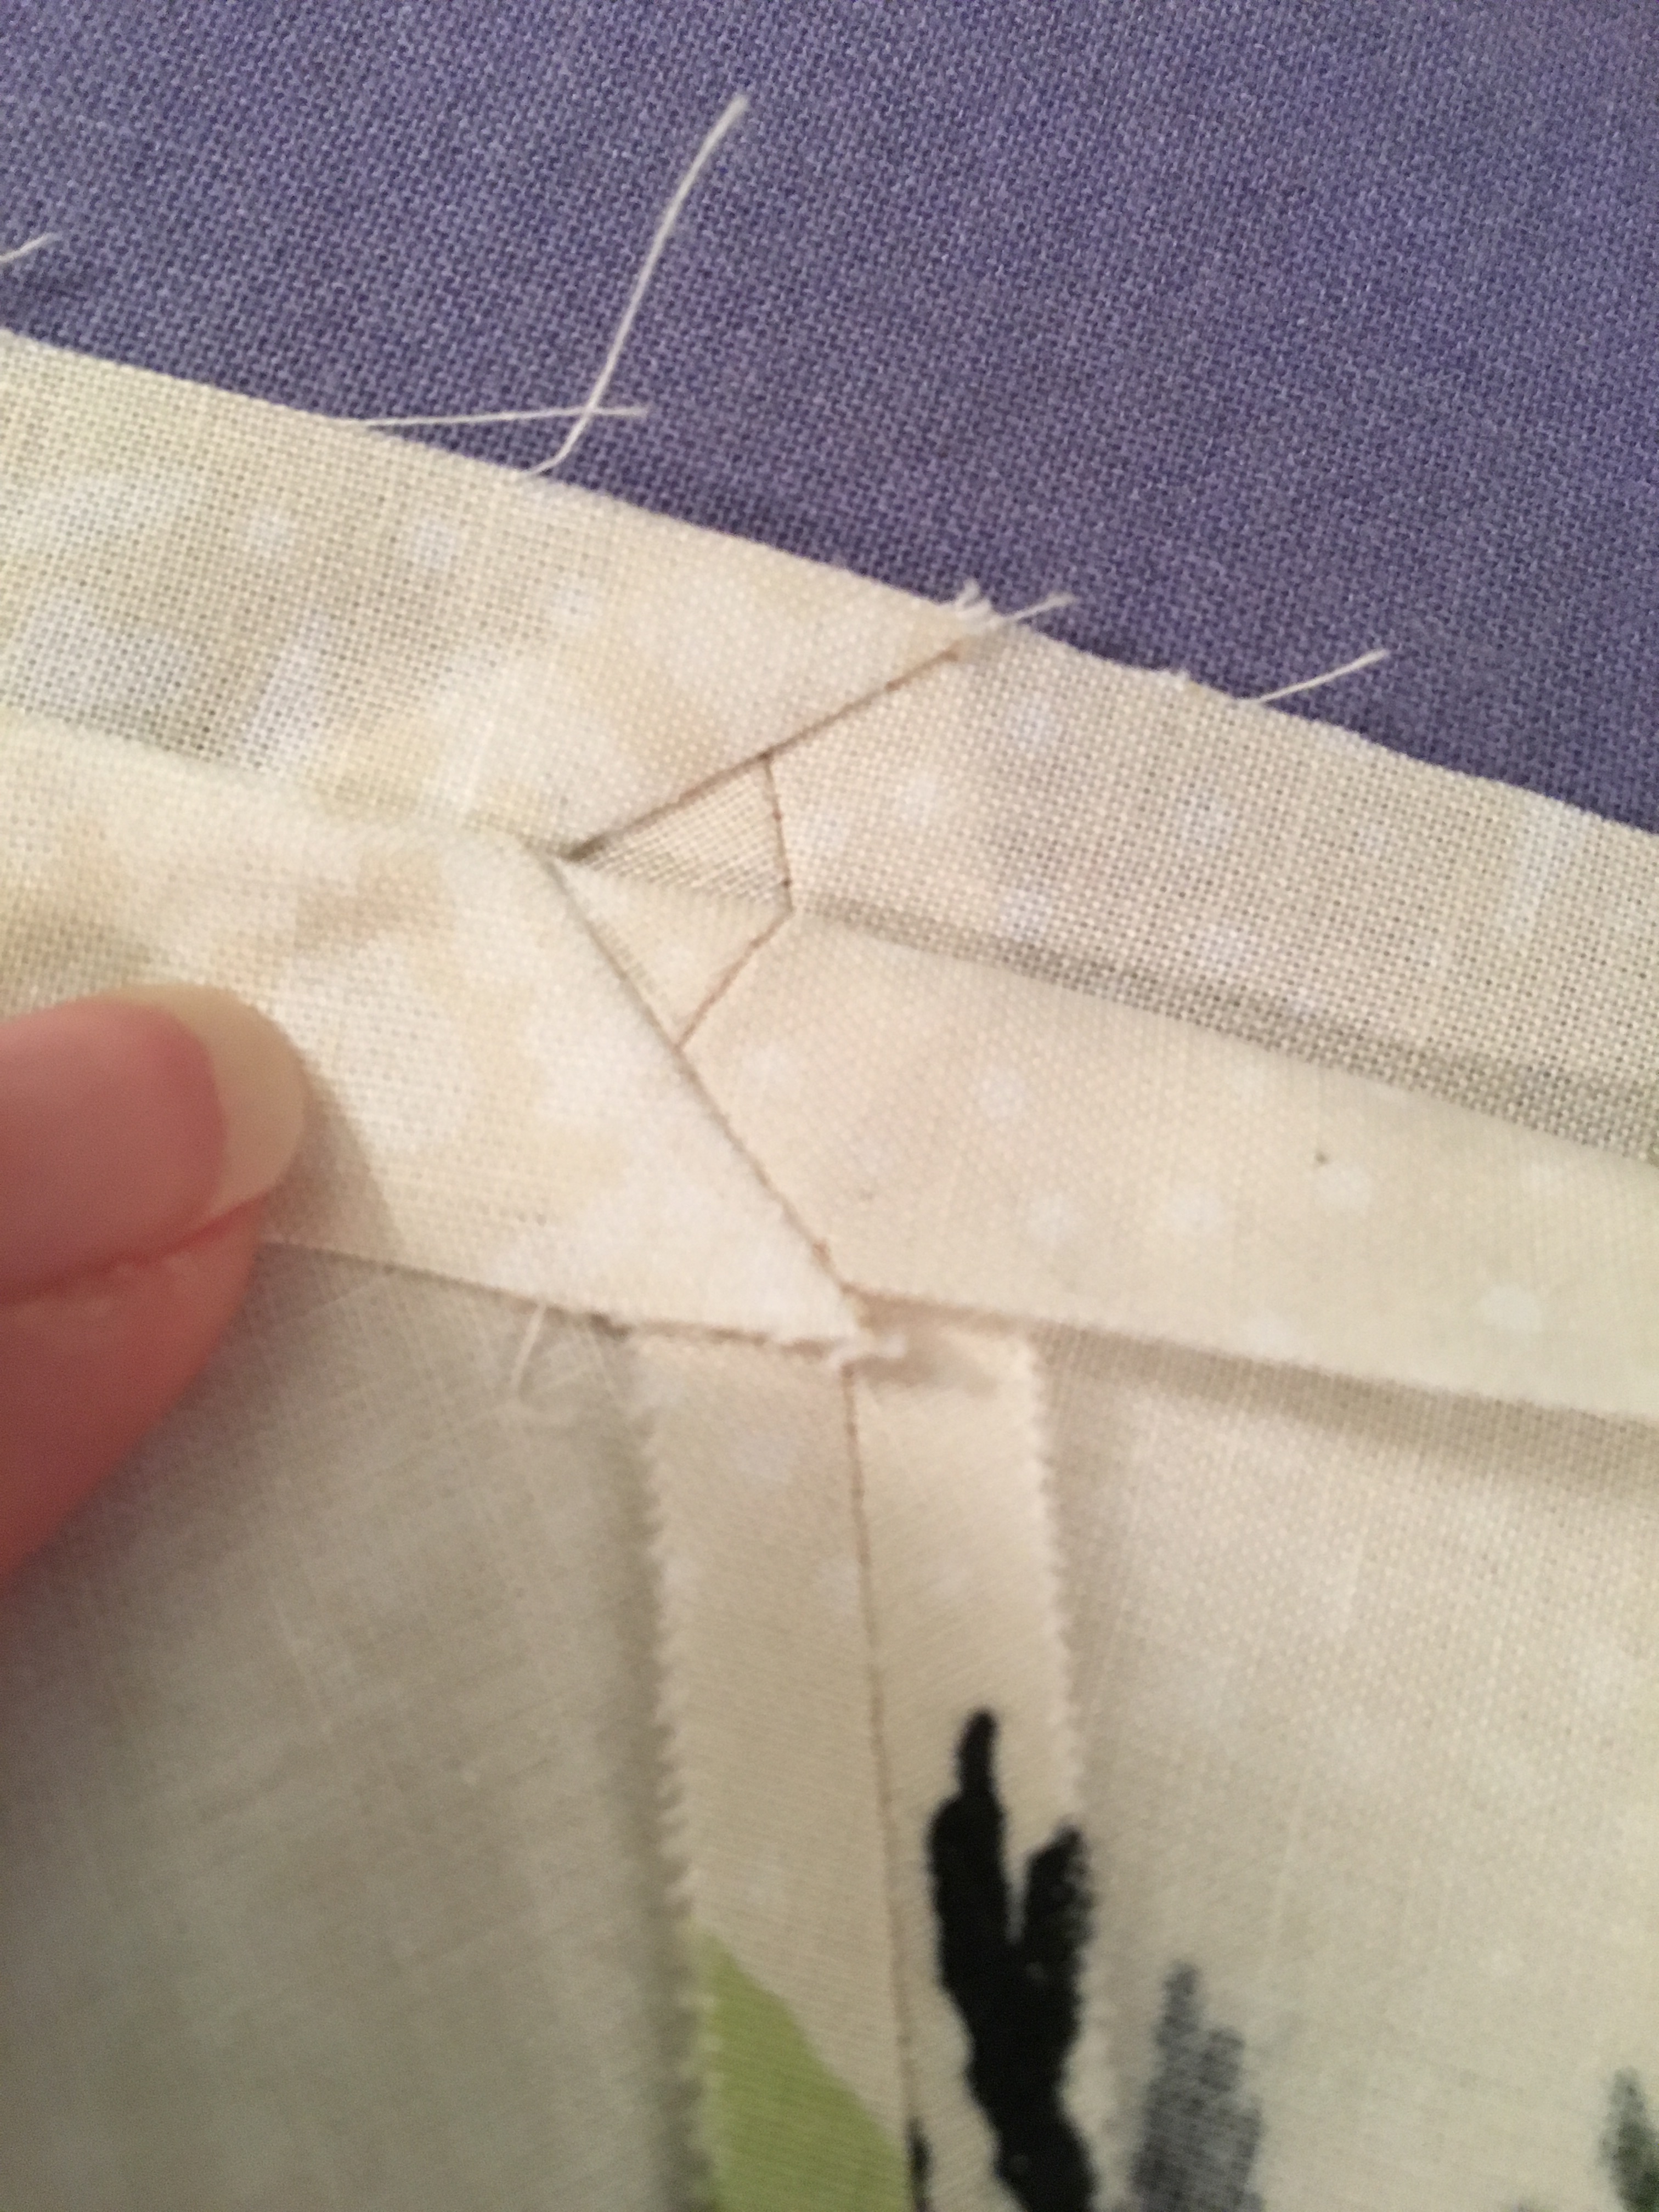
Cutting and Piecing the Block Corners:

To make it easier to piece the corners I cut oversized pieces and then trim the block afterwards.

Cut three 6″ strips.  Then cut 20 6″ squares from these strips.  Cut each square in half on the diagonal.  You will have 40 triangles for the block corners.

Refer to the pattern diagrams for piecing these corner triangle pieces.

After sewing these corner triangles you will need to trim the blocks.  Leave a 1/4″ seam when trimming.  A 16 1/2″ square ruler makes this much easier to do.

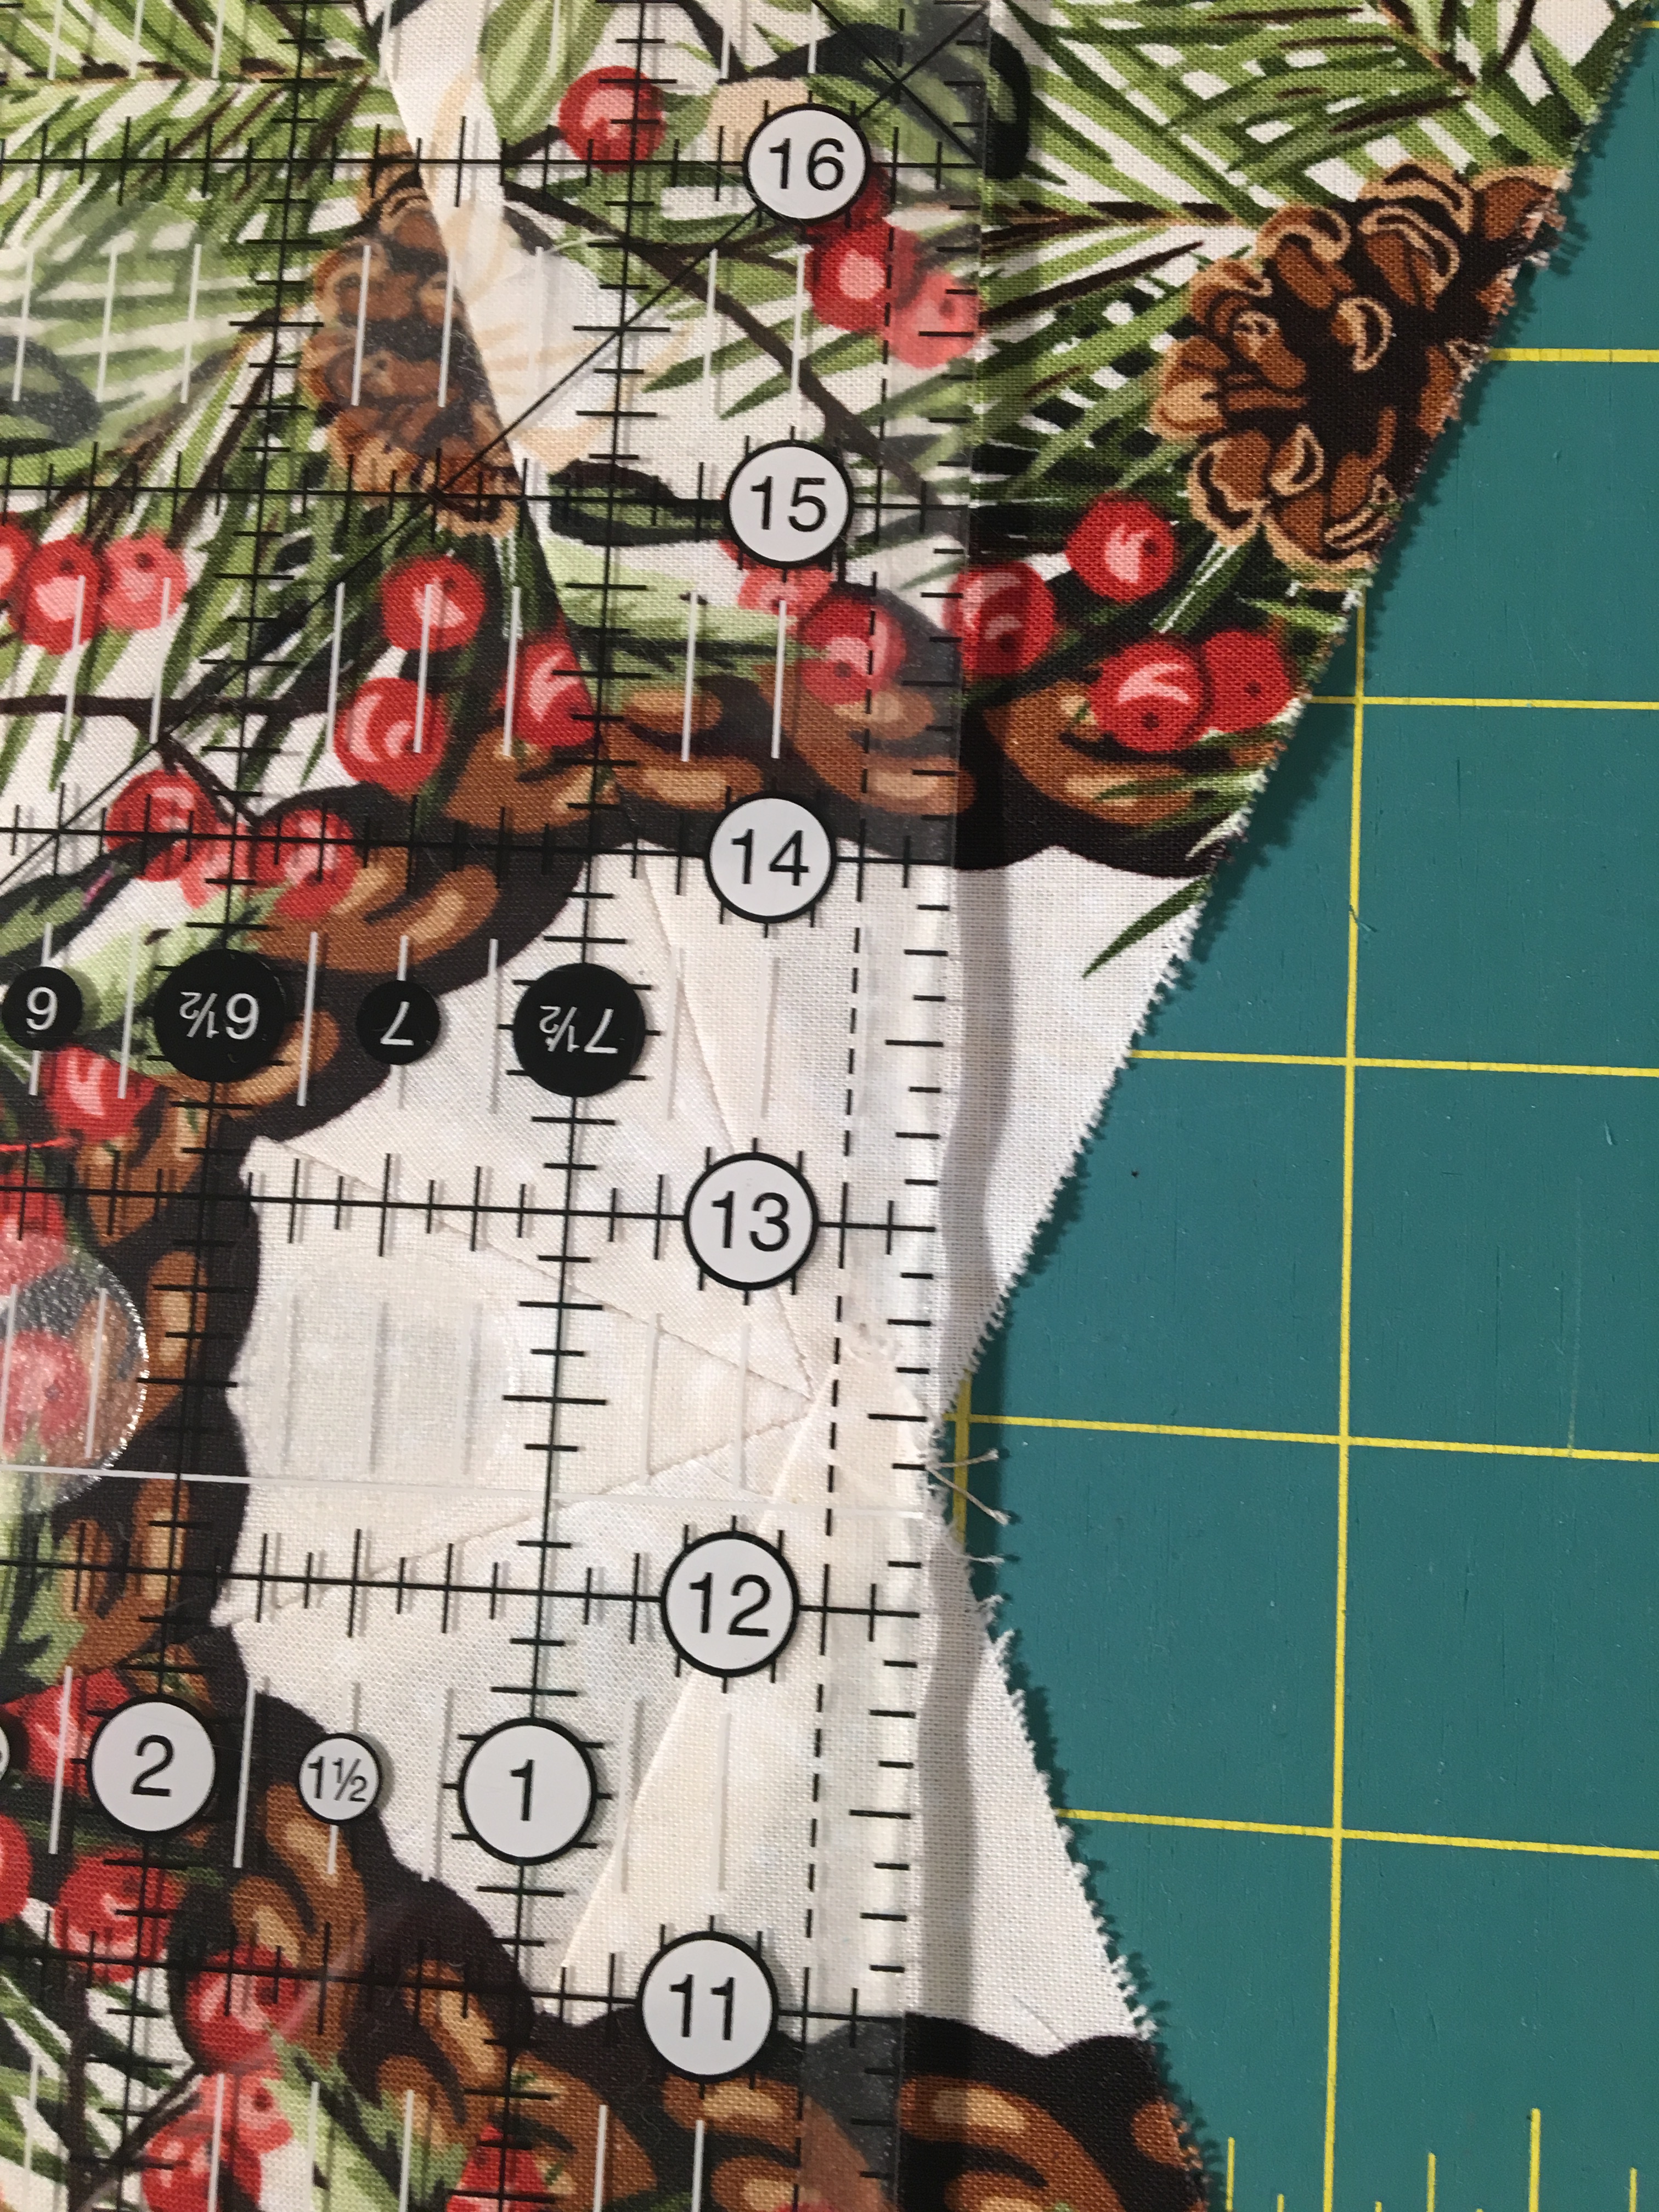
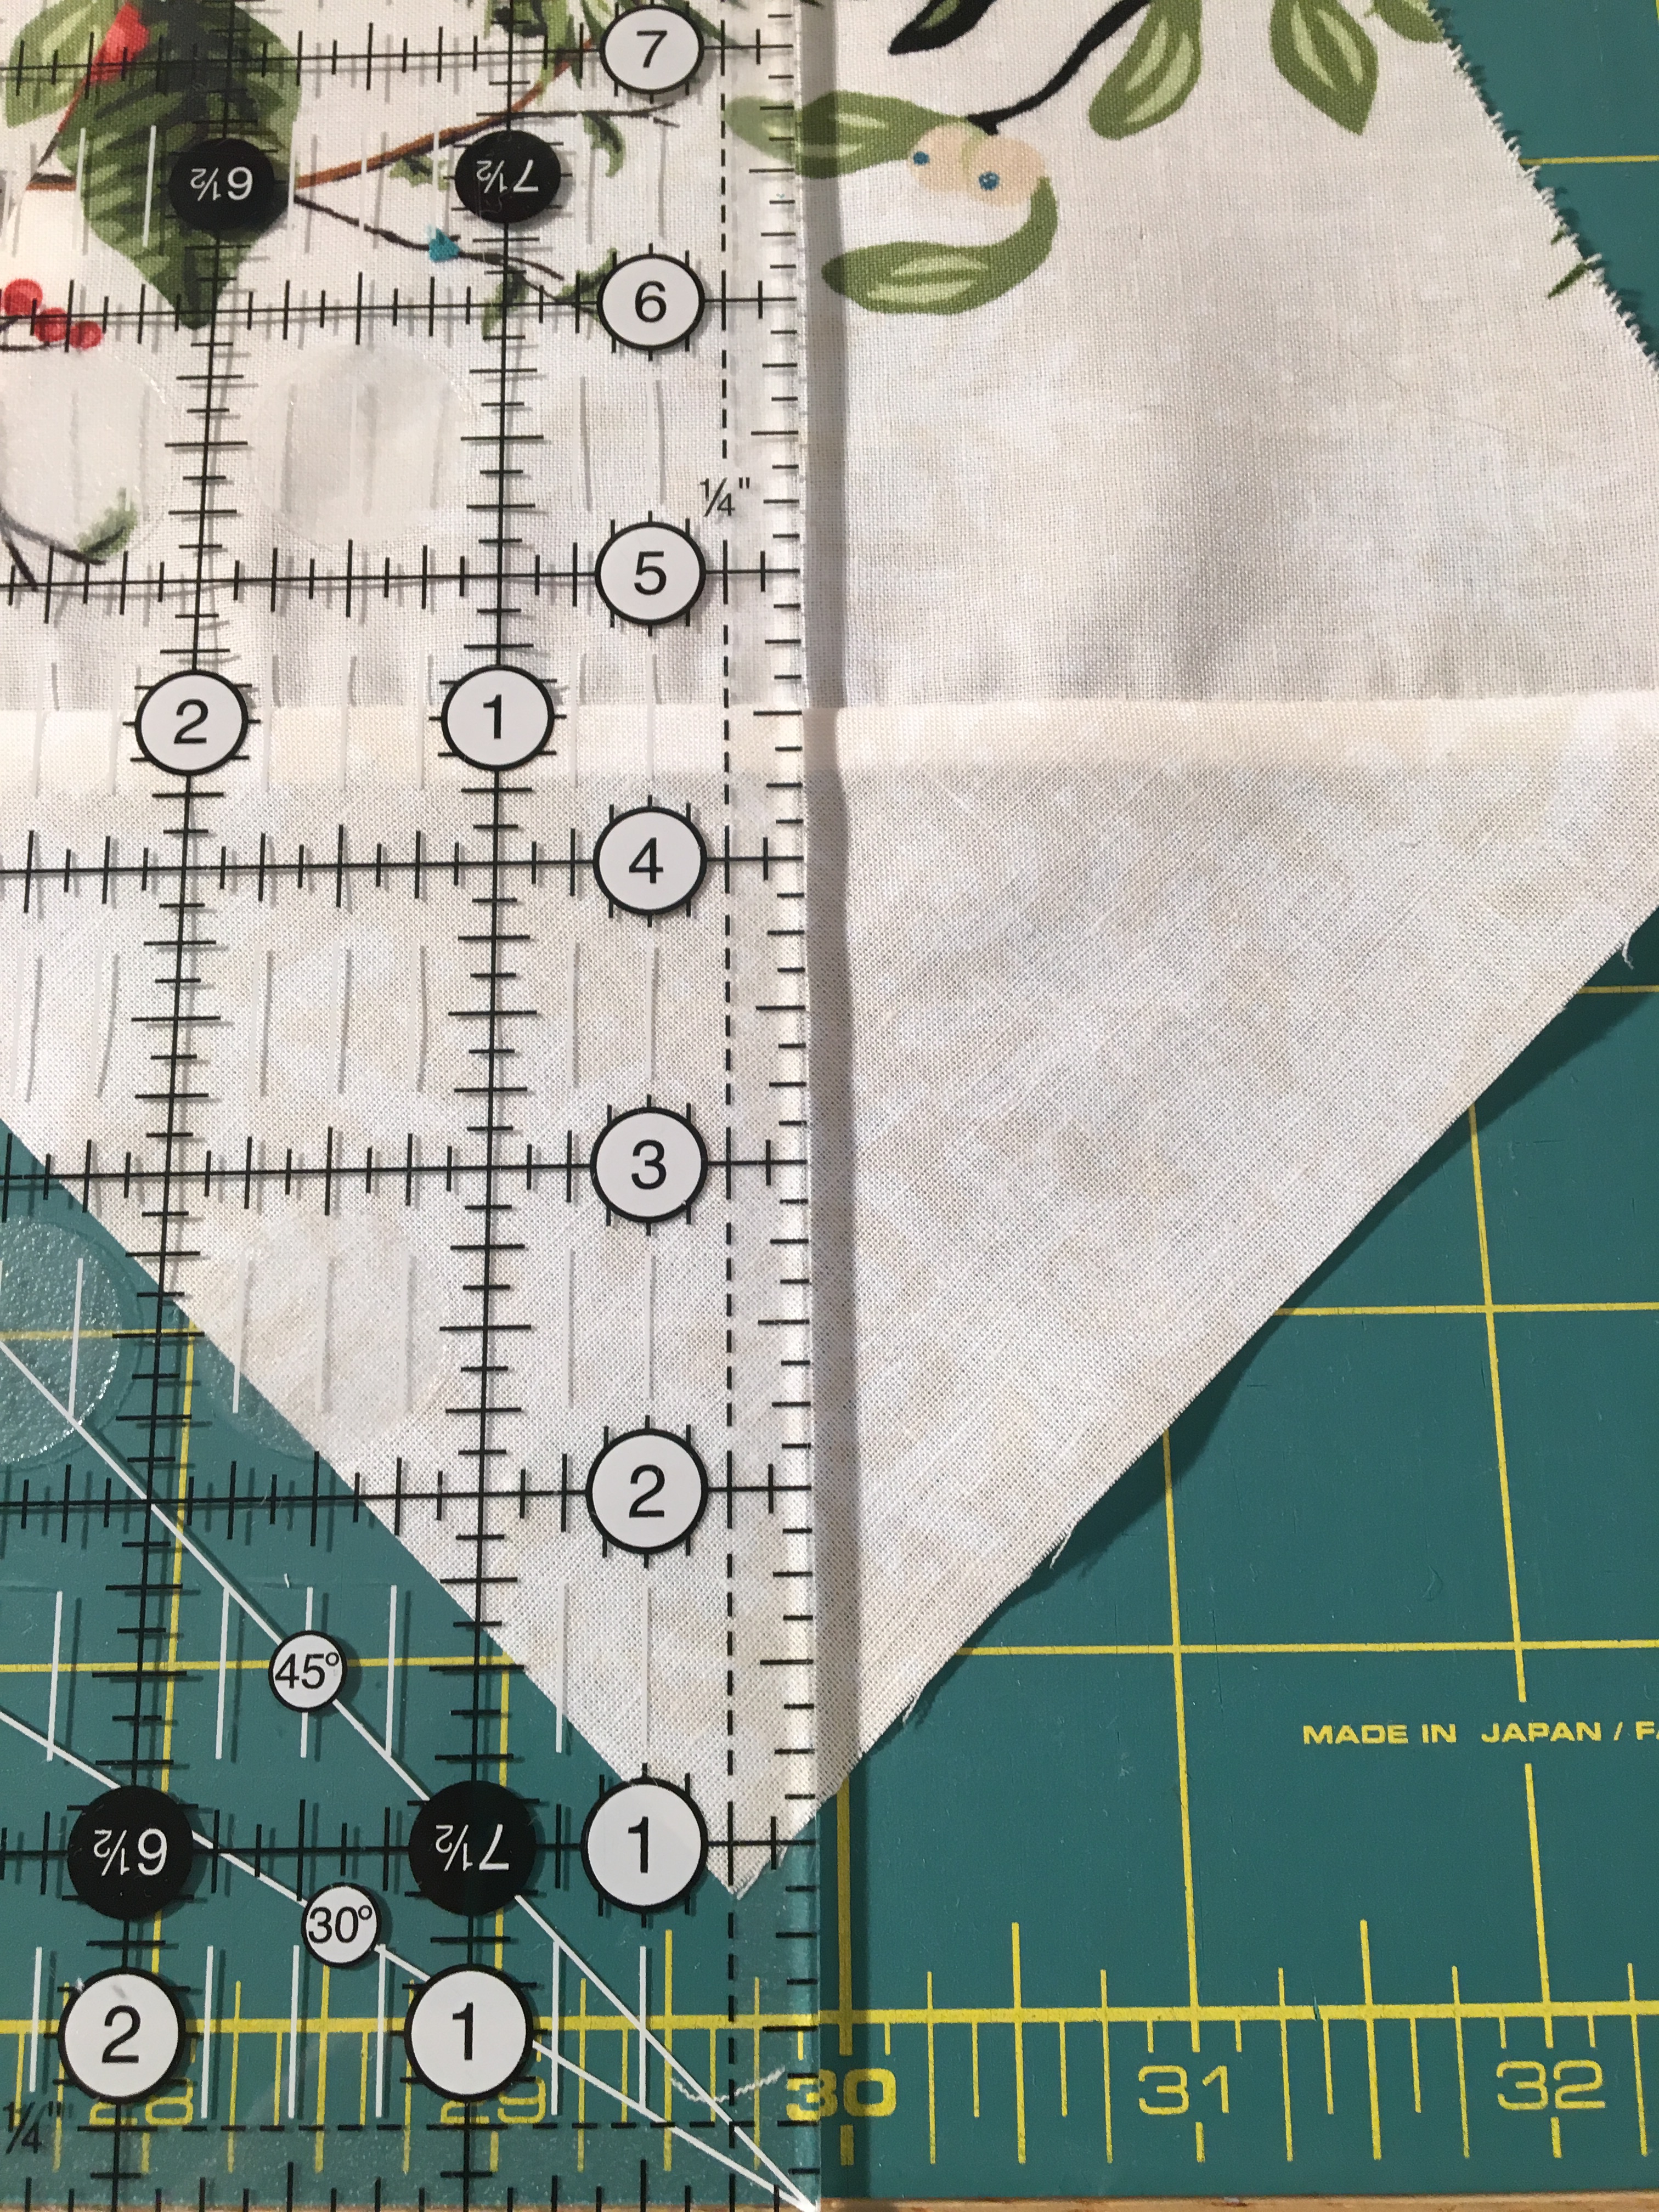
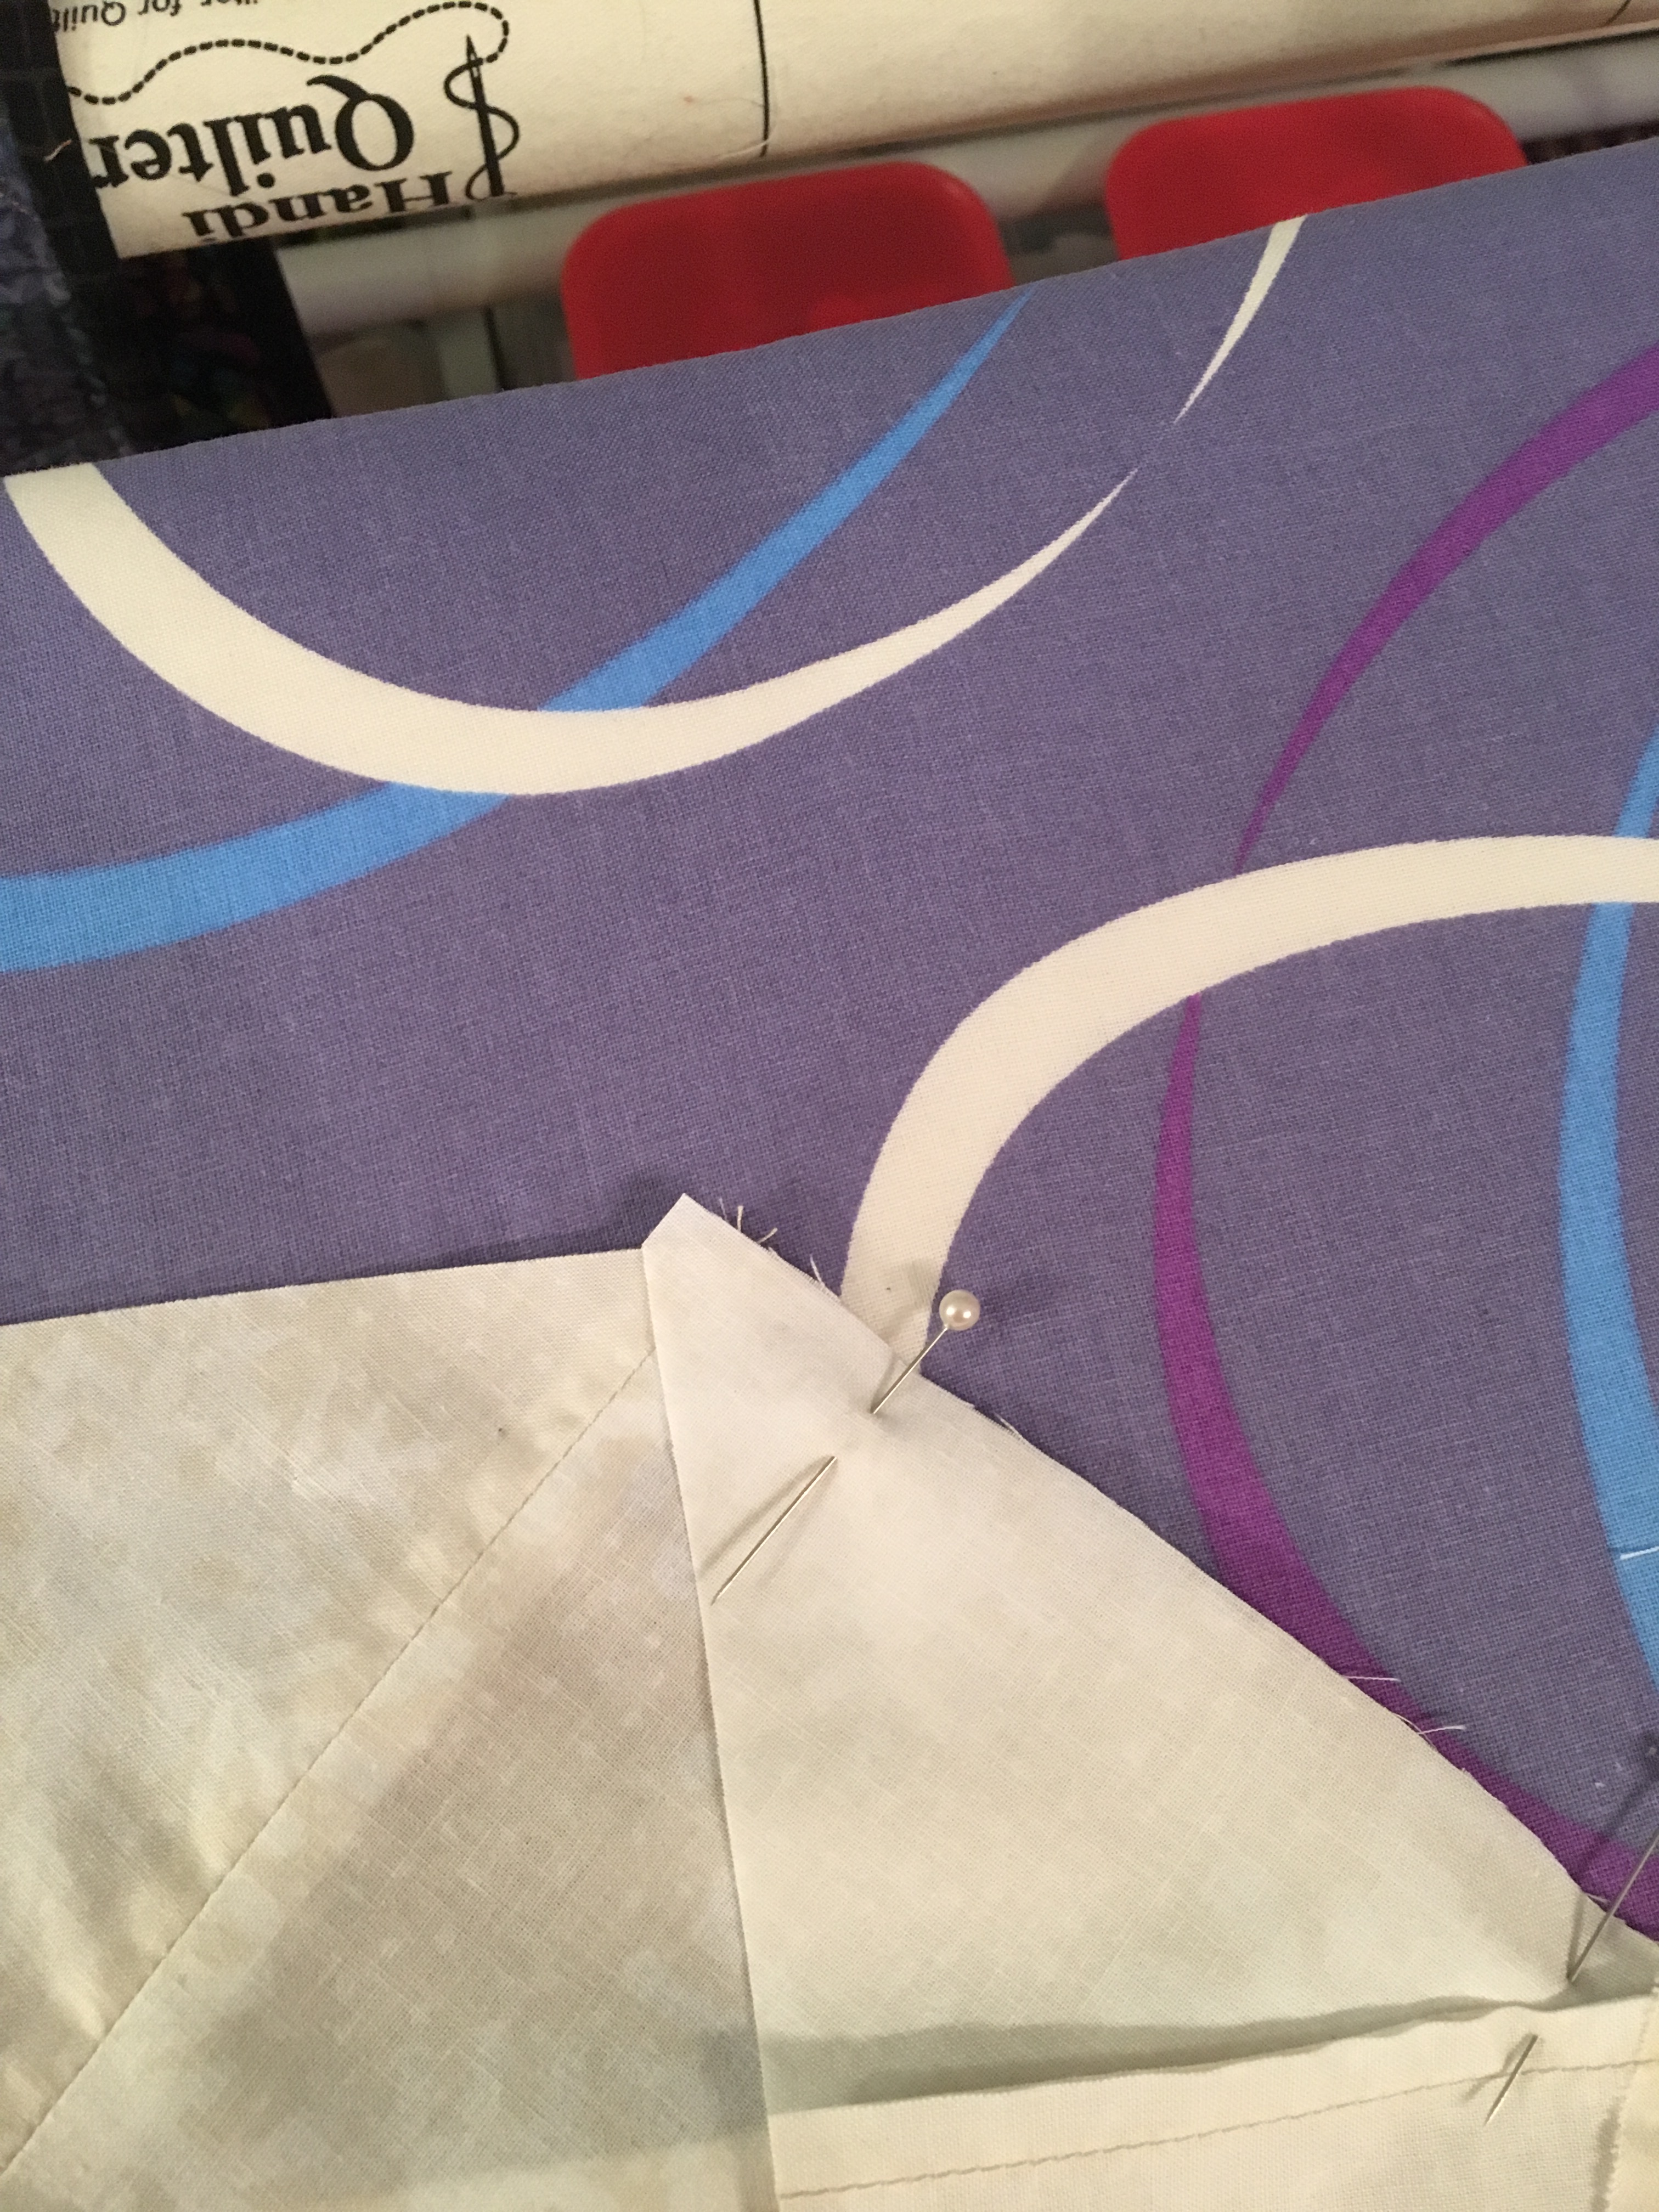
You can trim the side and corner blocks before you sew them into the quilt top.  Be careful!  Make sure to leave a 1/4″ seam.  I used a 24″ long ruler to make this cut.  For the side pieces: Place the block with outside triangles to your right. Line the bottom edge of the  block up on the 45 degree line on your cutting board or on your ruler and cut 1/4″ past the center and through the triangles on the ouside.  Pictures work best ….

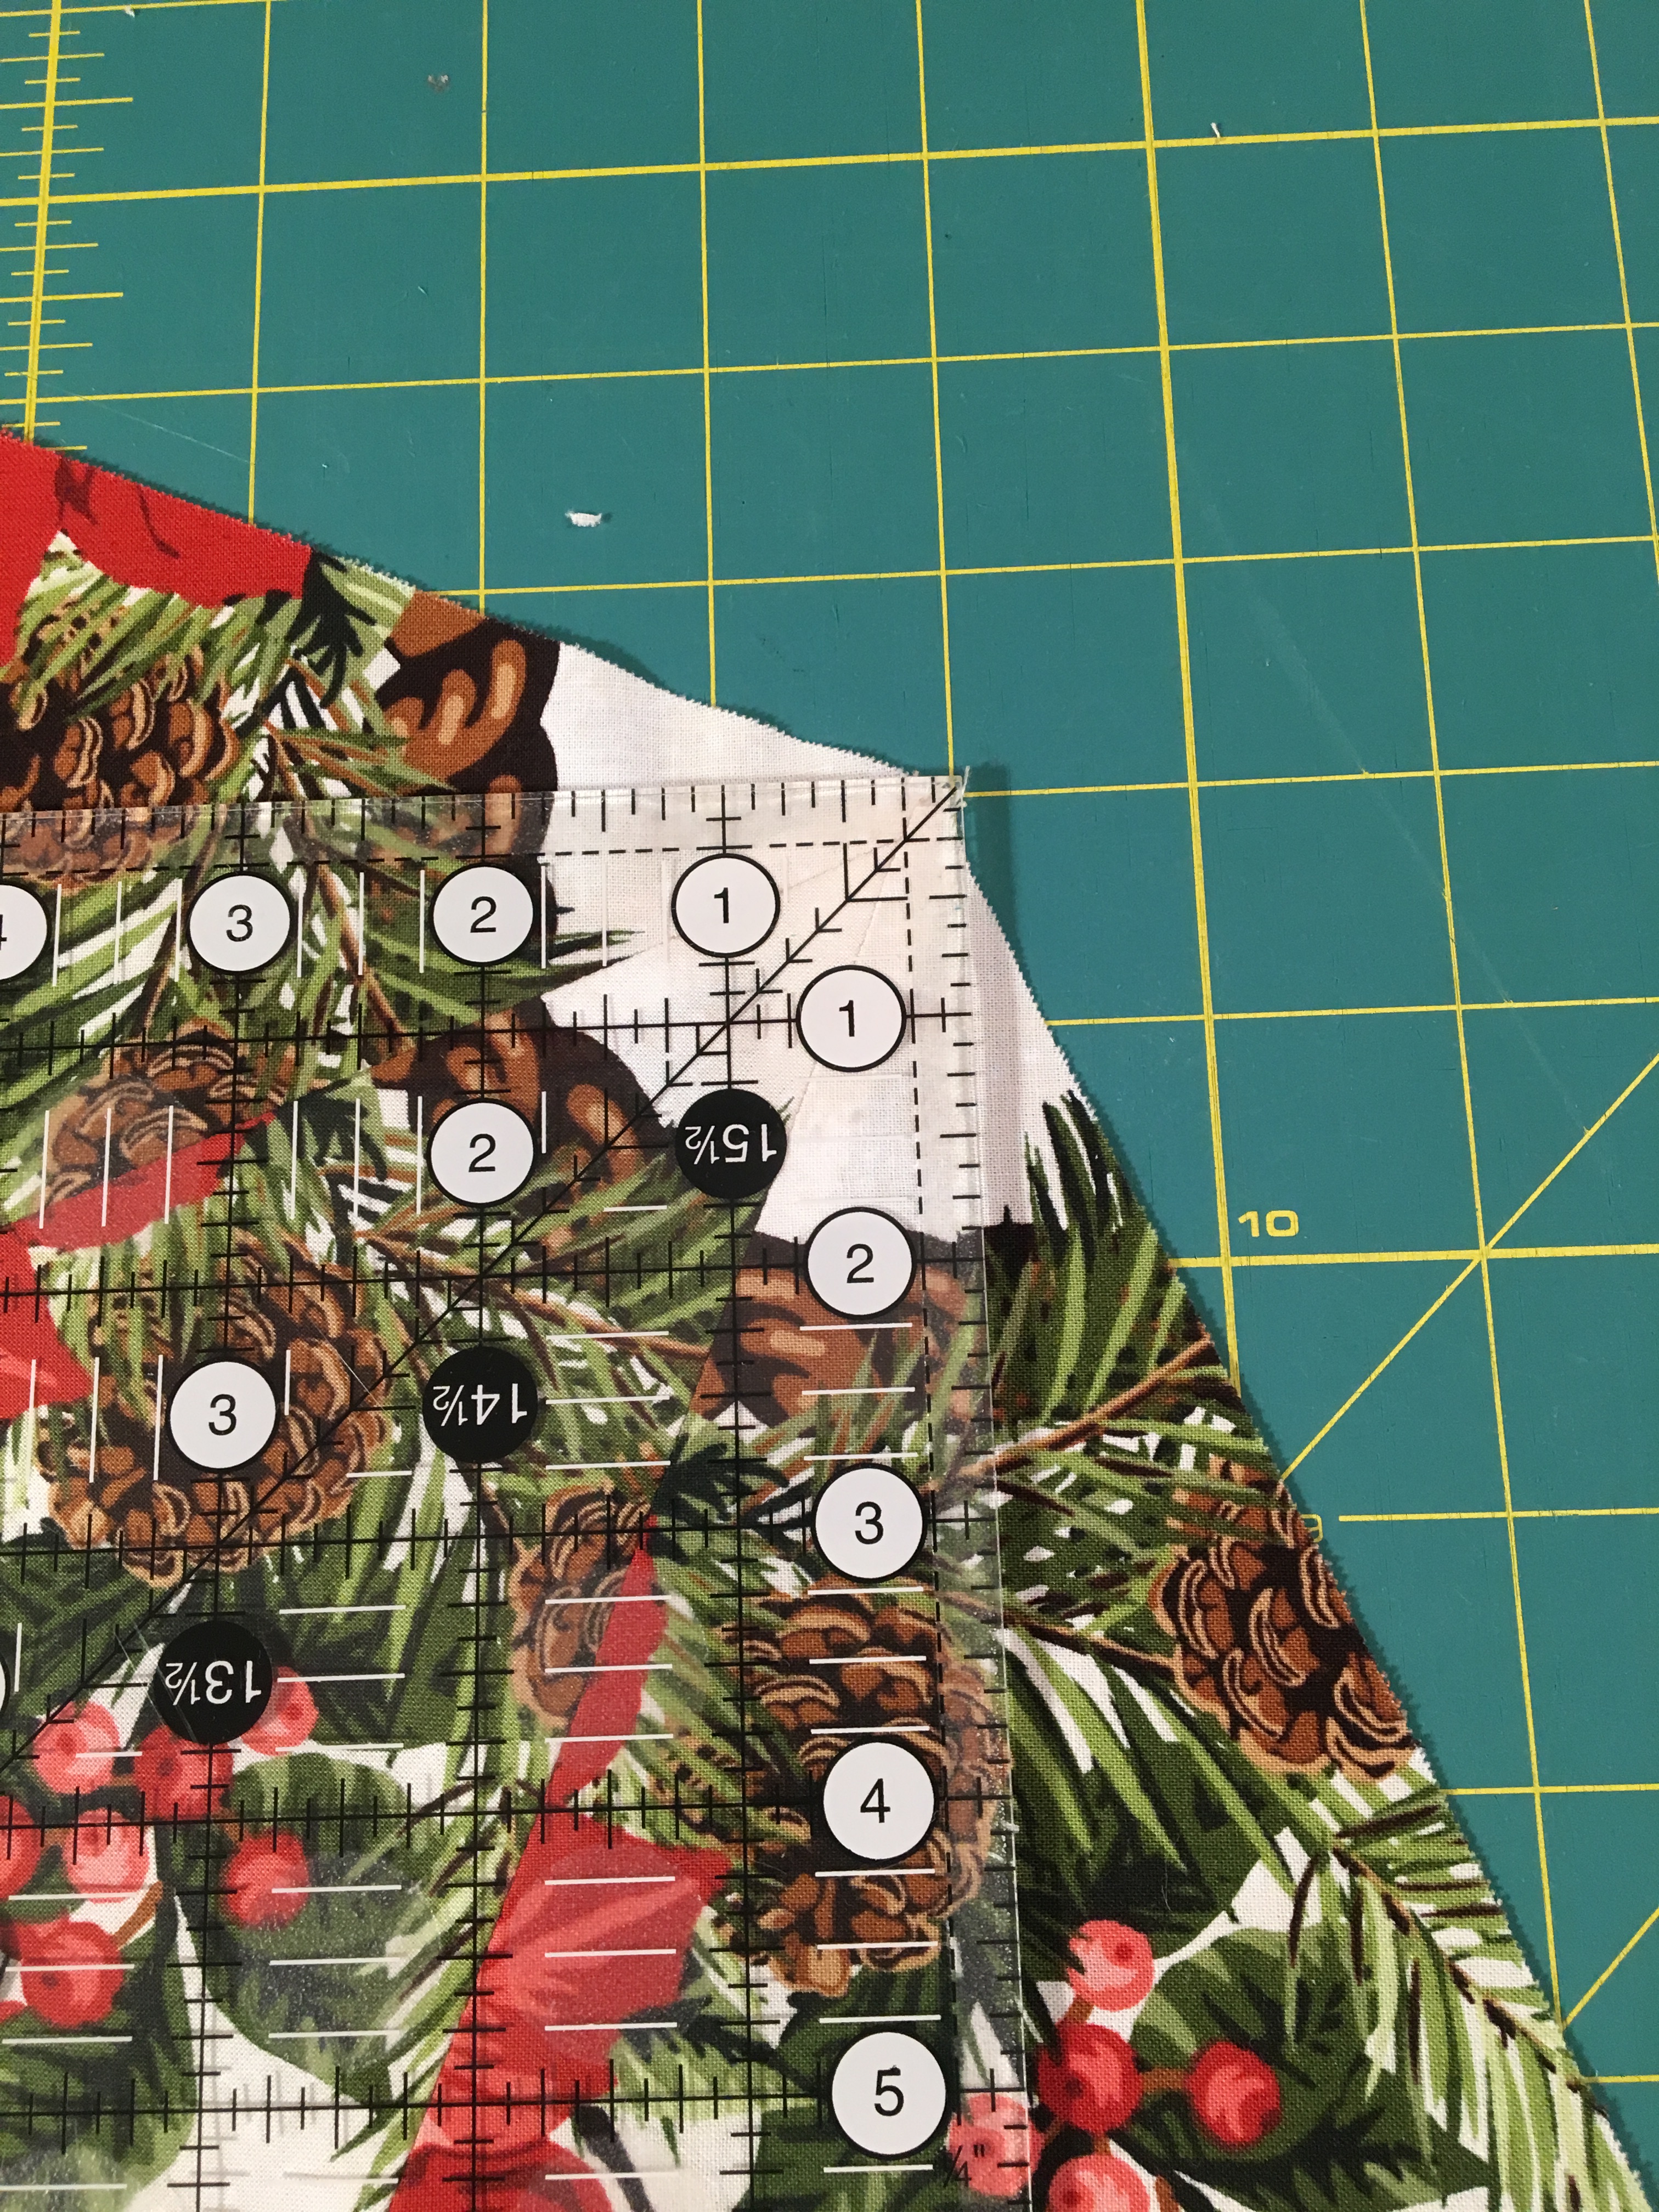
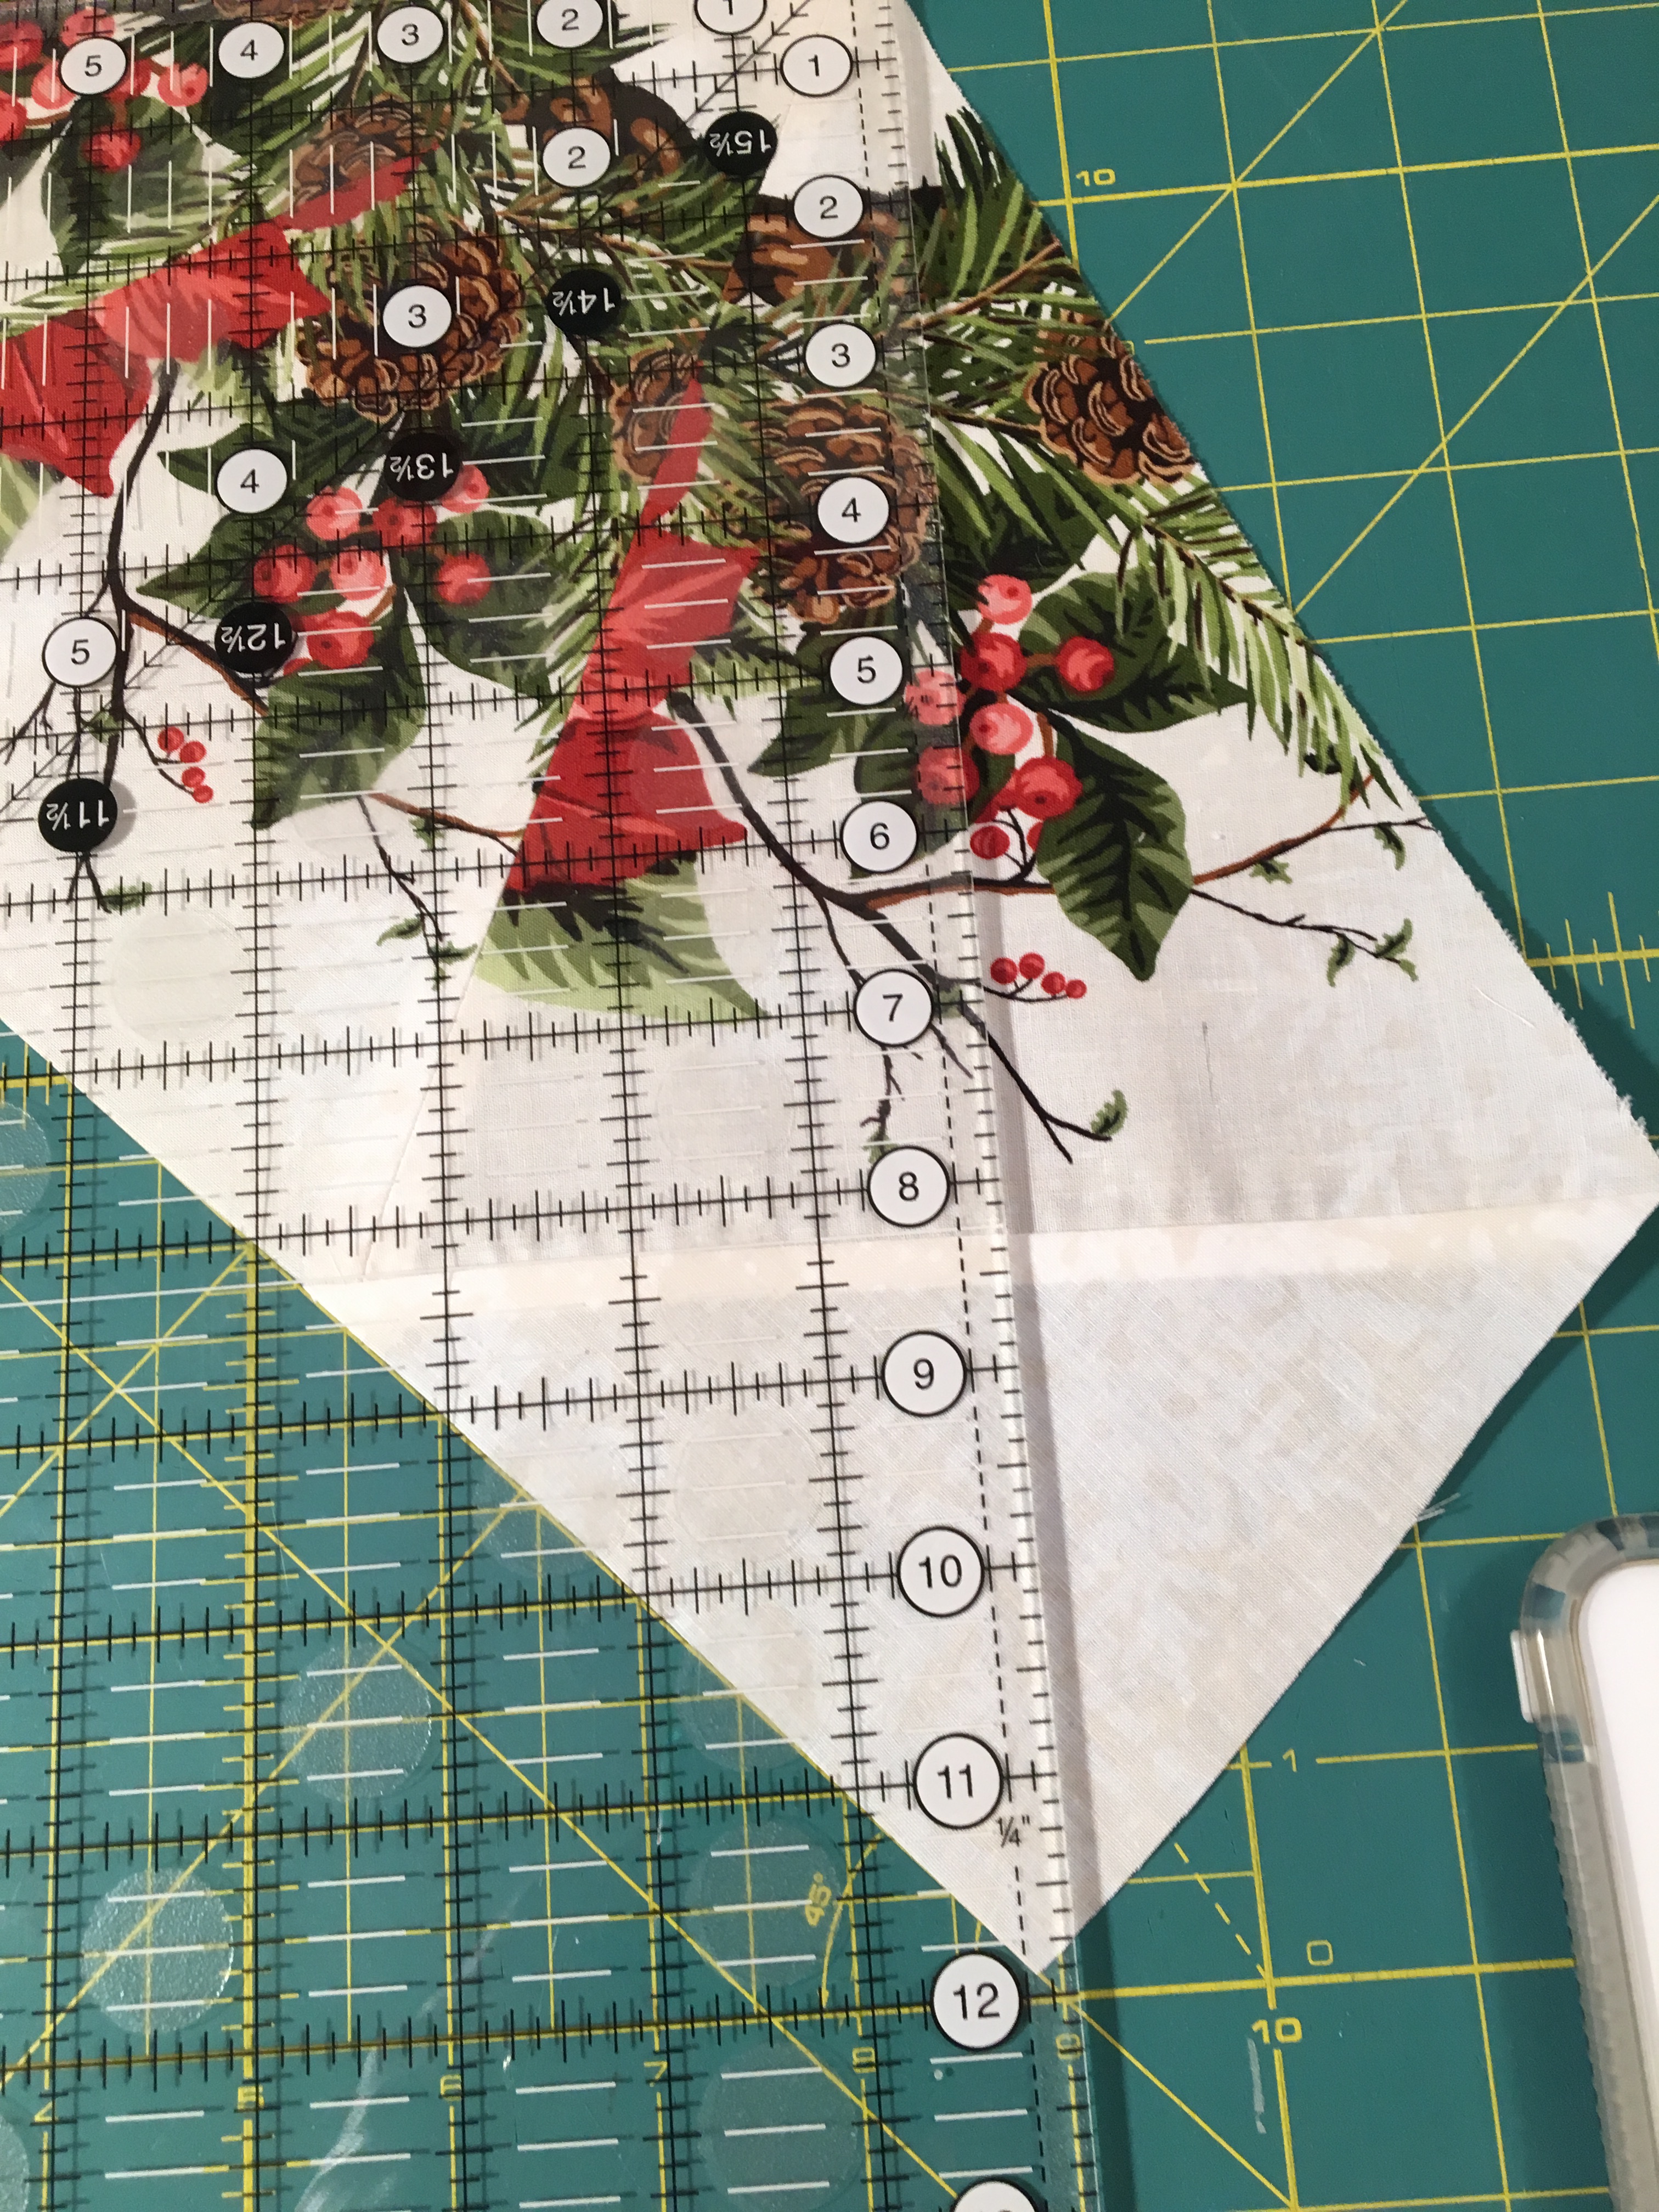
Corner Blocks:  line the longest straight edge up on the 45 degree line on your cutting mat.  Line your 16 1/2″ Square ruler up so that it is 1/4″ away from the center of the outside triangles and cut.

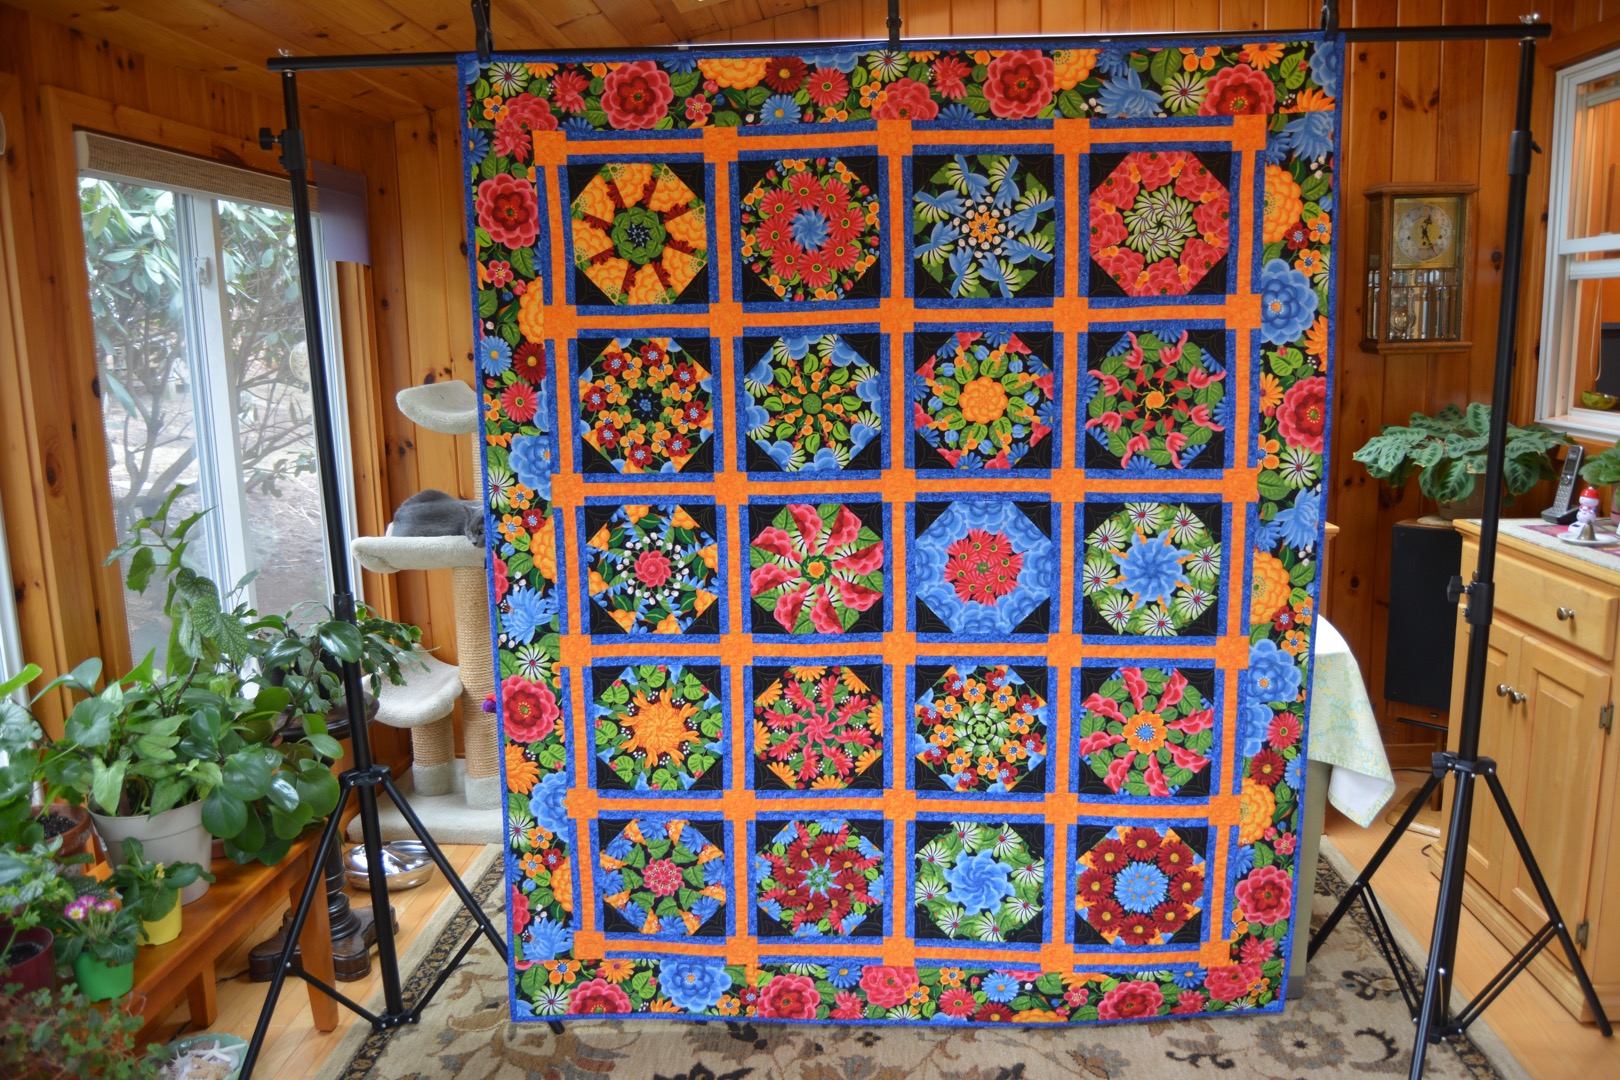
Once all the blocks are prepared arrange them and sew them in diagonal rows as explained in the pattern.

When matching the seams as you sew the blocks together you can fold back the seam to see if you are lining things up correctly.  Pin in place when you have the seams matched up.

If you cut the corner blocks before piecing the rows please be careful to piece the ends so that you leave a seam allowance for the border.

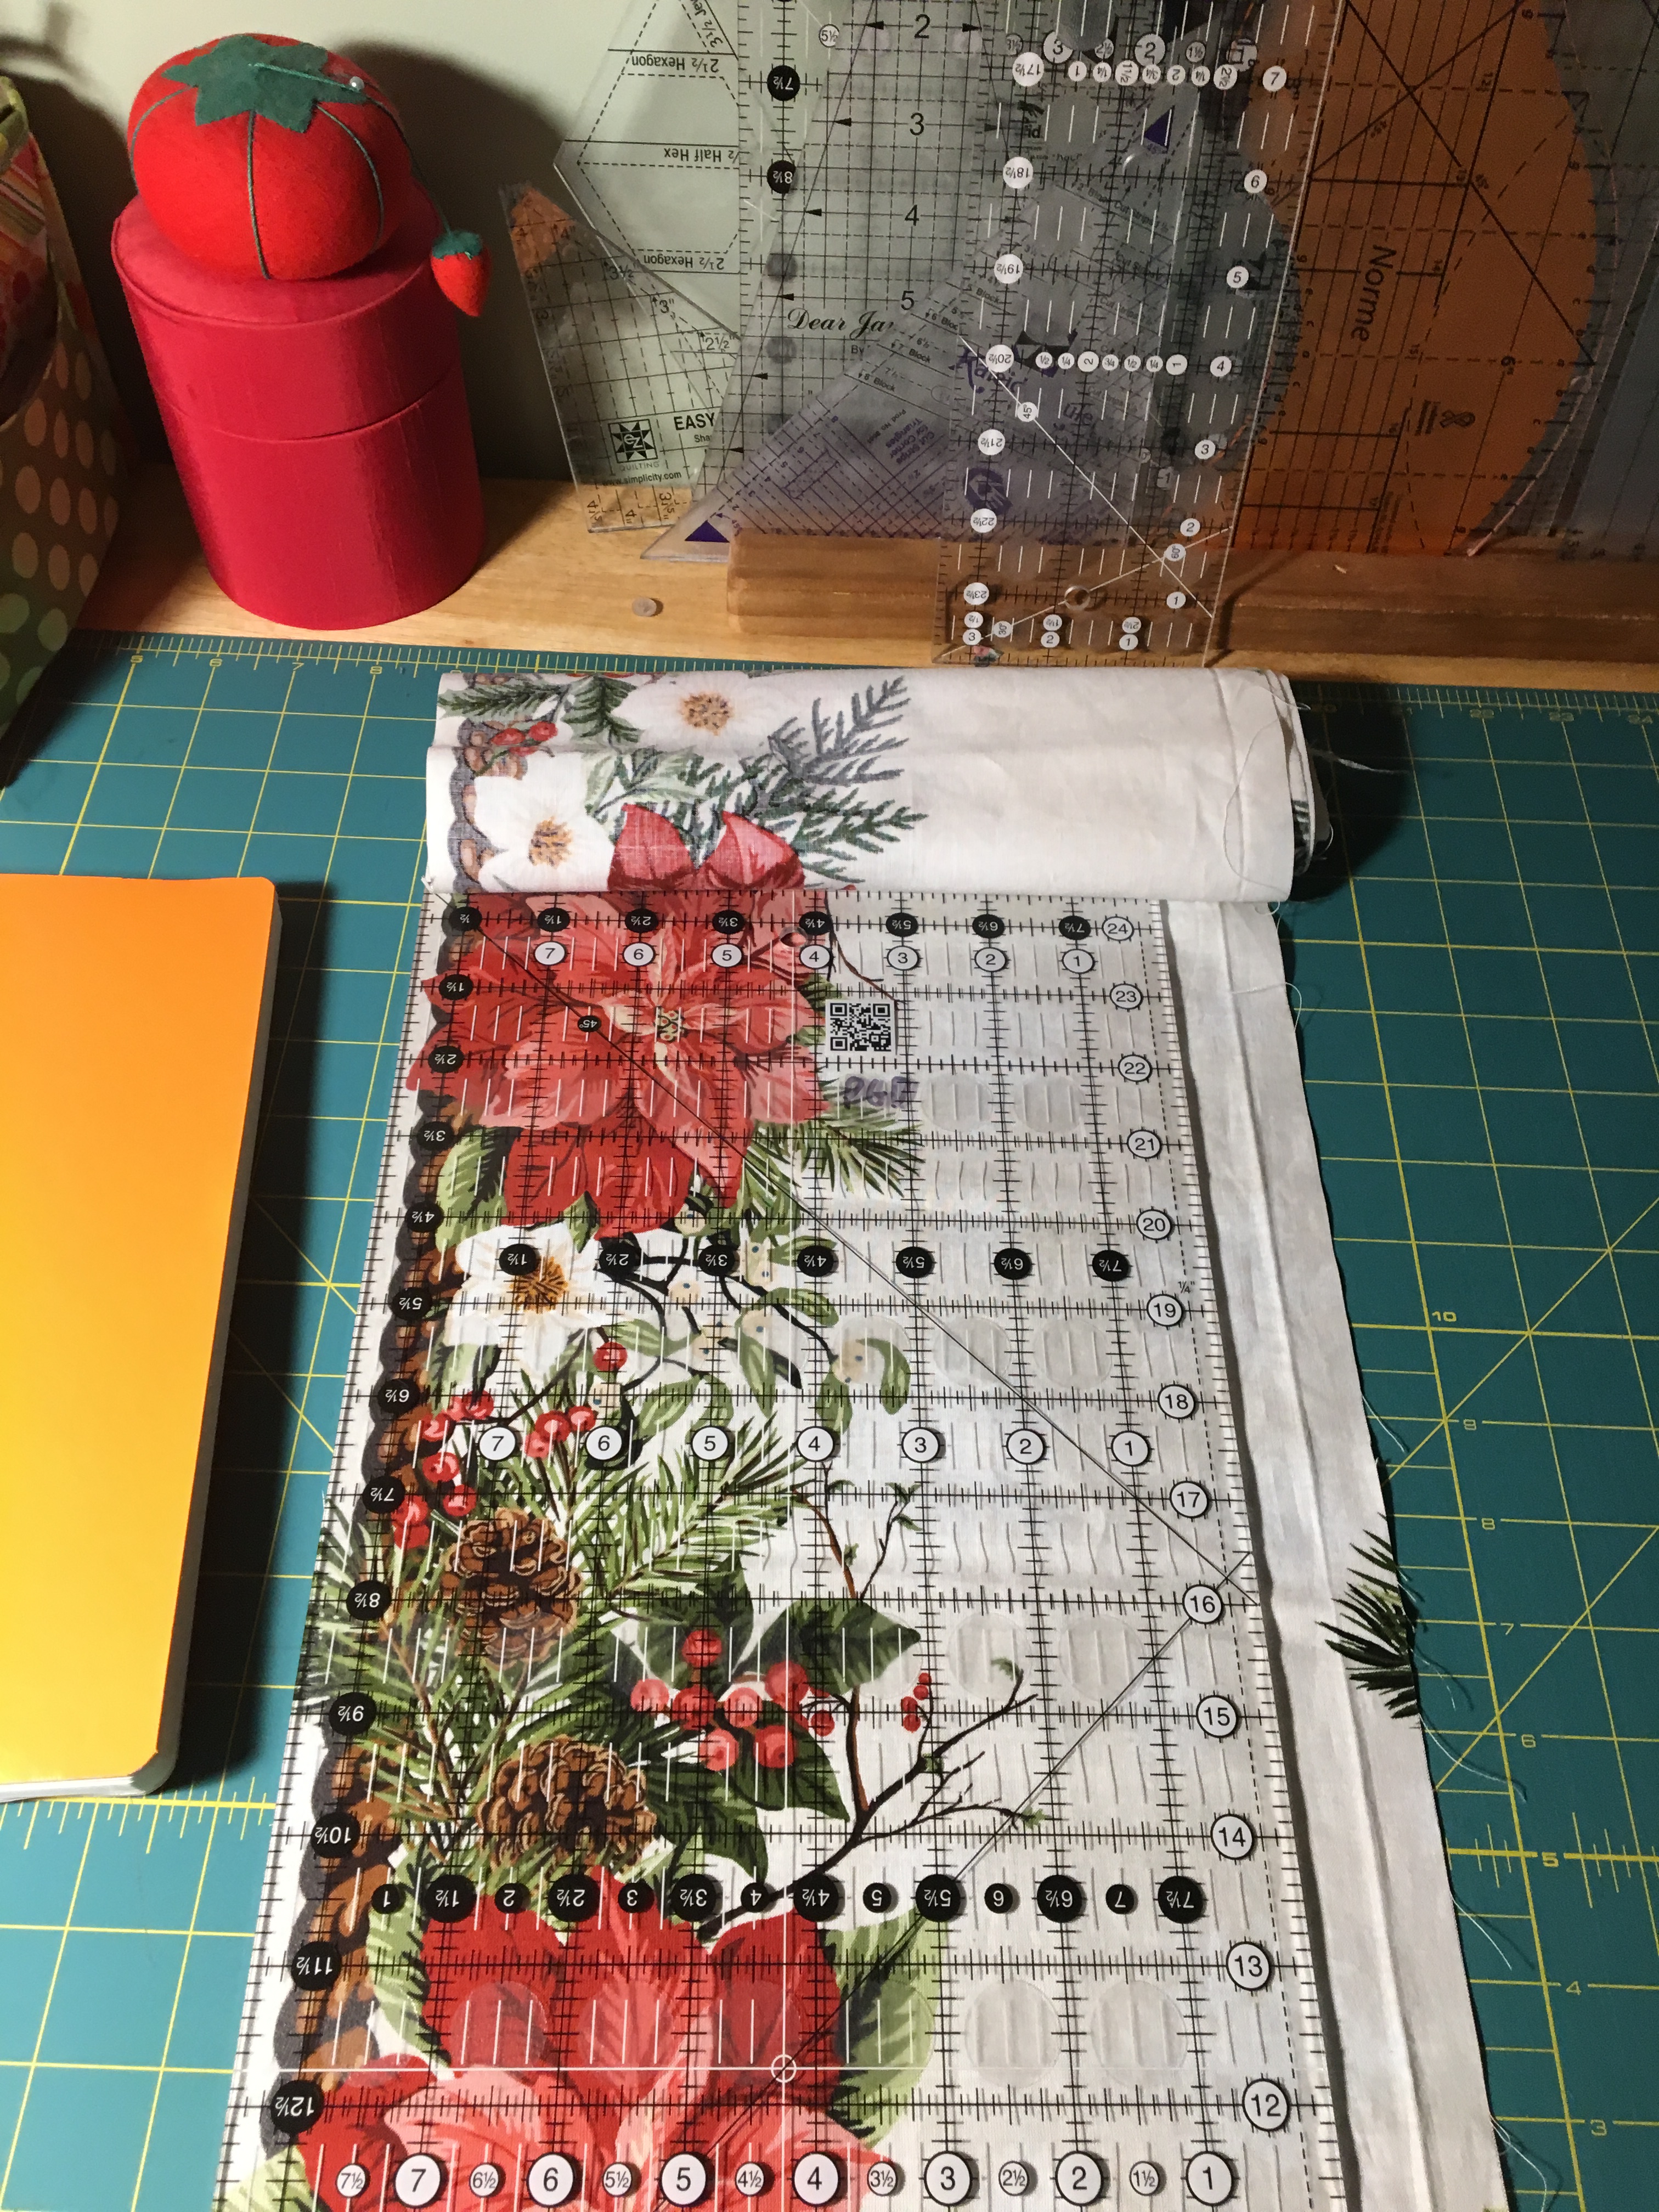
Borders:  cut the remaining yardage into four 8 1/2″ wide border pieces that are each the length of the remaining fabric.  Start by cutting 1/4″ away from the cable design for each of the four pieces.  Then trim each to 8 1/2″ wide.  The best way to manage the fabric is to roll it up and unroll as you cut along the length of the fabric.  Be careful!

Follow the pattern instructions for sewing on the borders.

I pressed the border seams away from the border, but you will have to press the corners towards the border when cutting the mitered corners, then press them back towards the blocks after sewing the corners together.  Here is a photo showing how to trim the ends of the borders.

Please note that becuase of the larger size of these blocks they are not going to be very flat.  The triangles are on the bias and stretched no matter how much best press I used!  My sewing machine cooperated and I was able to ease the fullness into the seams when piecing, but you can see puckering at the seams.

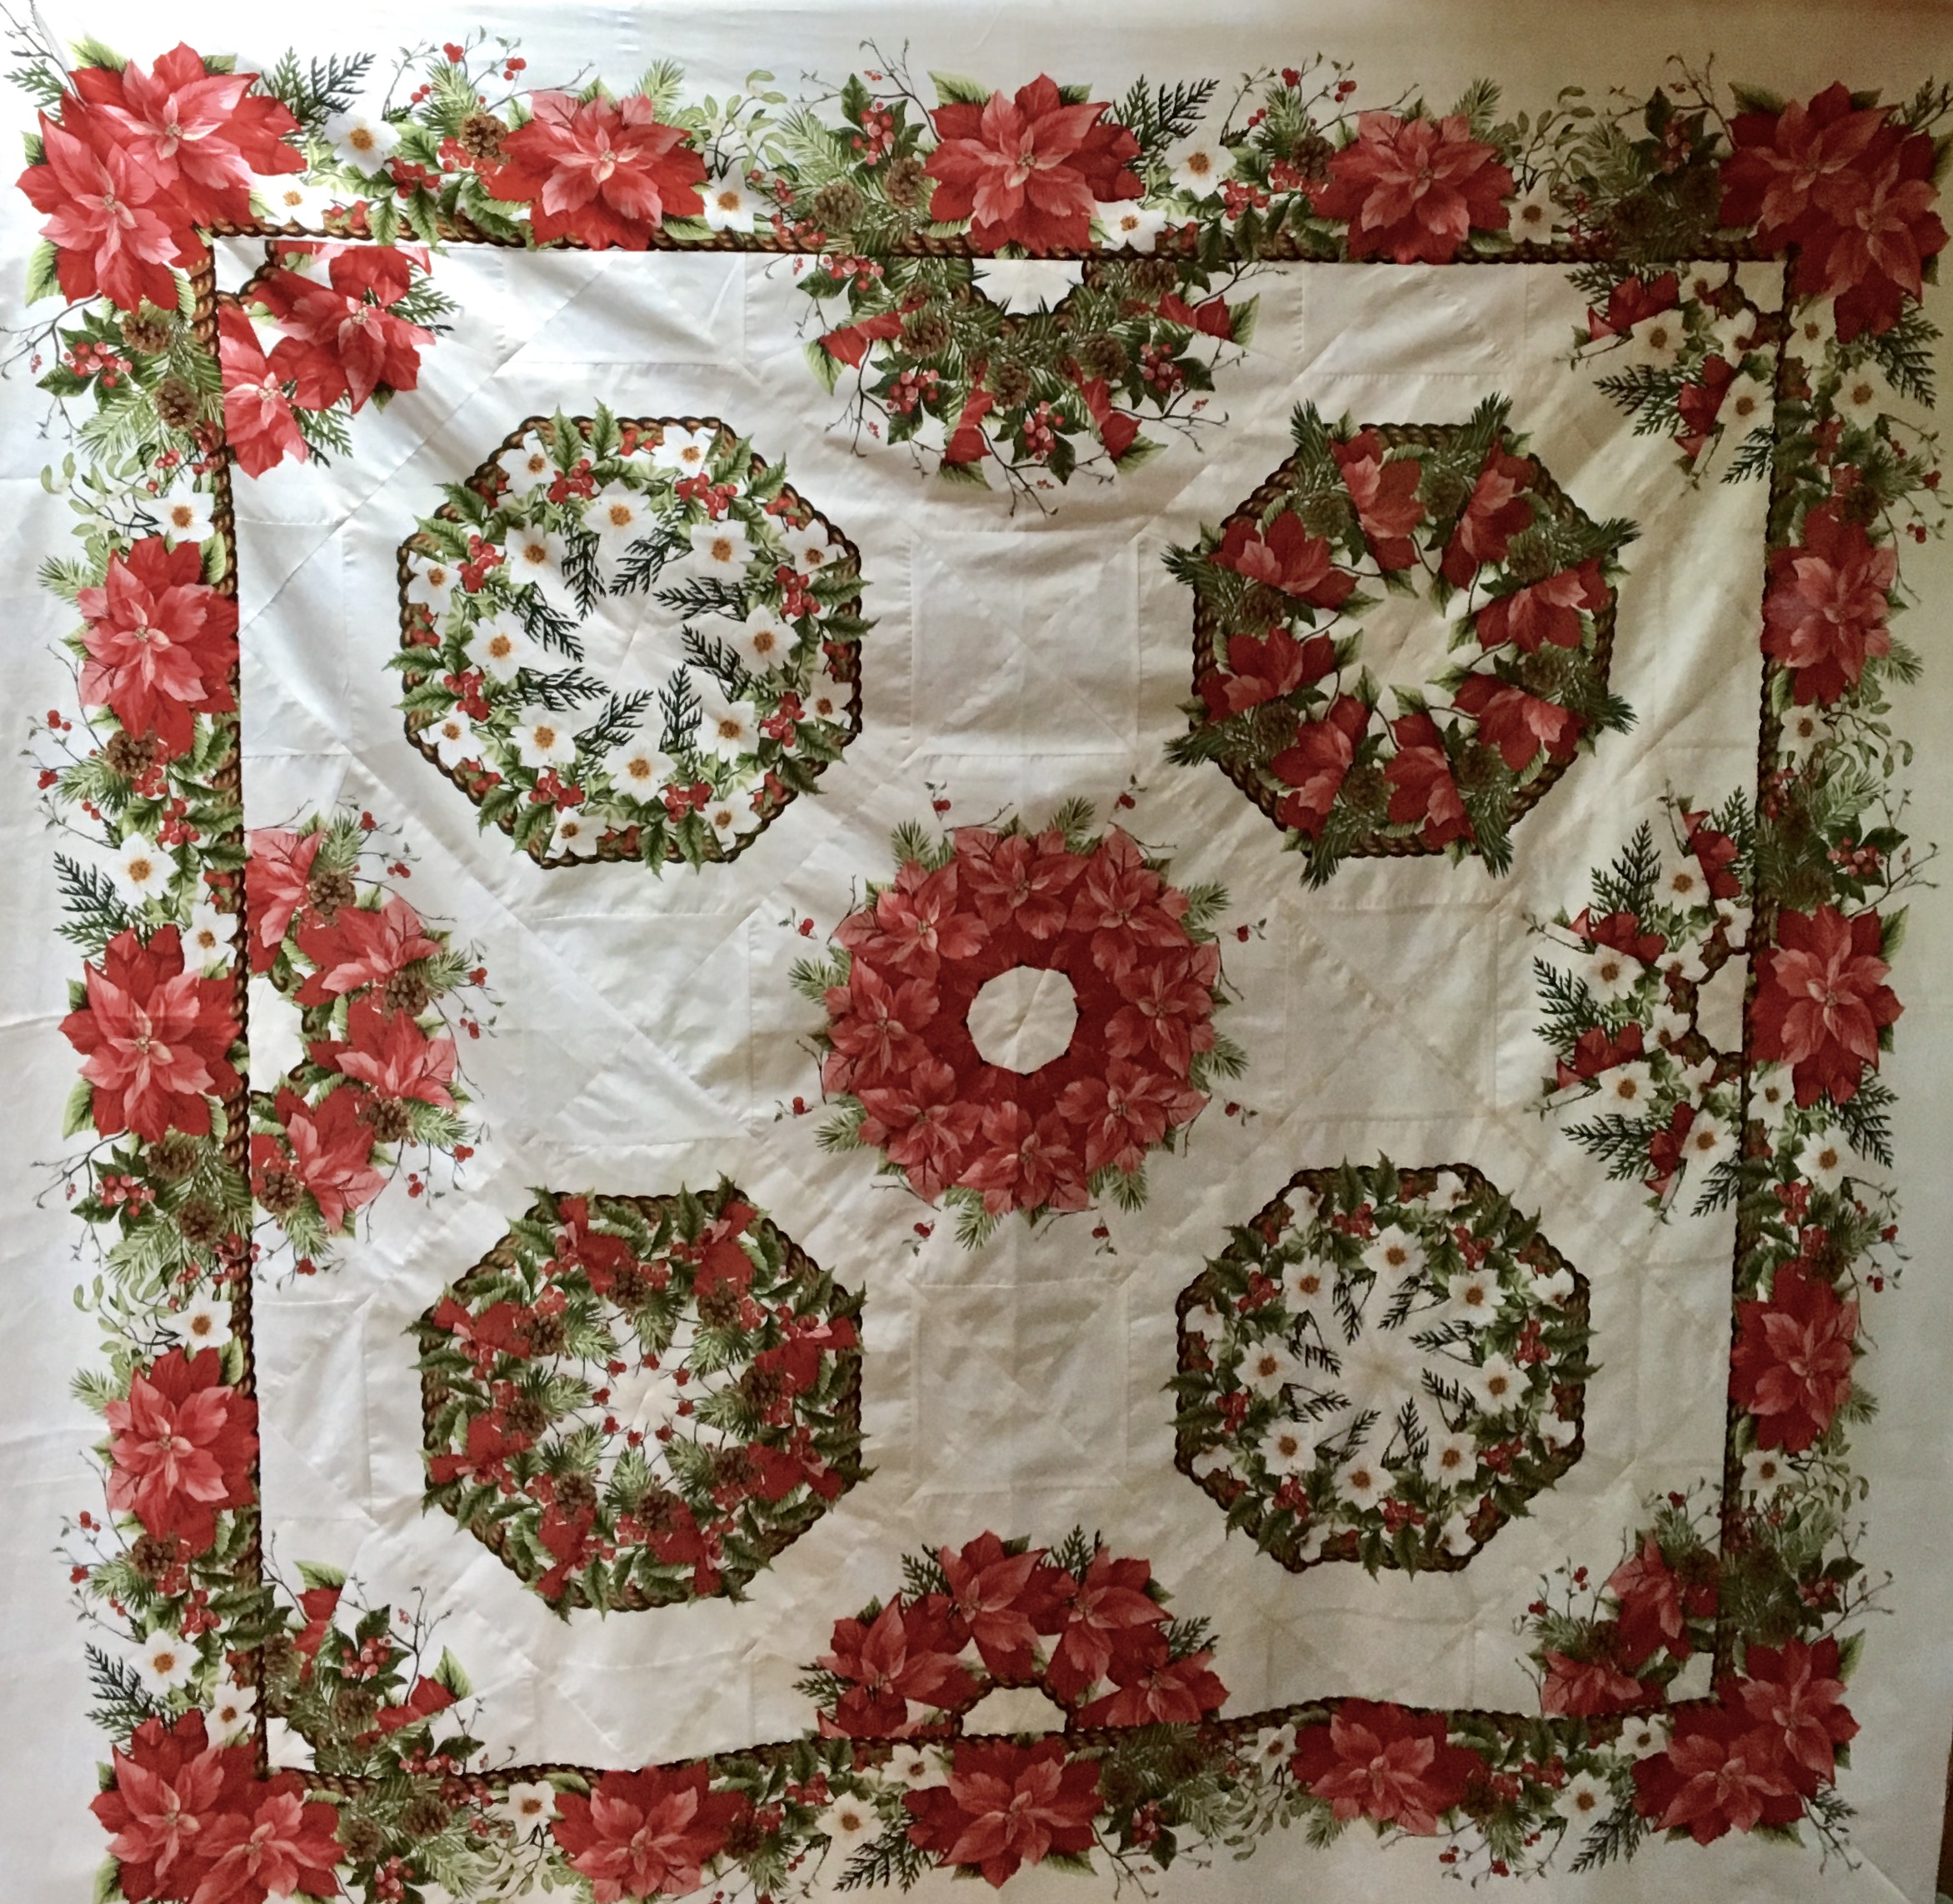
Let’s see how this looks after the top is quilted!

Finished Quilts!!

I have some finished quilts!  There are posts about these quilts so I need to share with everyone.

This is a Block of the Month quilt designed by Antoinette at Quilters Common 

I was working on this in my Modern vs. Reproduction post, but it is decidedly  a Contemporay Quilt.  I am still working on the reproduction version, which is probably still too brown for some people! 😉

Next up is my Kaleidoscope Magic Quilt.  This one has Kaleidoscope blocks where every other piece is the back of the fabric.  Can you see what I mean?


And did I ever show you my finished Slice and Dice Piecing quilt?

Ofcourse I have still not quilted my Dear Jane quilt.  I am thinking about it, though!

Kaleidoscope Magic

I have been having too much fun making kaleidoscope blocks lately.  Every time I look at a fabric now I am wondering how well it might work for kaleidoscope blocks.

Bethany Reynolds has books on this technique which includes patterns for blocks with 45 degree triangle quilts as well as 60 degree triangle quilts, and she also includes patterns using diamonds and half square triangles.  Her books are Stack-n-Whack and Stack-n-Whackier.  Check out your local quilt shop to see if either is available.  They might even order a copy of them for you.   Or you can just make some blocks and create your own quilt or quilts with them.

This week I will be sharing my enthusiasm at Quilters Common  in Wakefield, MA.  I am teaching a workshop on the process for making these quilts.  I also have a pattern available for this quilt which is available exclusively at Quilters Common.

Here is a quick rundown on the process.

I like to look for fabrics with large prints that have different shapes and colors.  You need to pay attention to the repeat of the design on the fabric. You can work with any repeat, but I have found that I like working with a 24″ repeat, which is usually pretty standard with the larger print fabrics.

Since the classic Kaleidoscope block consists of 8 45 degree triangle blocks, you need 8 repeats of the fabric.  8 times 45 is 360, which gives you a full circle!  Plan on buying at least 5 1/2 yards of fabric of your kaleidoscope fabric.

The first thing I do is cut my fabric in half lengthwise.  This way you will be working with half of the width of fabric and this will allow you to have some flexibility with your fabric.  You can either set up two sets of repeats of the fabric for cutting triangles, or you can use the other half of the width of fabric for length of fabric borders.  What you do with the fabric depends on what you have in mind for a quilt.

You can snip and rip your fabric down the length or carefully rotary cut it.  To do this I just rolled the fabric as I went to keep it out of the way.  Snipping if faster and more fun, but it may pull at the threads in the fabric, so don’t do this if your fabric is not a robust weave!

(As you view the photos in this article remember you can click on each to enlarge it.).

Layer the 8 repeats on your cutting board with the salvage on top.  The next thing to do is to carefully cut eight repeats of the fabric.  Each piece should be about 22″ x 24″ and they all should be pretty much the same.  Once you have all eight repeats cut, layer them and match them up by placing a pin through the same spot in all eight layers.  Secure that area that you have pinned by placing a second flat  head pin in and out of the eight layers.  Repeat this process with a few pins about 2″ in and each about 3″ apart from the side of the layers of fabric.

Once you have the pins in place you can take a look at the edge of the layers to see how well lined up they are.  Make some adjustments by repining if necessary.  If everything is lined up then go ahead a cut one strip of fabric for your blocks.  For my pattern I cut 5 1/2″ strips.

Next cut the triangles.  Bethany provides paper templates in her book, but I like using a 45 degree acrylic ruler.  Mine is the Simpli-EZ Ruler by EZ Quilting.  You should get 7 sets if triangles from each strip of fabric.  Cut through all eight layers at once.  Be sure you have a new blade in your rotary cutter.  I like using a larger 60 mm cutter because you get better leverage and a quicker cut.

Next step is to sew your triangles together.  First sew four pairs, then two pairs together and then the two halves together.


Consider trying this!  If the back of your fabric is suitable you can achieve a mirror effect by alternating the back of the fabric with the front!  To do this sew each set with both pieces right side up.

These two photos will give you an idea of the difference between using all of the right side of the fabric and a block with every other triangle with the reverse of the fabric.  The same set of identical triangle pieces were used for both photos.  Both are beautiful!  Which would you use?

To finish the blocks I cut two  4 1/2″ squares for each blocks and then cut them once on the diagonal.  Then I sewed each half square triangle to the corners of the blocks.  The triangles are over sized so that you can trim the blocks to the correct size.

Here is a picture of this quilt in progress:

And here is another finished version of the same quilt pattern.  The blocks on this one are all fabric right side up which creates more of a spiral effect.  Pictures show the front and back of the quilt.

The pattern is available for sale at Craftsy!

And a couple more finished using the same fabric.

… and one just getting started.  (it’s addicting!)