Category Archives: Sewing

Zipper Pouch Inspiration

The Boston Modern Quilt Guild will occasionally have a swap.  In November we were asked to bring a zippered pouch to the monthly meeting. I started checking out Pinterest and Google images for ideas.

I found this lovely Lavender Pouch at Pretty by Hand, but alas no pattern!  But then I found this neet Tutorial at Sew Like my Mom.  I combined the two and came up with my own version that includes a pocket on the back.

Too bad I didn’t get a picture of the bag after I added the turquoise ribbon!

Aunt Virginia’s Plan

This is a follow up to the blog posts about the Butterfly Treasure Quilt.

As I mentioned in my Butterfly Applique Post I gave the Finished Bow Tie Quilt to Pat.  If you recall, from the Quilting Treasures Post, she gave me that quilt top and the Butterfly Blocks ,which she found when she was cleaning out her mother’s house because her mother had moved to an Assisted Living apartment.

Pat had said she would give the finished quilt to her mother, Lydia, for Christmas and when she did her mother remembered the quilt top and told her the story behind it.  When Lydia was 13 years old in 1930 her Aunt Virgina gave her the quilt top and butterfly blocks with the thought that Lydia could improve her sewing skills to impress a young man that Aunt Virginia had in mind for Lydia to marry eventually.

I guess Lydia was not very interested in the young man because she never did finish the quilts!  So Aunt Virginia’s scheme did not go as planned.  But Lydia did keep those quilting treasures all these years for Pat to find and give to me.

I am glad that Lydia had the opportunity to share this bit of quilt history with her daughter Pat, because the day after Christmas Lydia fell and broke her hip.  The fall was because her heart was so weak, and she passed away on January 4th.  Lydia was 97 years old.

My heart goes out to Pat during her time of grief and I will always remember Lydia and her Aunt Virginia’s plan when I snuggle under my Butterfly Treasure quilt.


Holiday Cheer Gift Bag

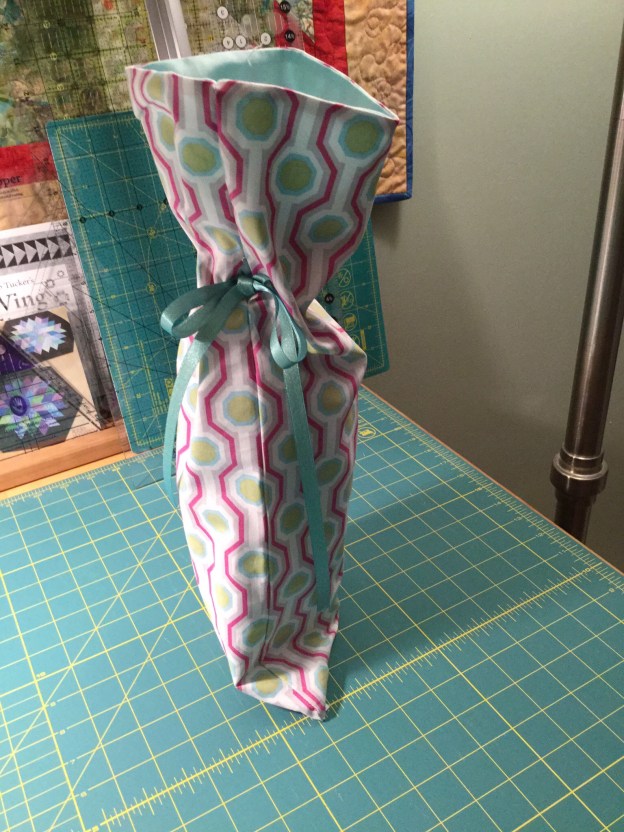
Here is a quick pattern for a Holiday Gift Bag.  This little pouch is a good size for a bottle of wine or perhaps a bottle of Pear Vodka for your Hairdresser! Debi was VERY happy with her Pear Vodka.  Start with two coordinating pieces of fabric each 15″ x 18″ and one 20″ piece of ribbon.  Place the two pieces of fabric right sides together and sew a seam across the short edge on one side.

image

Open up the two pieces with the seam in the middle and fold in half lengthwise, right sides together.

image

Now sew seams as follows:

Start on the fabric you want on the outside edge about 4″ or so from the first seam sewn.  The starting point can be adjusted depending on the length of the neck of your gift bottle. Sew from this point towards the inside (lining) fabric and continue along until you get around the first corner.  Then STOP!  Leave a gap of a few inches, so you can turn everything right side out, and start sewing again until you get to the folded edge, and then stop.  Start again at the fold by the bottom of the outside fabric and continue towards where you first started, but STOP before you reach that point to leave an opening that is large enough for your ribbon. Don’t forget to secure your stitches when starting and stopping.

My stitching is a bit messy because my first ribbon gap was too high!

image

Now, reach inside the opening and scrunch the tube up until you reach the other end and pull it through so your tube is now right side out.  Adjust the corners and press the opening closed.  Sew along the bottom edge to close the opening.


Fold the lining inside of the bag (it is now a bag!). Find the ribbon opening on the side seam. Pin a safety pin to one end of your ribbon and run it through the hole, around the bag and out again.

image

Put your bottle in the bag, tie the ribbon and clip the ends. Debi said she liked the gift bag, too!

image

This pattern can be adjusted as needed to accommodate any gift!

Happy Holidays and Cheers!

bmqg gift swap

Boston Modern Quilt Guild Gift Swap

Just a quick post to Thank Yvonne for the gift she sent me for the Boston Modern Quilt Guild Gift Swap.  Yvonne didn’t make it to the meeting, so she sent me a box full of goodies … a perfectly crafted fabric basket for organizing things, a pin cushion that has programmed stitching which says “Patrice loves to Sew” (yes!!) and a jazzy, roomy wristlet wallet.  But then there was more … the rest of the buttons used for the basket and also a bar of scented soap!  Thank you, Yvonne!

And also thanks to Jenn for organizing the whole swap!

Here is another picture of the basket, which I have already put to work, along with the rest of my Goodies:

P1040401


Kerryn Bag Class

Yesterday I taught the Kerryn Tote Bag class at Quilter’s Common in Wakefield, MA.

I had two students and Colette also joined us to work on a shop sample.

Joyce and Nancy finished their bags, and Colette almost finished hers.  I have to thank Colette for a couple of great ideas …

1.  Add fusible interfacing to one of the lining pocket pieces to add more stability to the inside pocket section.

2.  To shape the bottom of the bag:  After sewing the pocket sectioning seams from “pocket top” to “pocket top”, sew two seams from one side to the other of the 36″ x 21″ bag and lining pieces.  The seams should be 3″ apart in the center of the bag and lining pieces.

It was great fun spending the day sewing with the ladies at the shop.  I may be teaching the class again sometime in the future and will post when that is scheduled.  In the mean time the pattern is for sale as a downloadable file in my Craftsy Shop.


Cute Waterproof Cosmetic Bag

Just wanted to share this cute little cosmetic bag that I made to go with my beach bag.  I was heading over to our friend’s house for a day at the pool and all I had were quilted bags and of course I knew my wet bathing suit would soak through those!  I had some left over pet screen from my beach bag so I put this together … the next day … to replace the plastic zip lock bag that I used that day.

screen_pouch_50

Pillowcase Contest for Charity

I am participating in a Pillowcase Contest for charity.  It is being held at Quilters Common in Wakefield, MA.  The pillowcases will go to the Boston Chapter of “Conkerr Cancer” and “Hole in the Wall Gang Camp” for seriously ill children.  To vote you put a quarter, or more, in the box for the pillowcase you like.  The money collected for the votes will go to “Friends Fighting Breast Cancer”.  Also, when submitting a pillowcase for the contest you had to donate a non-perishable food item for the Wakefield Interfaith Food Pantry.  So, lots of opportunities to help out!

Here is the pillowcase that I entered into the contest.  I found an embroidery design from Radiant Blossoms II collection by OESD which I modified a bit, and changed the colors to go with the pillowcase fabric.  If I win I will get a $50 gift certificate for Quilters Common.

Please Vote for my pillowcase.  Vote Early and Vote Often! embroidery

The Quilted Tote Bag

When I first started using my Quilt Frame I took yards of fabric and quilted them for practice.  Around the same time my friend’s daughter was starting college and she asked me if I would make a tote bag for her to carry books and a laptop.  I had been thinking about making tote bags with my yards of quilted fabric, and thus we have the Kerryn Bag!

The bag has pockets on the outside and more on the inside.  It has a button and tab closure which is easy to add on after you have put the bag together.  These bags have been very popular and I often get requests for them.

kerryn-bag-craftsy

inside

zipperbags

If you would like to make this bag, I will be teaching a class at Quilters Common in Wakefield, MA on September 27, 2013.  The pattern for the bag is currently for sale at Quilters Common, and also in my Craftsy store.

To make this bag you will have to use a Jeans needle and have a machine that is comfortable sewing through several layers of quilted fabric.  To make the corners of the bag you need to sew through four layers, which means 6 layers at the seams!  If your machine is happy to do that for you then you might enjoy making your own tote bag.

I usually have enough fabric for a little purse or a cosmetic bag, or both!!


Bet you can’t make just one

Pillow Cases!!  Never buy a pillow case again.  I made these using a couple of kits from Peggy Anne’s Quilting and Sewing Company, and also one to match the curtains in the room.


Green and Orange Flower Cases

The Patrice Case


The Orange and Green Striped case is actually named after me and you may purchase this kit and have your own Patrice Pillow Case.  Yes, I do love orange and green.  The kit was a surprise from Peggy Anne.  When the package arrived I was wearing my orange shirt with a green sweater!  Yes I was!!!

The best way to make these pillow cases is with the roll up method. If you add the piping and you are finishing with the French seams I would suggest using a jeans needle and you may need the height compensating tool!

Curtains