Category Archives: Applique

Reverse Applique for Susie Q

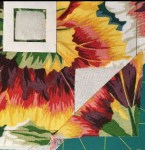
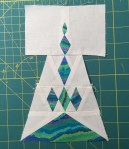
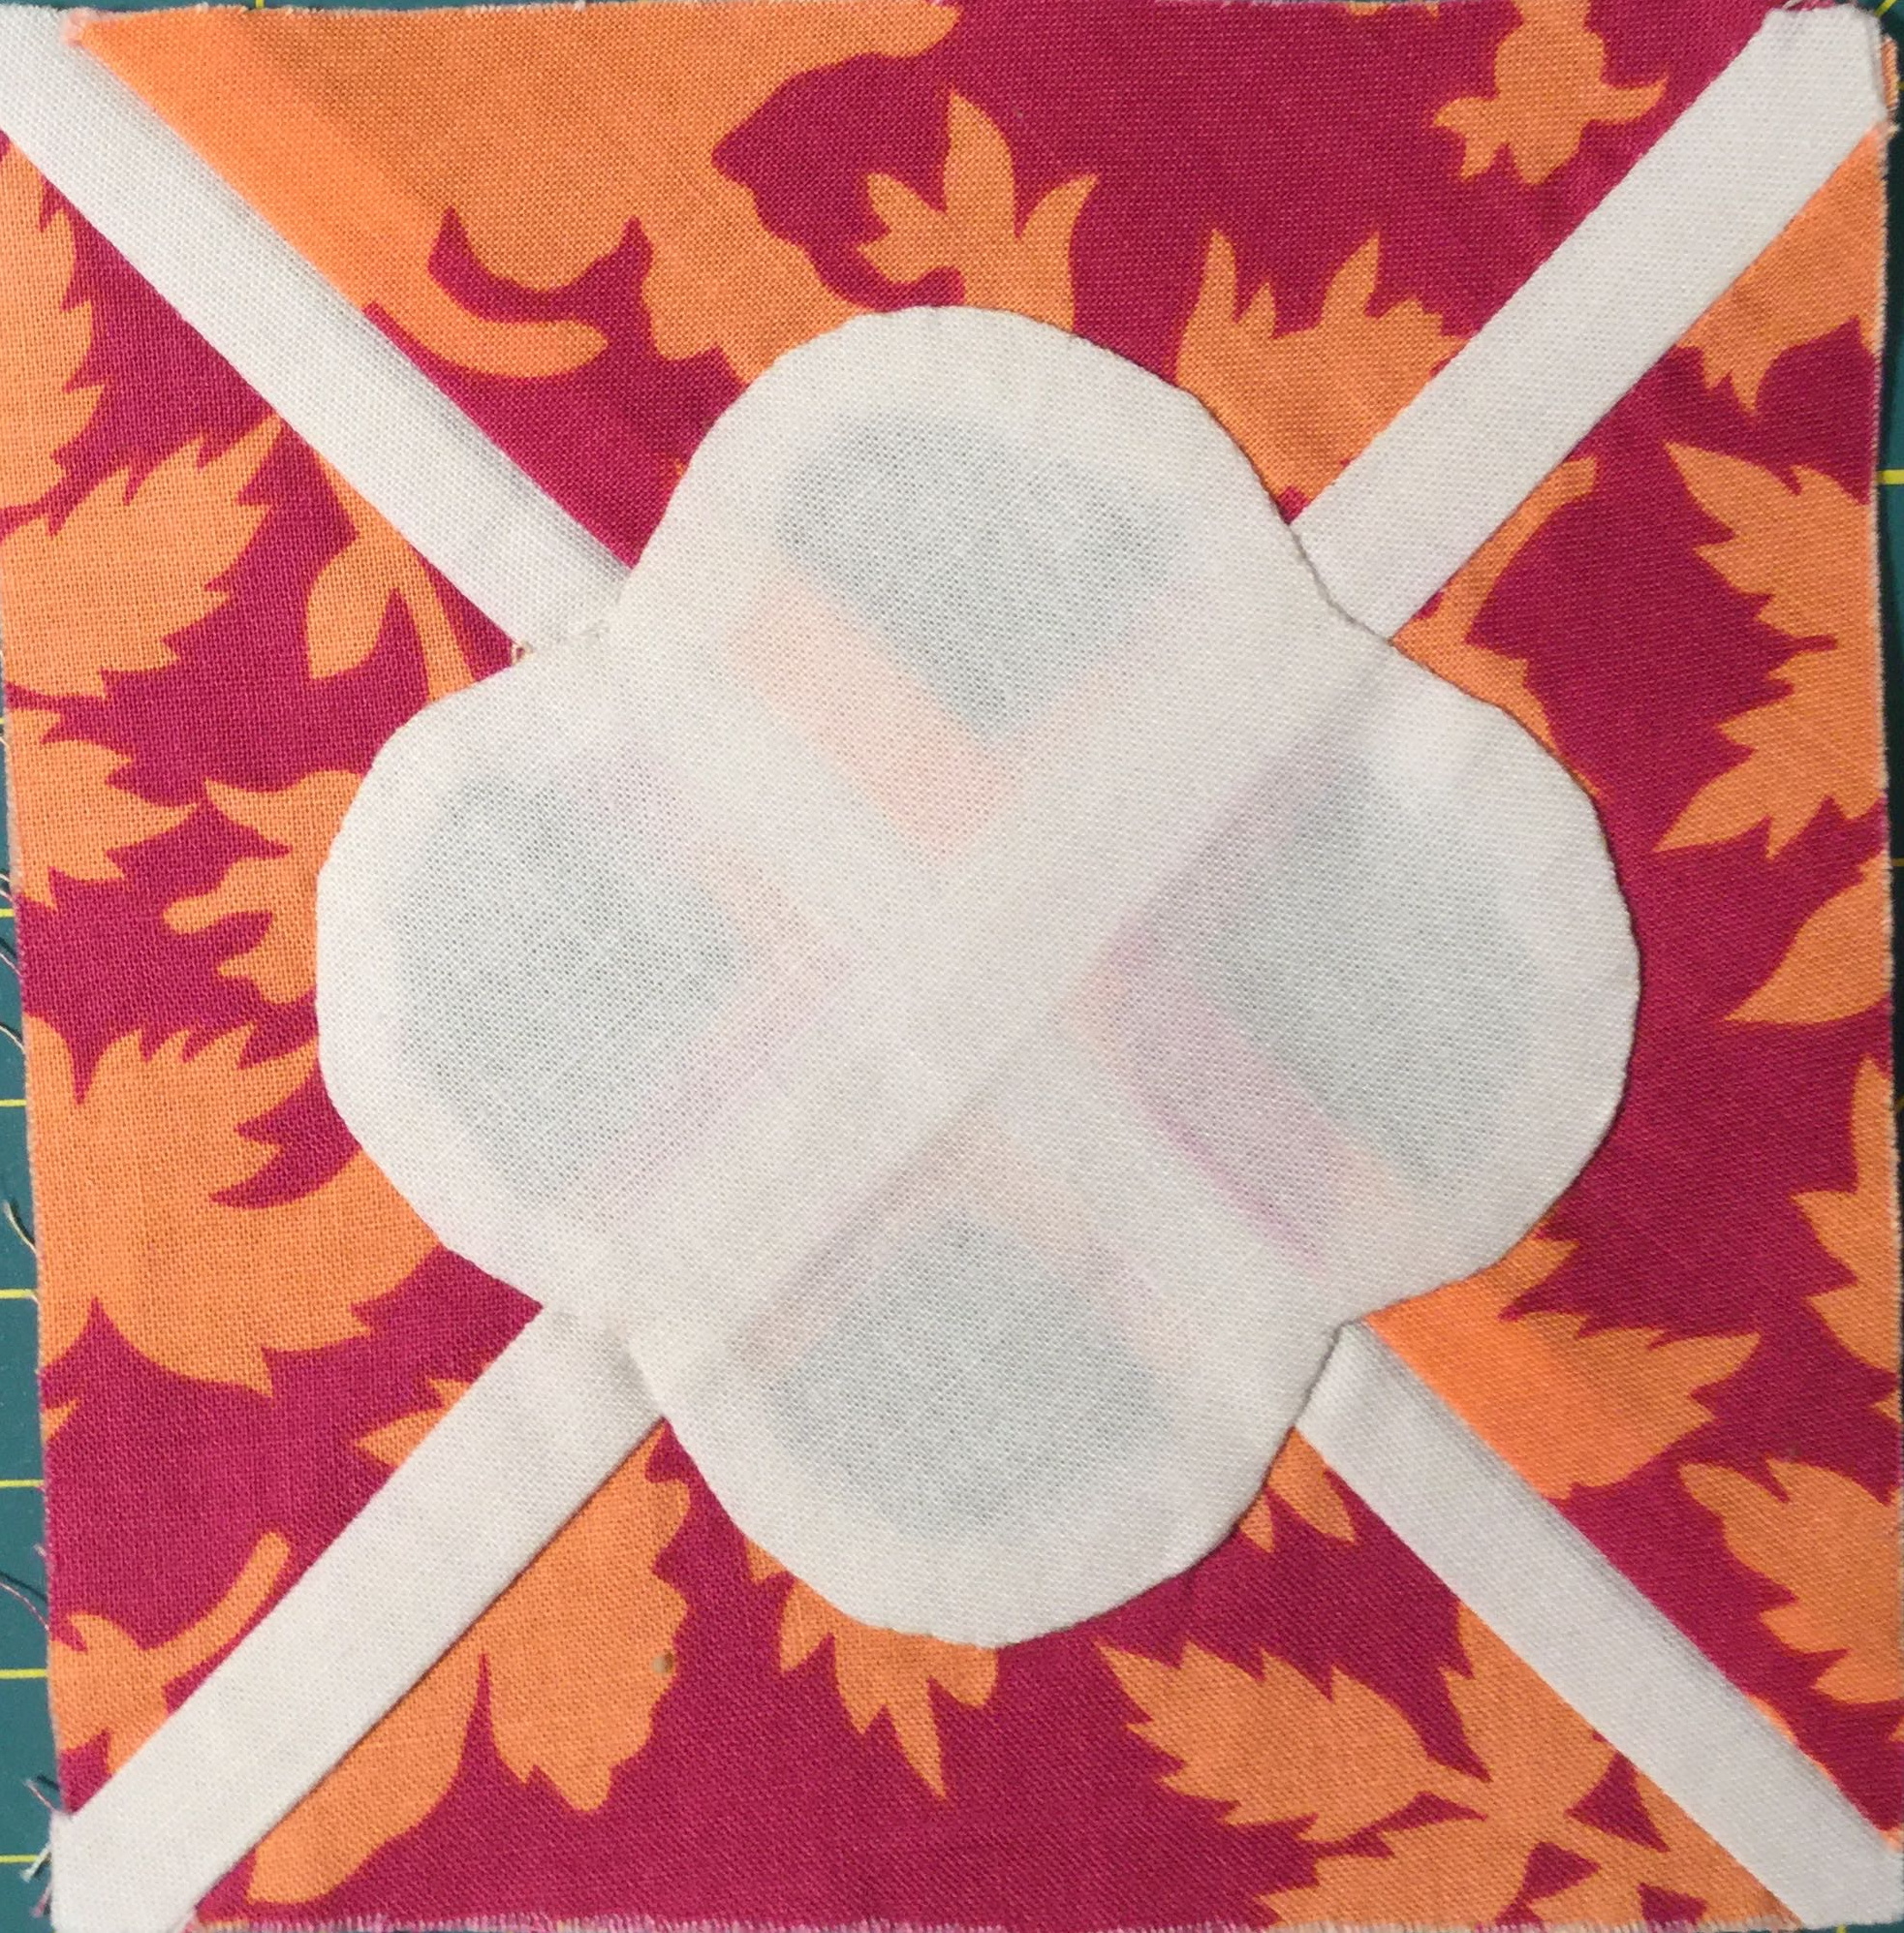
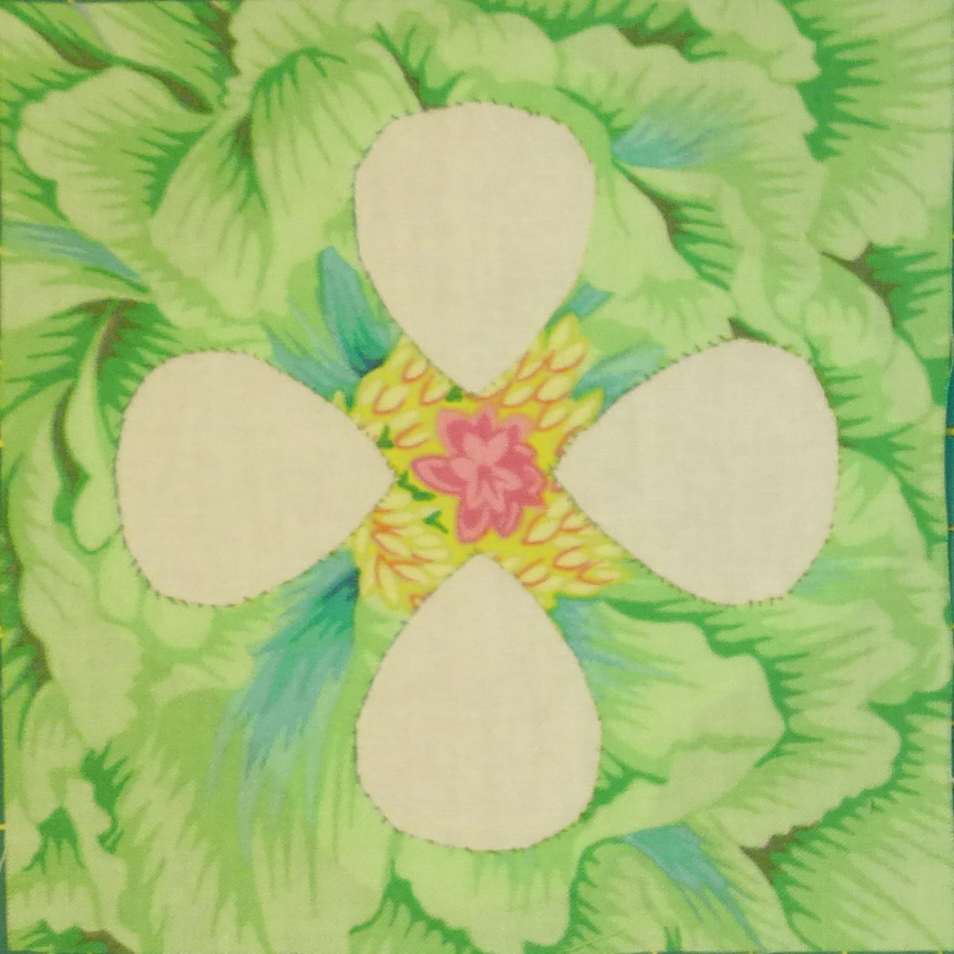
I used reverse applique for the melon on the Dear Jane LS6 Susie Q triangle. It would not be too hard to applique this melon but reverse applique on a seam gives you a very neat finish and this method is great for really small, impossible to applique melons.

The idea is set the melon into a seam so that you don’t have to turn raw edges under at a point.

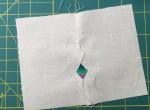
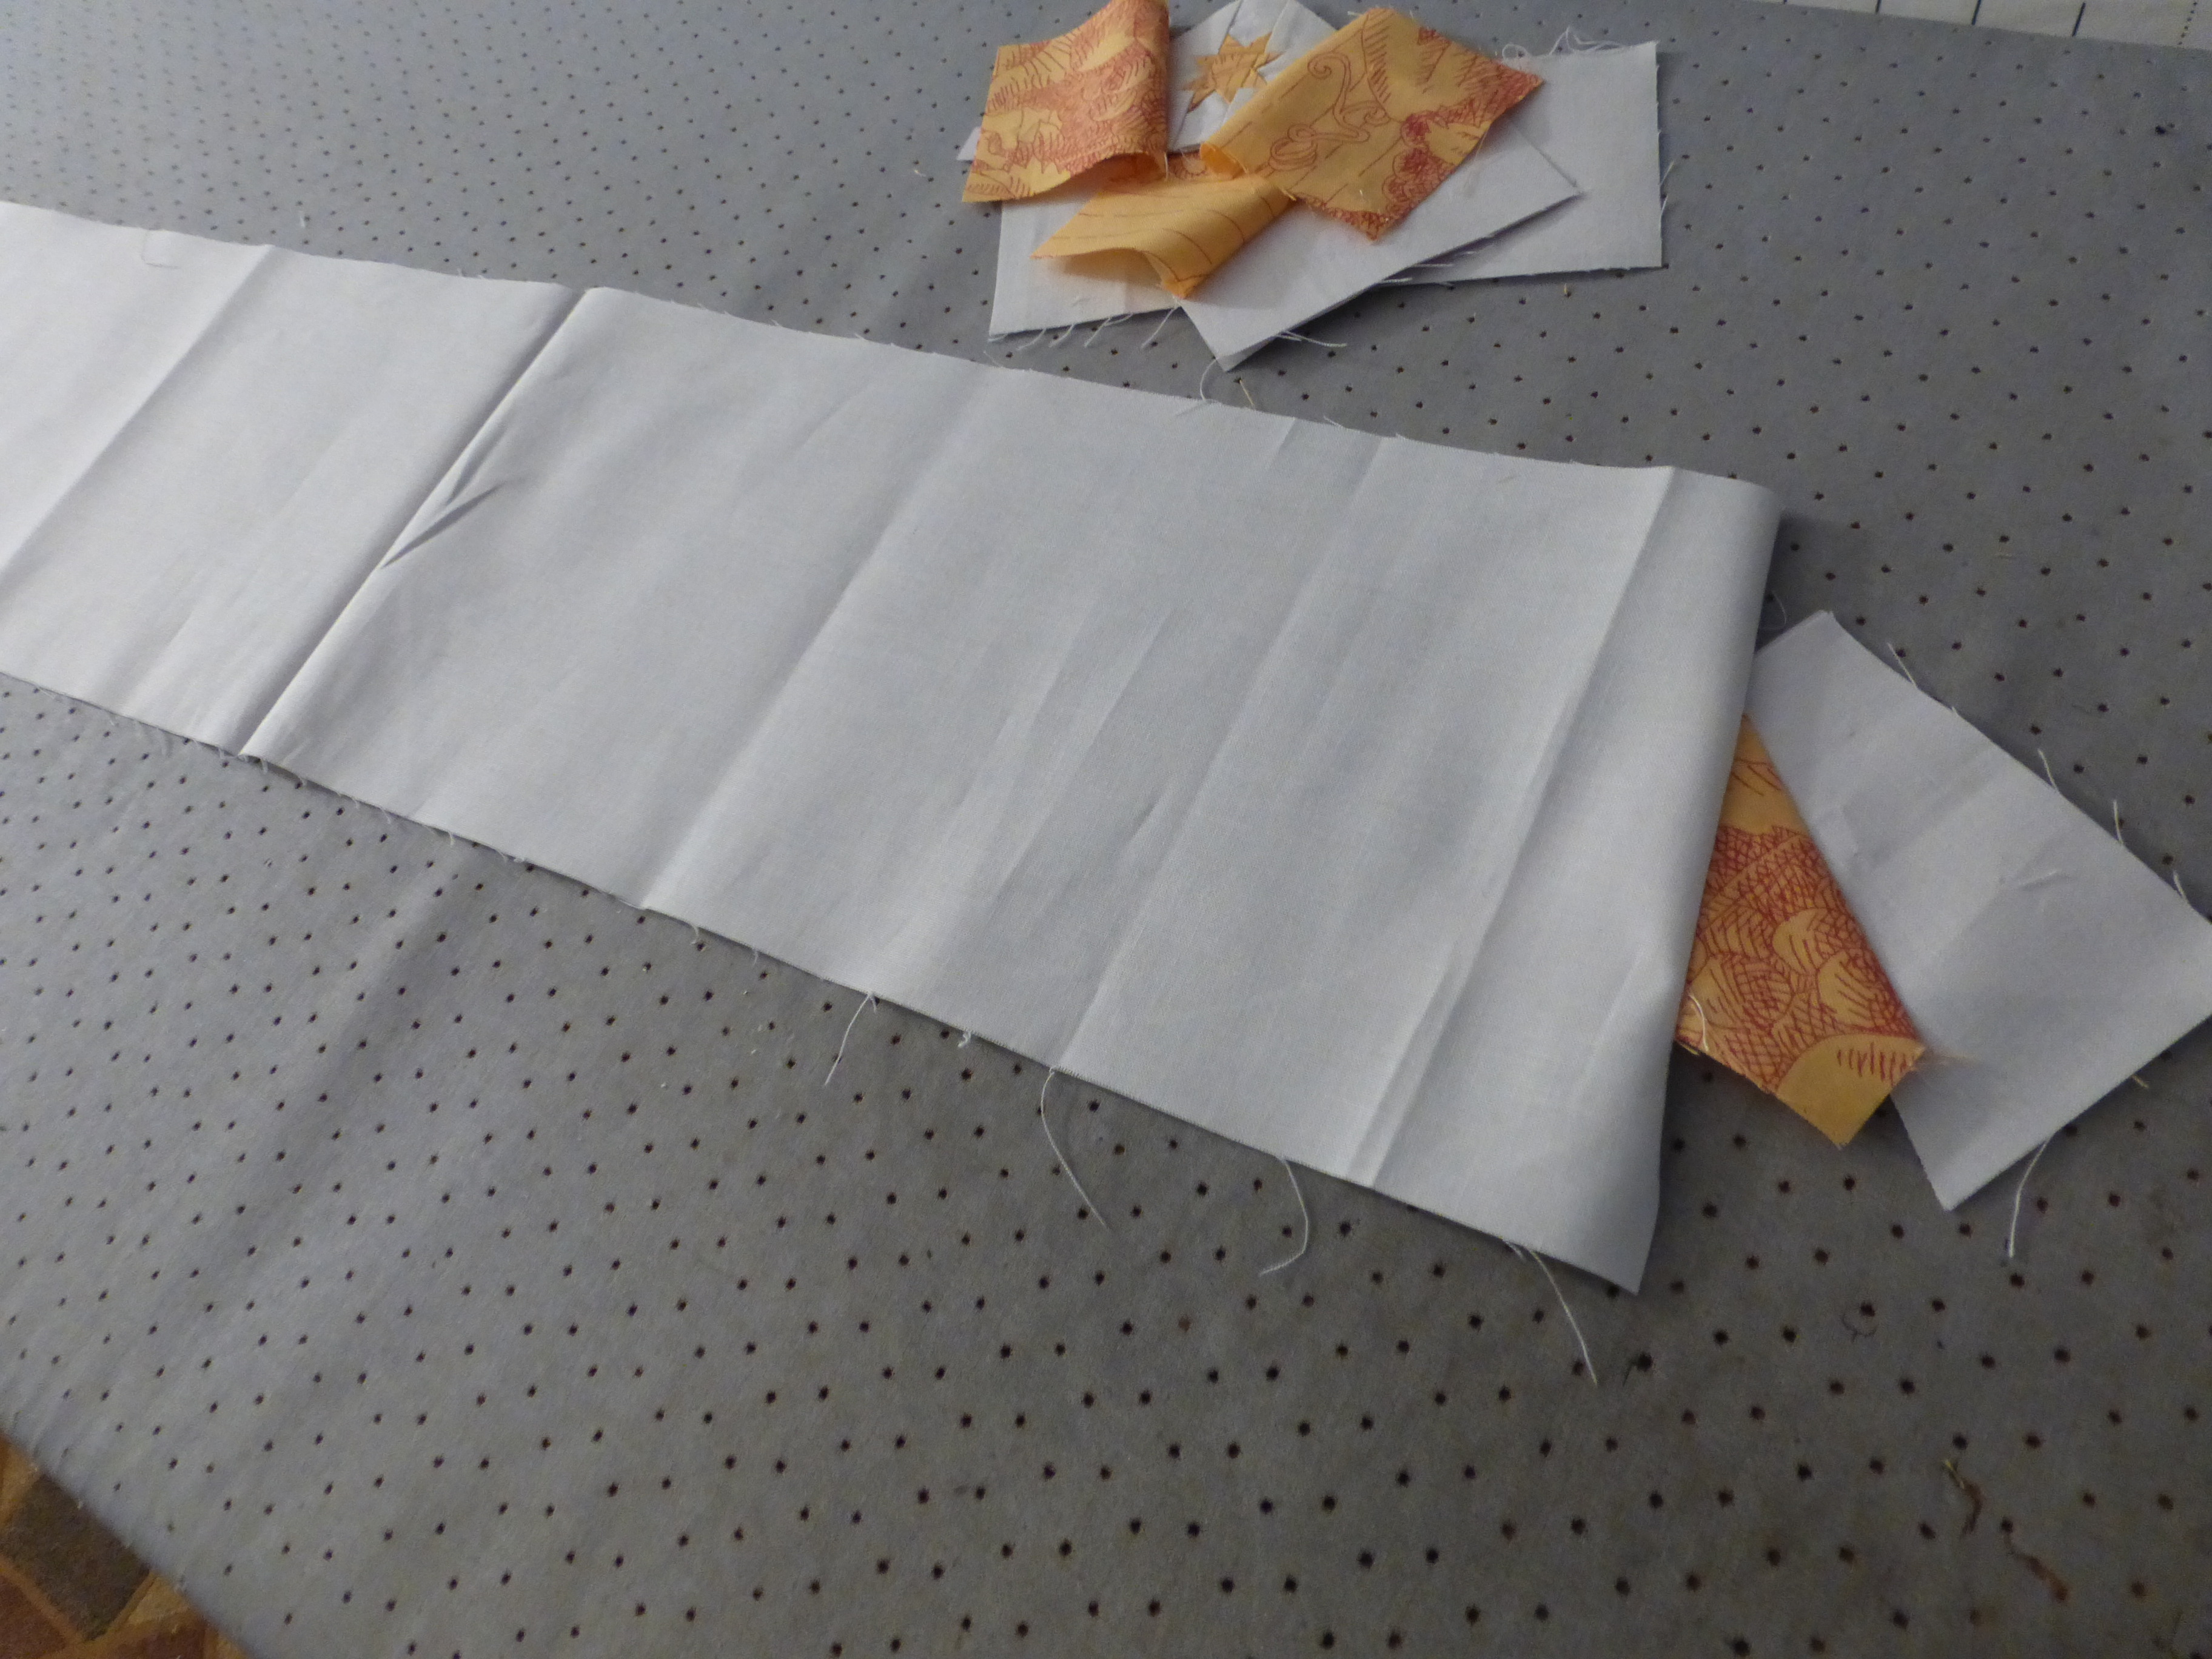
For this block start with 2 pieces of background fabric that are 5½” by 2”. Sew them together on the long edge twice to reinforce the seam because you will be cutting into the seam for the applique.

Cut out your melon template for reverse applique. Fold the template in half with the shiny side out. Line the fold up on the seam line of the background fabric and press in place without placing your iron on the shiny side of the template that is on top! 😉

Carefully cut out your melon shape leaving a ¼” seam allowance.

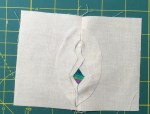
Remove the template, open up the background piece and press the seams open. Unfold the template and iron it on the front of the background piece centered over the cut out for the melon. Carefully rip out ¼” of the seam at the points so the seam allowance can be folded back for appliqueing.


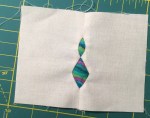
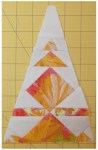
For this triangle block place a 3” x 1 ½” piece of print fabric behind the background fabric centered under the cut out. Baste the pieces together and reverse applique the melon. Trim the excess print fabric on the back leaving a ¼” seam allowance. Rotary cut the background fabric at one end of the melon leaving a ¼” seam allowance. Sew this piece to top of your triangle with the melon centered and lined up correctly. For this triangle the rest of the block was paper pieced.

To finish the triangle trim using your Dear Jane Triangle ruler.

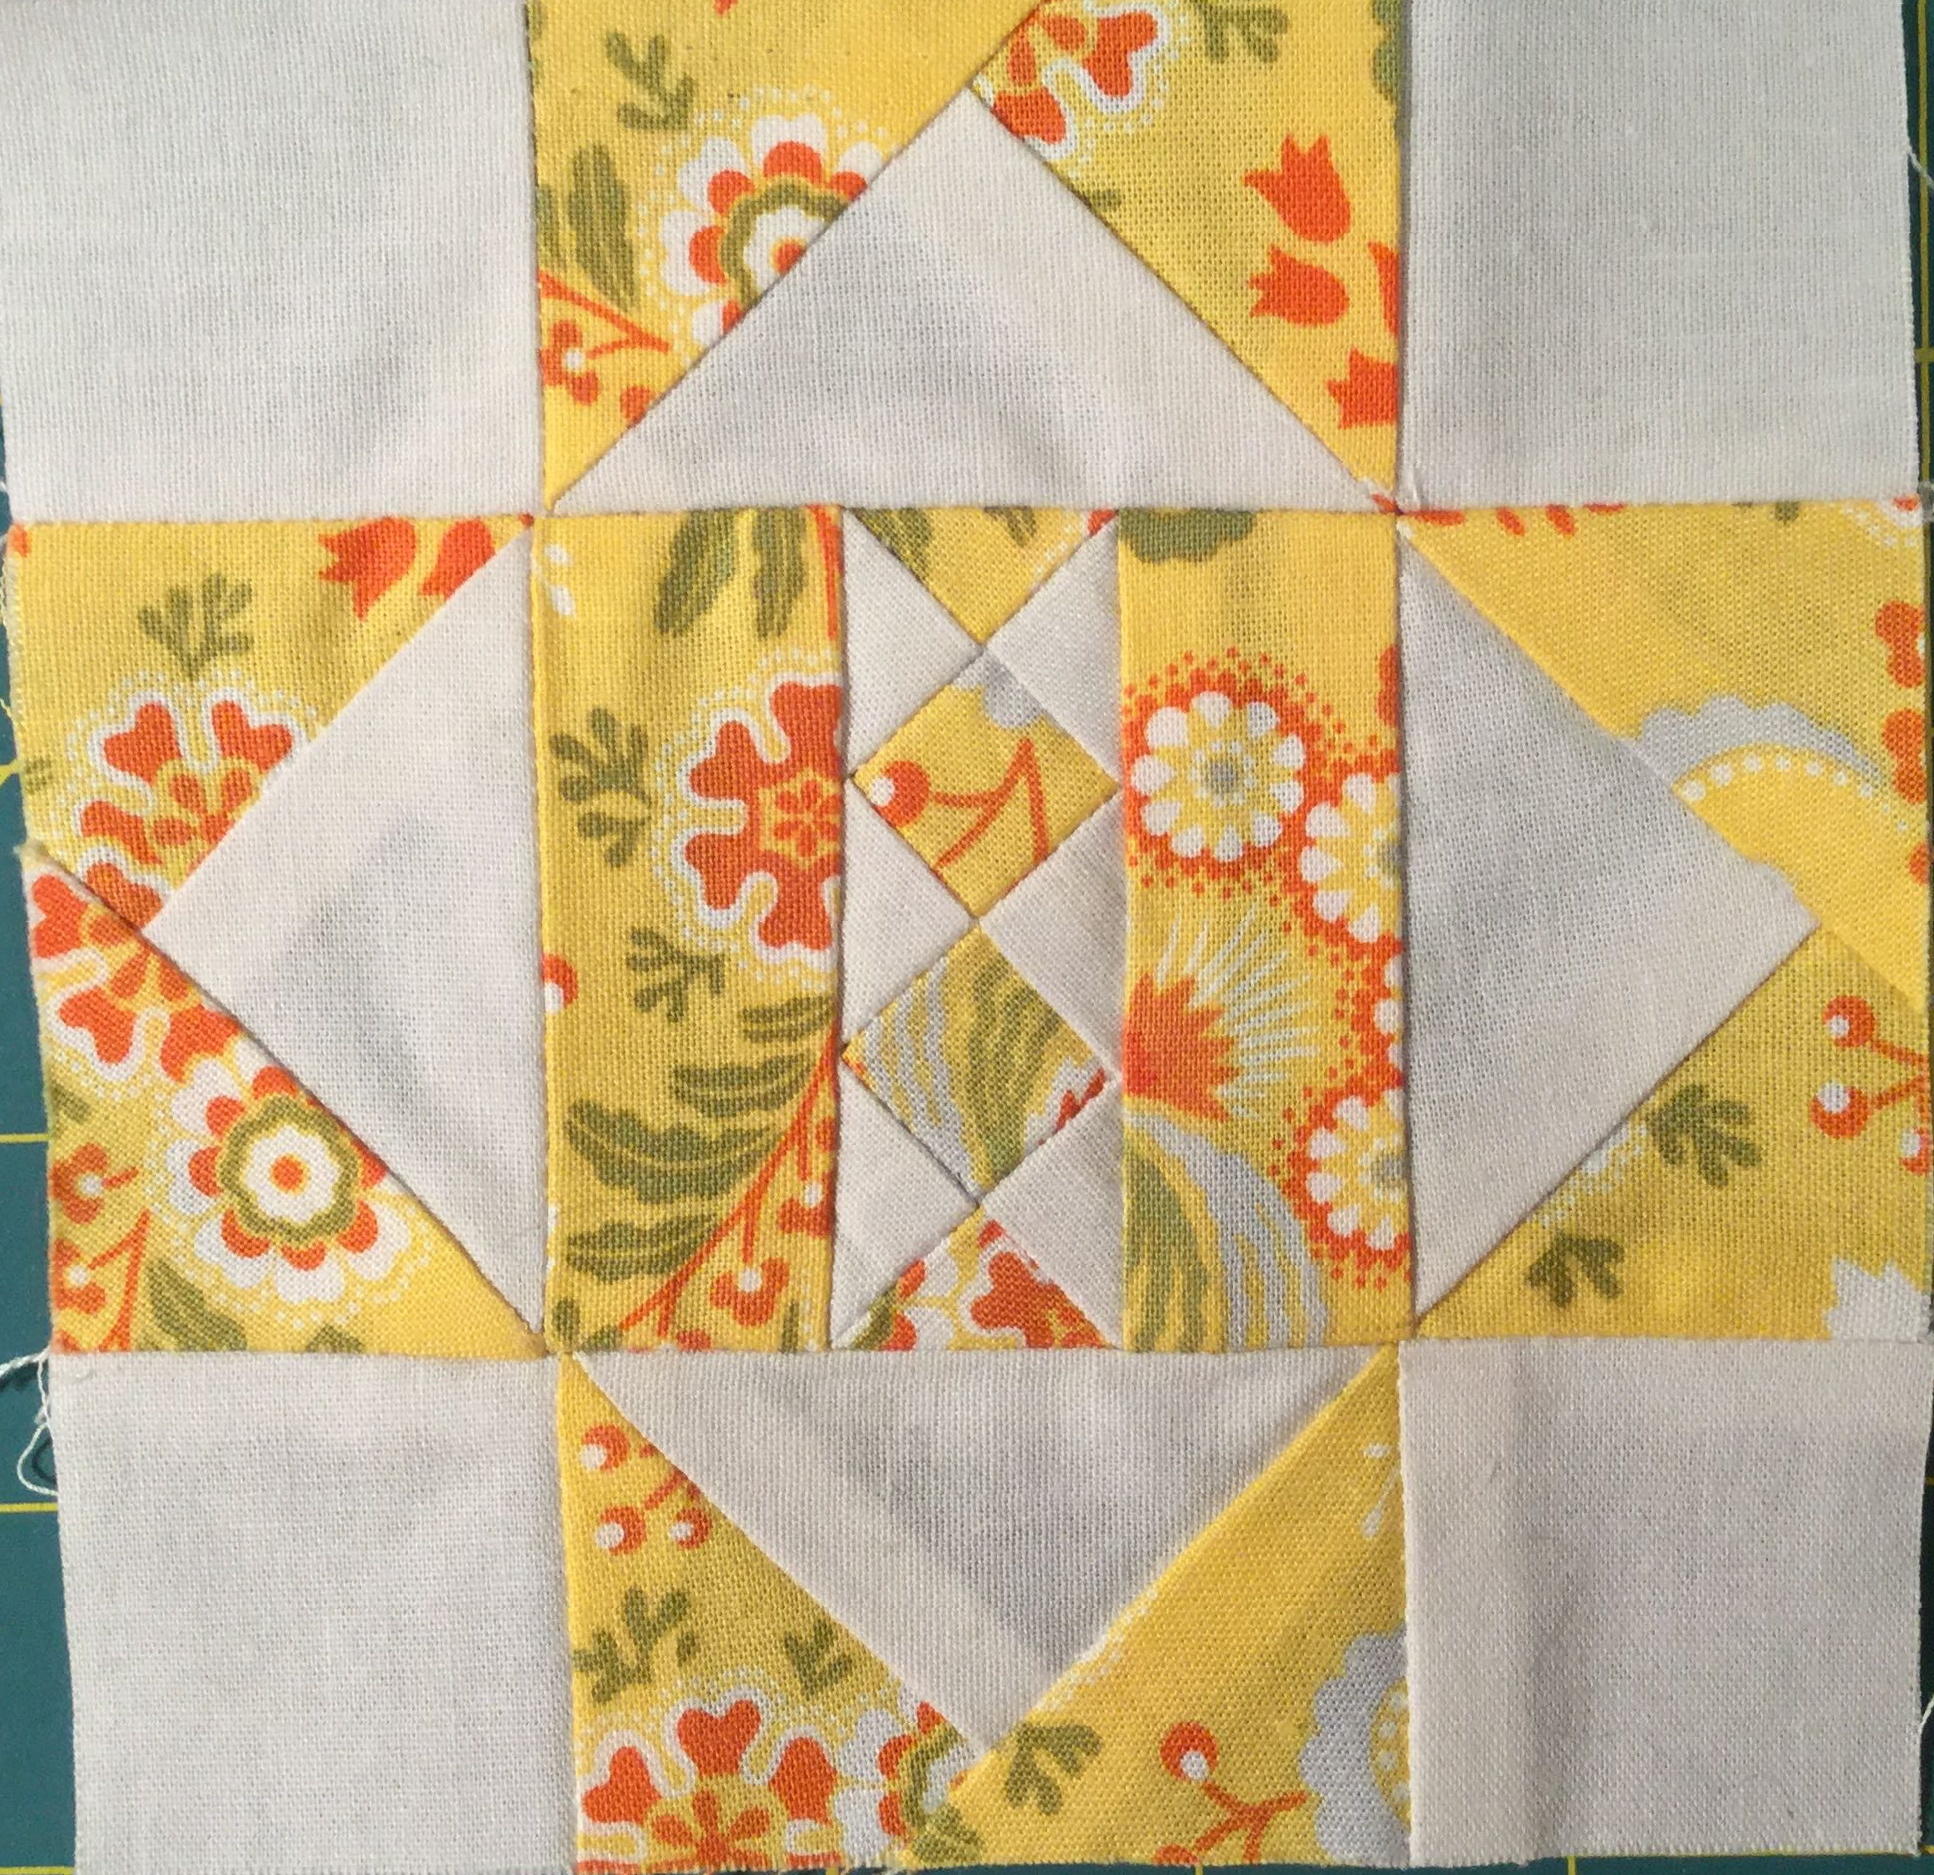
I have used this method on a few blocks. When I see a small melon that needs to be appliqued I try to figure out a way to use this method!


A Jane Stickle Block Turorial

I used reverse applique for this block. A bit fussy, but I was happy with the finished block.  I have photos from two different blocks since I did not get enough photos with my first block!  The tutorial assumes you have access to Dear Jane Templates from the Electric Quilt software, or you have drawn them yourself.

Cut one 6 ½” square of print fabric and cut twice diagonally into 4 triangles
Cut one 3 ½” square of print fabric and cut twice diagonally into 4 triangles
Cut on 6” square of background fabric

Sew the large print triangle pieces back together to make a square with diagonal seams. This will allow you to reverse applique on seams and avoid turning under raw edges in the corners.

Sew each seam twice to reinforce them because the ends will need to be ripped out so they can be folded to set in the applique.

Center your Dear Jane ruler on the square with the diagonal seams lined up. Draw a line around the edges of the ruler to mark cutting lines for the block. This will allow you to correctly position the corner triangles.

image

Cut out a square and triangle template printed on freezer paper. Cut out on the cutting lines and cut out the center on the seam lines.

Iron the template square in the center of the pieced square. Carefully cut out the center leaving a ¼” seam allowance. Then carefully rip out the seams up to the corners of the template. Finger press the seam allowances to the back.

Line the triangle template up on the seam in each corner to mark cutting lines. The point will go towards the center. The edges on each side of the template should line up with the outside cutting lines drawn on the pieced block.

Press the template into each corner and then draw cutting lines ¼” from the inside edges of the template. Once each corner is marked, cut out the corners on the cutting lines.

Carefully rip out ¼” of the seam in each corner so that the seam allowance can be folded back. Draw the seam lines on the inside and press the ¼” seam allowance to the back in each corner.

Now you can finally applique/reverse applique this piece to the background square!

Baste the print square to the background piece and reverse applique the center and each corner. Once you have finished appliqueing carefully cut back the background fabric diagonally in each corner by lining your ruler up with the ends of the cutting lines on the print piece.

Sew each of the small print triangles to the corners. Trim the block to 5” with your Dear Jane ruler by matching the diagonal seams with the guidelines on the ruler.

Wow! They are both beautiful!! Which one should I use?

Reverse Applique on Seam Lines

I have discovered that reverse appliquéing Jane melons in the middle of a seam is much easier than regular reverse appliqué and certainly much easier than appliqué, especially for those annoying teeny tiny melons! It’s much easier because you don’t have to manage the raw edges at the points; you are stitching up to the folded seam. I came across this method in the That Quilt Blog Tutorial for Block F-5.  Once I realized how neat the melons came out I decided to use this method whenever possible, even modifying blocks to add seams if necessary.

Here is how I modified the TR-6 triangle to use this for a very small melon and a diamond:

I replaced the top triangle piece with two rectangles sewn together which will be trimmed at the end.

If you find an opportunity to use this method try it. I bet you will like it.

What’s Going On With Jane

I have been fitting a Jane Block in here and there, so I thought I would post pictures of them.

TR12-janesoak

Jane’s Oak has been done a bit differently.  I machine pieced the bottom instead of appliquéing it, so the white on the sides is missing.

I had a dreadful time with the Parcheesi block after trying to hand piece it and came up with a rebellious melon free solution!

f5-no-melon

F5-parchesi F6-deaniesdaisies

The block is really very similar to its neighbor Deanie’s Daisies when approached this way.  I may still do it the correct way in a year or two!

I was happy with the rest of the blocks and I found the melons in Dad’s Plaids to be very cooperative.  I sprayed the heck out of the fabric with Best Press and then used the needle turn method for both the appliqué and reverse appliqué.  I also used Jenny Haskins Template Magic as a guide for turning the fabric.  That stuff is great because it sticks to the fabric and can be reused a few times.

a7-dadsplaids g5-poof

I did not cut the back out of Poof because the seems for the piecing were not secured so I am afraid they will rip out.  Maybe some fabric glue?  Not sure so I am leaving it as is for now.

H10-bensbowtie e12-maryruthscorset

g11-decisionsdecisions m5-motherspoint

I now have 59 blocks done, but am way behind in the group I am doing this with.  I must be about 8 months behind now.  But, I am still getting them done and am pleased with the results, so I am not giving up on this!

Vintage Butterfly Applique Quilt

I have finished my vintage butterfly quilt.  I love the colors in this quilt! This is the quilt I made with my vintage 30’s butterfly applique blocks that were a gift from my Mother-in-Law’s friend.  As I mentioned in my last post her friend Pat gave me some “quilted fabric” that turned out to be wonderful quilt tops and blocks that her mother made in the 30s.

I saw Pat yesterday and she was very pleased with both quilts, but I could tell the Bow Tie quilt was calling to her, so I gave the finished quilt to her.  She is going to give it to her mother for Christmas.  He mother is in assisted living with short term memory loss.  But, her long term memory is fine so I imagine it will be quite exciting for her to see her old quilt top again.  At least I hope so!  Maybe she will be wondering when and how it turned from a quilt top to a finished quilt!

The Butterfly Treasure Quilt took all of my quilting attention for the last few weeks.  Both it and the wall hanging version are finished.  The wall hanging is made with some wonderful Kaffe Fassett prints, so it gives the 30s pattern a new look!  The pattern for both is also finished now and for sale at Craftsy.

treasure

back


Quilting Treasures

A few weeks ago I was having lunch with my Mother-in-Law at our local town lunch place.  One of her friends joined us and was telling me about some “quilted fabric” she found while cleaning her mother’s place out.  She asked if I would like to have it.  I have to be honest; I was not too enthused, but, I said I might be able to use it for something.

A few days later Bob arrived home from dropping off groceries for Isabel with a shopping bag full of some real quilting treasures.  I found fabric pieced together in the 30s waiting to be quilted!

Inside I found a 70″ x 70″ quilt top. It is a very scrappy Bow Tie block quilt.  I added borders and quilted it, but still need to add the binding.P1050624

The next thing I found in the bag was a set of 24 butterfly applique blocks that had been pieced together. I was going to just add some borders and quit it up, but Colette at Quilters Common insisted that I needed to take the top apart and use the blocks to create a full size quilt.  She was certain whoever made the blocks intended to make a much larger quilt.

24bblocks

With this thought in mind I decided to take the top apart and trim the blocks so they were all 7 1/2″ squares and use them with nine patch blocks in an Irish Chain setting.  I am glad I listened to Colette, because I am falling in love with this quilt top.  I still need to add the borders and quilt it, but, I have a plan for the quilting.
trim  24top

Since I was designing a top with the butterfly blocks I decided write a pattern for the quilt. I needed to include instructions for the Butterfly Applique Blocks, so I thought it only fair that I make a few of them myself.


I ended up with a nice little wall hanging sized quilt made with Kaffe Fassett fabrics.  I have to thank Alice for coming to my rescue and picking out the the perfect shade of dot fabric for me.  I was having a difficult time finding just the right fabrics for my nine patch blocks.

kaffebs

Once I get these quilts finished I will finalize the pattern and you will find it for sale on Craftsy.  The pattern will include instructions for both sizes of the quilt.

But, there is one more treasure to show you.  Two Sunbonnet Sue blocks were also in the bag of treasures.

sunbonnetsues

I have added borders to them and will be making pillows with them …. AND I am using scraps from my projects to stuff the pillows.  Save yours up and do the same thing with them!

P1050630

When looking at all of these quilting treasures I see fabrics in the Butterflies and Sun Bonnet Blocks that are also in the Bow Tie Quilt top.  Isn’t it interesting to have a set of projects that have more than likely been worked on by one person!


Jane I Have Not Given Up on You!

Okay, here they are!  More Jane blocks.

My Jane Stickle group is concentrating on the G Row to get one entire row done.  I am now about 6 months behind, so I decided to focus on those as well, rather than do them in the order assigned.

I completely hand pieced Block G8 and I am happy with the result.  It was a bit frustrating at first and I concluded that I am happy the sewing machine was invented!  This is not a Kaffe or a Phillip or even a Westminster fabric, but I think it works well with them.  Guess I have decided to branch out and mix some other fabrics in.  If I have a fabric that works I am going to use it! No one in my group seemed to notice my Kaffe Fassett/Phillip Jacobs departure, so I got away with it!

G8_Oct-14


I did give hand piecing another try with G1.  I thought it would be too difficult to try curved piecing on the machine because the curve seemed a bit too tight.  I finished this block with the machine.

G1-Oct-14


For block G7 I decided to go ahead and try machine piecing the curves and it went quite well.  I pressed the pieces in half to line up the centers and pinned at the center and each side.  I put the convex piece on the bottom when sewing.  I only redid one of the curved seems and I actually ended up redoing that one twice!

G7-Oct-14

G9 is just straight forward paper piecing and I used an Amy Butler fabric this time (at least it is a Westminster fabric!).  I wanted to use this orange!

G9-Oct-14


Finally, I was looking at my progress chart and double checking to see if I had everything in the right place.  I found my chart had a couple of blocks in the wrong row and also discovered a block with the wrong fabric! But, aren’t I lucky because the block is D13, which is just about the easiest block you could find yourself redoing.  So, I now have a red and an orange D13.


And to wrap things up I will also show you the second B12 that I made some time ago because I was not happy with my first try at reverse applique.  The first is really not so bad, but I think I like the fussy cutting in the redo better.

b-12_starflower-1B12-Oct-14


Is this more than you ever wanted to know about my Jane blocks??

Oh!!  …. in case anyone is counting I finally got 50 blocks done! WOOT WOOT!!


Poor Neglected Jane

After many moths of neglecting my Jane quilt I finally got some blocks put together for the July meeting.

Here are each of my blocks.  The Star block was a bit of a challenge, but the method we used for the center was to fold a little square in half which worked out wonderfully.

c9 E-8

L-6 G6 b13 I-1

I did have a bit of a hard time getting one of the background pieces lined up correctly when paper piecing the star.  After ripping out three times I grabbed a 6″ width of fabric strip, placed the paper on top off that and ran it through the machine.  Plenty of room and no wasted fabric  after I trimmed it … how’s that for a new paper piecing method!

paper-piecing


Back to Jane

I did manage to get a couple of months behind on Jane, but I got five blocks done for the March meeting.  Five more and I will have 50 blocks.  The group at Quilter’s Common has been meeting for one year now.  Three more years and I might have a quilt top!  I don’t think I will catch up for awhile, but I hope I don’t get further behind!


Another Applique Quilt

I am working on my version of Peggy Anne’s In the Meadow Quilt.  I know it is supposed to be a counting quilt, but I am getting a bit creative here, so the number of babies will not be quite the same and some may be missing from the scene all together.  Changing my approach to a smaller quilt with separate blocks for each applique has re-awakened my creative spirit.

Here are the two blocks I have finished

fish ducklings

Here is the current plan

meadow-plan

Here is my previous background for the quilt, which may now be the backing?

meadow background